Create Payment Token For Deferred Charges
This payment flow enables customer authentication and tokenizes their payment details, allowing you to charge the token later. It is designed for transactions that require strong customer authentication even when the charge is processed outside of the customer's active session.
This guide provides step-by-step instructions and relevant code examples to help you integrate this payment flow using the CCBill Advanced Widget.
- The CCBill RESTful API supports TLS 1.2 only.
- A CCBill Account.
- API credentials provided by CCBill.
- A whitelisted domain (contact CCBill Support for setup).
- Experience with RESTful Web Services and JSON formats.
The Payment Flow
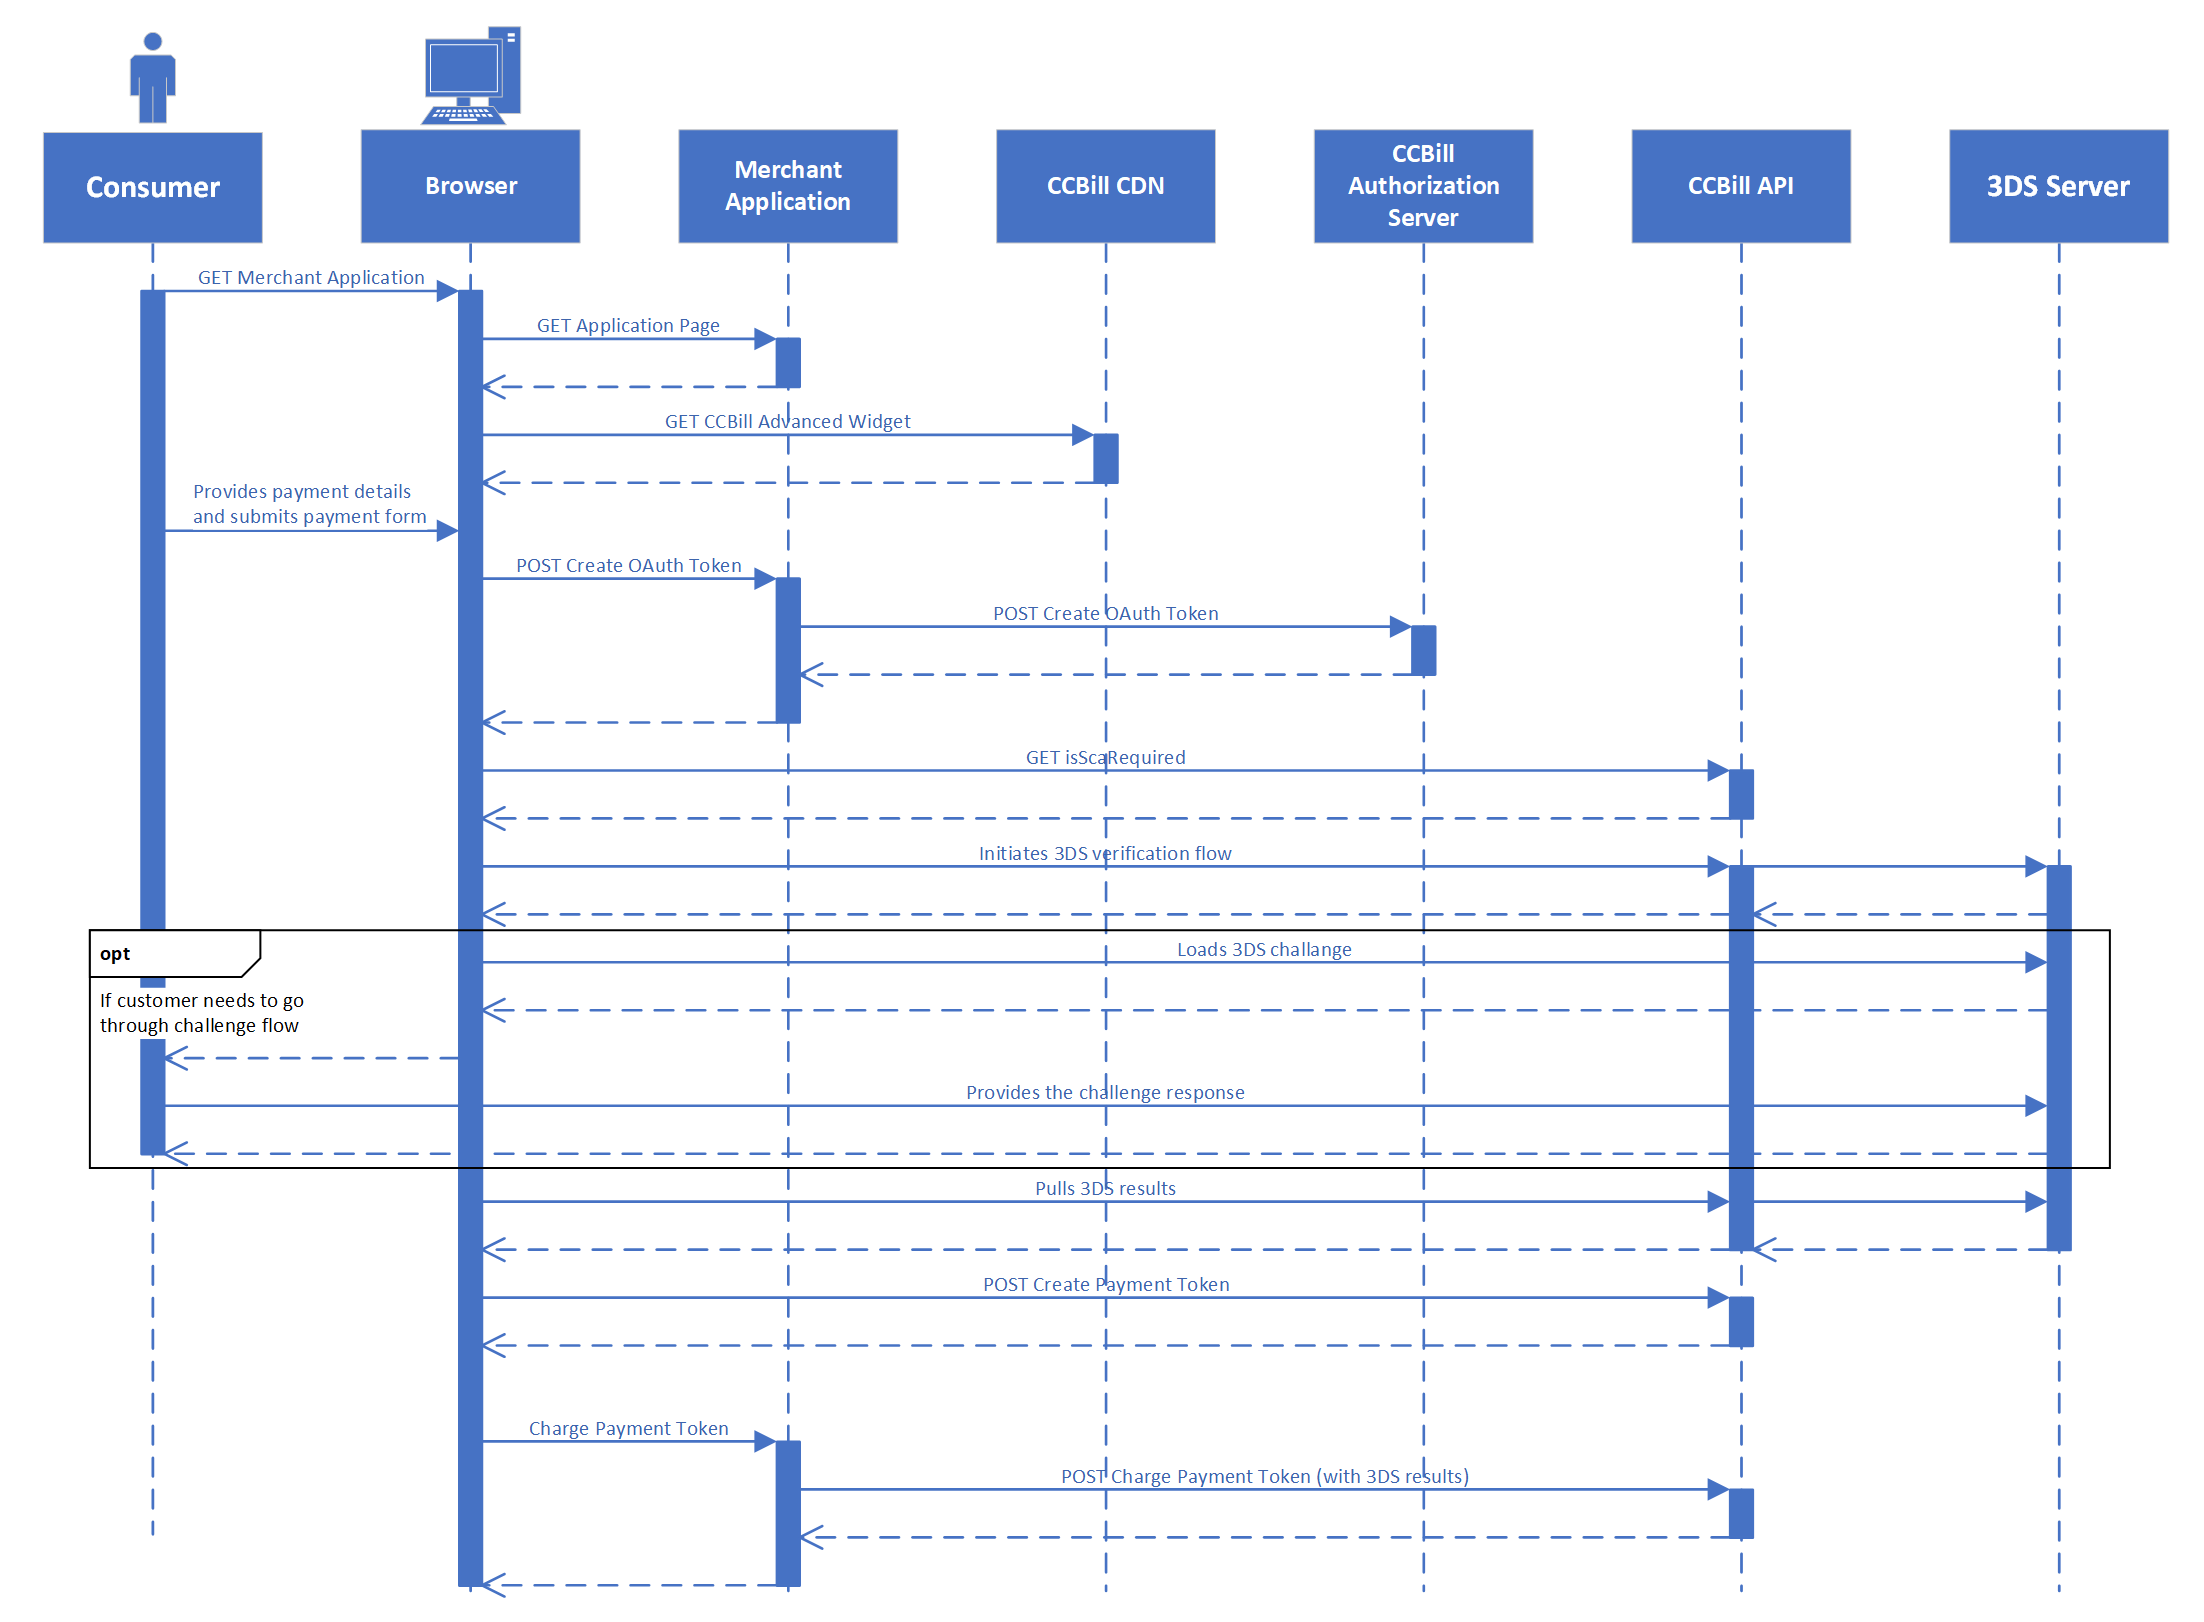
To perform a 3DS check based on customer payment details, create a payment token, and use it to charge a customer at a later time/date, follow these steps:
- Include the Widget on your page.
- Provide payment details.
- Generate the frontend OAuth bearer token.
- Check whether the 3DS authentication is required based on customer data (or a pre-existing payment token).
- Authenticate the customer and create a payment token.
- Use the payment token and backend OAuth bearer token to process a transaction securely.
The following sequence diagram describes the flow for creating and charging payment tokens with 3DS authentication.
The following steps explain how to set up the CCBill Advanced Widget and create payment tokens with 3DS authentication.
1. Include the Widget in Your Page
To use the CCBill Advanced Widget, add the following preload link and script elements to your HTML page:
<link rel="preload" href="https://js.ccbill.com/v1.13.1/ccbill-advanced-widget.js" as="script"/>

<script type="text/javascript" src="https://js.ccbill.com/v1.13.1/ccbill-advanced-widget.js"></script>The API version in this URI example is v1.13.1. Pay special attention to the version in the URI path, as the version number may be subject to change.
2. Collect Customer and Payment Data
The Advanced Widget automatically extracts values from form fields. Depending on your integration, the required fields can be provided in three ways:
- Use custom ID attributes (requires additional mapping).
- (Recommended) Use data-ccbill HTML data attributes.
- Use default _ccbillId_FieldName ID attributes.
Using data-ccbill data attributes is non-intrusive and provides more flexibility. It allows you to map form inputs directly without modifying existing id attributes.
<form id="payment-form">
    <input data-ccbill="firstName" />
    <input data-ccbill="lastName" />
    <input data-ccbill="postalCode" />
    <input data-ccbill="country" />
    <input data-ccbill="email" />
    <input data-ccbill="cardNumber" />
    <input data-ccbill="currencyCode" />
    <input data-ccbill="expYear" />
    <input data-ccbill="expMonth" />
    <input data-ccbill="nameOnCard" />
    <input data-ccbill="cvv2" />
    <input data-ccbill="ipAddress" />
</form>If you cannot modify your HTML to include data-ccbill attributes, use the default _ccbillId_ attributes instead. This method is less flexible because the field names must match CCBill's predefined format.
<form id="payment-form">
    <input id="_ccbillId_firstName" />
    <input id="_ccbillId_lastName" />
    <input id="_ccbillId_postalCode" />
    <input id="_ccbillId_country" />
    <input id="_ccbillId_email" />
    <input id="_ccbillId_cardNumber" />
    <input id="_ccbillId_expYear" />
    <input id="_ccbillId_currencyCode" />
    <input id="_ccbillId_expMonth" />
    <input id="_ccbillId_nameOnCard" />
    <input id="_ccbillId_cvv2" />
    <input id="_ccbillId_ipAddress" />
</form>If you prefer custom IDs, map them to corresponding input fields using the customIds parameter in the Widget constructor.
<form id="payment-form">
    <input id="custom_firstName_id" />
    <input id="custom_lastName_id" />
    <input id="custom_postalCode_id" />
    <input id="custom_country_id" />
    <input id="custom_email_id" />
    <input id="custom_cardNumber_id" />
    <input id="custom_currencyCode_id" />
    <input id="custom_expYear_id" />
    <input id="custom_expMonth_id" />
    <input id="custom_nameOnCard_id" />
    <input id="custom_cvv2_id" />
    <input id="custom_ipAddress_id" />
</form>
<script>
// map custom ids to relevant fields
const customIds = {
    firstName: "custom_firstName_id",
    lastName: "custom_lastName_id",
    postalCode: "custom_postalCode_id",
    country: "custom_country_id",
    email: "custom_email_id",
    currencyCode: "custom_currencyCode_id",
    cardNumber: "custom_cardNumber_id",
    expYear: "custom_expYear_id",
    expMonth: "custom_expMonth_id",
    nameOnCard: "custom_nameOnCard_id",
    cvv2: "custom_cvv2_id",
    ipAddress: "custom_ipAddress_id"
};

// pass custom ids to Widget constructor
const widget = new ccbill.CCBillAdvancedWidget("application_id", customIds);

// call the desired Widget method

</script>| NAME | REQUIRED | DESCRIPTION |
|---|---|---|
| firstName | Yes | Customer's first name. |
| lastName | Yes | Customer's last name. |
| currencyCode | Yes | A three-digit currency code (ISO 4217 standard) for the currency used in the transaction. |
| address1 | No | Customer's billing address. If provided, it should be between 1 and 50 characters long. |
| address2 | No | Customer's address (line 2). If provided, it should be between 1 and 50 characters long. |
| address3 | No | Customer's address (line 3). If provided, it should be between 1 and 50 characters long. |
| postalCode | Yes | Customer's billing zip code. It should be a valid zip code between 1 and 16 characters long. |
| city | No | Customer's billing city. If provided, it should be between 1 and 50 characters long. |
| state | No | Customer's billing state. If provided, it should be between 1 and 3 characters long. |
| country | Yes | Customer's billing country. Should be a two-letter country code as defined in ISO 3166-1. |
| Yes | Customer's email. Should be a well-formed email address, max 254 characters long. | |
| phoneNumber | No | Customer's phone number. If provided, it should be a well-formed phone number. |
| ipAddress | Yes | Customer's IP address. (IPv4 only) |
| browserHttpUserAgent | No | Browser User-Agent header value. |
| browserHttpAccept | No | Browser Accept header value. |
| browserHttpAcceptEncoding | No | Browser Accept Encoding header value. |
| browserHttpAcceptLanguate | No | Browser Accept Language header value. |
| cardNumber | Yes | A valid credit card number. |
| expMonth | Yes | Credit card expiration month in mm format. Should be a value between 1 and 12. |
| expYear | Yes | Credit card expiration year in yyyy format. Should be a value between current year and 2100. |
| cvv2 | Yes | Card security code. Should be a 3-4 digit value. |
| nameOnCard | Yes | Name displayed on the credit card. Should be between 2 and 45 characters long. |
3. Generate OAuth Bearer Token
The CCBill RESTful API uses OAuth-based authentication and authorization. Use the frontend credentials (Merchant ApplicationID and Secret Key that are Base64 encoded) you received from Merchant Support to generate a frontend bearer token.
You must include this token in the Authorization header of API requests when creating payment tokens. Use the following example and adjust the necessary parameters to obtain a frontend bearer token:
curl -X POST 'https://api.ccbill.com/ccbill-auth/oauth/token' \
  -u '[Frontend_Merchant_Application_ID]:[Frontend_Secret_Key]' \
  -H 'Content-Type: application/x-www-form-urlencoded' \
-d 'grant_type=client_credentials'String getOAuthToken() {
String credentials = Base64.getEncoder()
.encodeToString(("[Frontend_Merchant_Application_ID]" + ":" + "[Frontend_Secret_Key]")
.getBytes(StandardCharsets.UTF_8));
String requestBody = "grant_type=client_credentials";
HttpRequest request = HttpRequest.newBuilder()
.uri(URI.create("https://api.ccbill.com/ccbill-auth/oauth/token"))
.header("Authorization", "Basic " + credentials)
.header("Content-Type", "application/x-www-form-urlencoded")
.POST(HttpRequest.BodyPublishers.ofString(requestBody, StandardCharsets.UTF_8))
.build();
try {
HttpResponse<String> response = HTTP_CLIENT.send(request, HttpResponse.BodyHandlers.ofString());
return extractAccessToken(response.body());
} catch (IOException | InterruptedException e) {
e.printStackTrace();
return null;
}
}<?php
function getOAuthToken() {
$url = "https://api.ccbill.com/ccbill-auth/oauth/token";
$merchantAppId = "[Frontend_Merchant_Application_ID]";
$secretKey = "[Frontend_Secret_Key]";
$data = http_build_query(["grant_type" => "client_credentials"]);
try {
$httpRequest = new HttpRequest();
$httpRequest->setUrl($url);
$httpRequest->setMethod(HTTP_METH_POST);
$httpRequest->setHeaders([
"Authorization" => "Basic " . base64_encode("$merchantAppId:$secretKey"),
"Content-Type" => "application/x-www-form-urlencoded"
]);
$httpRequest->setBody($data);
$httpClient = new HttpClient();
$response = $httpClient->send($httpRequest);
$responseData = json_decode($response->getBody(), true);
return $responseData['access_token'] ?? die("Error: Invalid OAuth response.");
} catch (HttpException $ex) {
die("Error fetching OAuth token: " . $ex->getMessage());
}
}
?>Important Notes
- Never expose API credentials on the front end. Always store your Merchant Application ID and Secret Key securely in server-side environment variables.
- This request must be sent from your backend. OAuth token requests cannot be made from a web browser for security reasons.
- OAuth access tokens are temporary. Each token remains valid for a single request or until it expires.
- Reduce API token attack surface. Execute calls to create an Oauth token and a payment token in quick succession to minimize the risk of the access token being exposed to attackers.
- Use CSRF tokens for your front-end payment forms. Protect your front-end forms with CSRF tokens to prevent unauthorized form submissions.
4. Check if SCA is Required
The isScaRequired() function determines whether strong customer authentication is required before generating a payment token. The system checks the provided credit card number, merchant account number, subaccount number, and currency code.
This method allows you to dynamically apply 3DS authentication only in instances when they are truly required.
Code Example
async function checkIfScaRequired() {
    const widget = new ccbill.CCBillAdvancedWidget('your-application-id');
    const scaRequiredResponse = await widget.isScaRequired(
        "[Frondent_Access_Token]",
        [Your_Client_Account_Number],
        [Your_Client_Subaccount_Number]);
    return await scaRequiredResponse.json();
}The isScaRequiredForPaymentToken() function determines whether strong customer authentication(3DS) is required for a pre-existing payment token.
Merchants who have already stored payment information as a token (paymentTokenID) can use it to determine if SCA is required before processing a charge.
Code Example
async function checkIfScaRequired() {
    const widget = new ccbill.CCBillAdvancedWidget('your-application-id');
    const scaRequiredResponse = await widget.isScaRequiredForPaymentToken(
        "[Frondent_Access_Token]",
        "[payment_token_id]");
    return await scaRequiredResponse.json();
}Response Handling
The function automatically checks the transaction parameters to determine if strong customer authentication (SCA) is required:
- A successful response returns a Boolean value that indicates whether 3DS is required for the transaction. Use the result to dynamically route customers through a 3DS flow only when required. This ensures a better user experience and compliance with SCA regulations.
- If validation fails (e.g., invalid credentials), the response will show an error message to describe the issue.
5. Create a Payment Token With 3DS Authentication For Deferred Charges
The createPaymentToken3DS() method authenticates the cardholder using 3D Secure (3DS) and creates a payment token. The token can be charged later without additional 3DS authentication.
Use this method to authenticate the customer once and charge them later without triggering another 3DS flow.
Code Example
async function createPaymentToken3ds(widget, authToken, clientAccnum, clientSubacc) {
    return await widget.createPaymentToken3DS(authToken, clientAccnum, clientSubacc);
}Response Handling
The function returns a response with the outcome of the 3DS authentication and token creation process:
- If the request is successful, the function returns an object with the Payment Token and additional metadata.
- If the request fails, the response contains an error code and message explaining the issue (e.g., invalid credentials or authentication failure).
6. Charge Payment Token (3DS)
Use the Payment Token ID and backend bearer token to charge a customer's credit card through a 3DS-secured payment flow. Generate a new backend bearer token using your Base64 encoded backend credentials.
Code Examples
curl -X POST 'https://api.ccbill.com/transactions/payment-tokens/[payment_token_id]' \
-H 'Accept: application/vnd.mcn.transaction-service.api.v.2+json' \
-H 'Authorization: Bearer [Backend_Access_Token]' \
-H 'Cache-Control: no-cache' \
-H 'Content-Type: application/json' \
-d '{
"clientAccnum": [Your_Client_Account_Number],
"clientSubacc": [Your_Client_Subaccount_Number],
"initialPrice": 9.99,
"initialPeriod": 30,
"currencyCode": 840
}'public ResponseEntity<String> processPurchase() {
String requestBody = """
{
"clientAccnum": [Your_Client_Account_Number],
"clientSubacc": [Your_Client_Subaccount_Number],
"initialPrice": 9.99,
"initialPeriod": 30,
"currencyCode": 840
}""";
HttpRequest request = HttpRequest.newBuilder()
.uri(URI.create("https://api.ccbill.com/transactions/payment-tokens/[payment_token_id]"))
.header("Accept", "application/vnd.mcn.transaction-service.api.v.2+json")
.header("Authorization", "Bearer [Backend_Access_Token]")
.header("Cache-Control", "no-cache")
.header("Content-Type", "application/json")
.POST(HttpRequest.BodyPublishers.ofString(requestBody, StandardCharsets.UTF_8))
.build();
try {
HttpResponse<String> response = client.send(request, HttpResponse.BodyHandlers.ofString());
return ResponseEntity.ok(response.body());
} catch (IOException | InterruptedException e) {
e.printStackTrace();
return ResponseEntity.status(500).body("Error processing payment");
}
}<?php
function processPurchase() {
$url = "https://api.ccbill.com/transactions/payment-tokens/[payment_token_id]";
$paymentData = json_encode([
"clientAccnum" => [Your_Client_Account_Number],
"clientSubacc" => [Your_Client_Subaccount_Number],
"initialPrice" => 9.99,
"initialPeriod" => 30,
"currencyCode" => 840,
]);
try {
$httpRequest = new HttpRequest();
$httpRequest->setUrl($url);
$httpRequest->setMethod(HTTP_METH_POST);
$httpRequest->setHeaders([
"Accept" => "application/vnd.mcn.transaction-service.api.v.2+json",
"Authorization" => "Bearer [Backend_Access_Token]",
"Cache-Control" => "no-cache",
"Content-Type" => "application/json"
]);
$httpRequest->setBody($paymentData);
$httpClient = new HttpClient();
$response = $httpClient->send($httpRequest);
return $response->getBody();
} catch (HttpException $ex) {
die("Error charging payment token: " . $ex->getMessage();
}
}
?>Response Handling
The API endpoint handles the transaction:
- A successful charge returns a response with transaction details.
- If the charge fails, the response includes an error code and a descriptive message.
Full Integration Example (Deferred Charges)
To streamline the process of securely storing payment details for later use, we have provided a complete example that shows how to implement a 3DS-authenticated tokenization flow using the CCBill Advanced Widget. It allows merchants to authenticate the cardholder up front and charge the stored token later.
The example has:
- A JavaScript frontend that initializes the widget, collects payment data, and triggers the 3DS authentication flow to create a Payment Token.
- A Java backend that generates the bearer token, receives the Payment Token from the frontend, and securely stores it for future use in deferred billing scenarios.
Replace all placeholder values with actual data in your integration.
async function fetchOAuthToken() {
return (await (await fetch('https://your-website.com/api/auth-token')).json()).token;
}
async function createPaymentToken(widget, authToken, clientAccnum, clientSubacc) {
const paymentTokenResponse = await widget.createPaymentToken(
authToken,
clientAccnum,
clientSubacc
);
return await paymentTokenResponse.json();
}
async function createPaymentToken3ds(widget, authToken, clientAccnum, clientSubacc) {
    return await widget.createPaymentToken3DS(authToken, clientAccnum, clientSubacc);
}
async function chargePaymentToken(paymentToken) {
return await (await (fetch('https://your-website.com/api/purchase', {
method: 'POST',
headers: {
'Content-Type': 'application/json'
},
body: JSON.stringify({
paymentToken,
amount: 9.99,
currency: 840
})
}))).json();
}
async function authenticateAndPurchaseLater() {
const widget = new ccbill.CCBillAdvancedWidget('your-application-id');
const clientAccnum = [Your_Client_Account_Number];
const clientSubacc = [Your_Client_Subaccount_Number];
try {
// retrieval of the auth token from merchant provided endpoint
// this should be done as late in the submission process as possible to avoid potential exploit.
const authToken = await fetchOAuthToken();
let paymentToken;
// check if 3DS is required and process the 3DS flow with the client if necessary
const scaRequired = await checkIfScaRequired(widget, authToken, clientAccnum, clientSubacc);
if (scaRequired) {
// go through 3DS flow and create payment token in a single API call.
// The resulting 3DS payment token should be submitted to merchant owned endpoint
// and can be charged at some point in future via /transactions/payment-tokens/{paymentTokenId}.
paymentToken = await createPaymentToken3ds(widget, authToken, clientAccnum, clientSubacc);
} else {
// create the non-3DS payment token to be submitted to the merchant owned endpoint
// and charged via /transactions/payment-tokens/{paymentTokenId}.
paymentToken = await createPaymentToken(widget, authToken, clientAccnum, clientSubacc);
}
// submit the payment token to be charged to an endpoint implementing backend charging of the token
const chargeCallResponse = await chargePaymentToken(paymentToken);
return Promise.resolve(chargeCallResponse);
} catch (error) {
// react to any errors that may occur during the process
return Promise.reject({ error });
}
}
let result = await authenticateAndPurchaseLater();import java.io.IOException;
import java.net.URI;
import java.net.http.HttpClient;
import java.net.http.HttpRequest;
import java.net.http.HttpResponse;
import java.nio.charset.StandardCharsets;
import java.time.Duration;
import java.util.Base64;
import org.springframework.web.bind.annotation.*;
import org.springframework.http.ResponseEntity;
import com.fasterxml.jackson.databind.JsonNode;
import com.fasterxml.jackson.databind.ObjectMapper;
@RestController
@RequestMapping("/api")
public class ApiController {
private static final HttpClient HTTP_CLIENT = HttpClient.newBuilder()
.connectTimeout(Duration.ofSeconds(10))
.build();
@PostMapping("/auth-token")
public ResponseEntity<AuthTokenResponse> getAuthToken() {
String accessToken = fetchOAuthToken("[Frontend_Merchant_Application_ID]", "[Frontend_Secret_Key]");
if (accessToken != null) {
return ResponseEntity.ok(new AuthTokenResponse(accessToken));
} else {
return ResponseEntity.status(500).body(new AuthTokenResponse(""));
}
}
@PostMapping("/purchase")
public ResponseEntity<String> processPurchase(@RequestBody PurchaseRequest purchaseRequest) {
String requestBody = String.format(
"""
{
"clientAccnum": %d,
"clientSubacc": %d,
"initialPrice": %.2f,
"initialPeriod": 30,
"currencyCode": %d
}
""",
purchaseRequest.paymentToken().clientAccnum(),
purchaseRequest.paymentToken().clientSubacc(),
purchaseRequest.amount(),
purchaseRequest.currency()
);
HttpRequest request = HttpRequest.newBuilder()
.uri(URI.create("https://api.ccbill.com/transactions/payment-tokens/"
+ purchaseRequest.paymentToken().paymentTokenId()))
.header("Accept", "application/vnd.mcn.transaction-service.api.v.2+json")
.header("Authorization", "Bearer "
+ fetchOAuthToken("[Backend_Merchant_Application_ID]", "[Backend_Secret_Key]"))
.header("Cache-Control", "no-cache")
.header("Content-Type", "application/json")
.POST(HttpRequest.BodyPublishers.ofString(requestBody, StandardCharsets.UTF_8))
.build();
try {
HttpResponse<String> response = HTTP_CLIENT.send(request, HttpResponse.BodyHandlers.ofString());
return ResponseEntity.ok(response.body());
} catch (IOException | InterruptedException e) {
e.printStackTrace();
return ResponseEntity.status(500).body("Error processing payment");
}
}
private static String fetchOAuthToken(String merchantAppId, String sercretKey) {
String credentials = Base64.getEncoder()
.encodeToString((merchantAppId + ":" + sercretKey).getBytes(StandardCharsets.UTF_8));
String requestBody = "grant_type=client_credentials";
HttpRequest request = HttpRequest.newBuilder()
.uri(URI.create("https://api.ccbill.com/ccbill-auth/oauth/token"))
.header("Authorization", "Basic " + credentials)
.header("Content-Type", "application/x-www-form-urlencoded")
.POST(HttpRequest.BodyPublishers.ofString(requestBody, StandardCharsets.UTF_8))
.build();
try {
HttpResponse<String> response = HTTP_CLIENT.send(request, HttpResponse.BodyHandlers.ofString());
return extractAccessToken(response.body());
} catch (IOException | InterruptedException e) {
e.printStackTrace();
return null;
}
}
private static String extractAccessToken(String responseBody) {
try {
ObjectMapper objectMapper = new ObjectMapper();
JsonNode jsonNode = objectMapper.readTree(responseBody);
return jsonNode.has("access_token") ? jsonNode.get("access_token").asText() : null;
} catch (IOException e) {
e.printStackTrace();
return null;
}
}
private record AuthTokenResponse(String token) {}
private record PurchaseRequest(double amount, String currency, PaymentToken paymentToken) {}
private record PaymentToken(String paymentTokenId, Integer clientAccnum, Integer clientSubacc) {}
}Additional Documentation