Introduction
The loading speed of an e-commerce website directly affects sales and other key performance indicators. Caching websites, both browser-side and server-side, significantly reduces the time it takes to load a page.
Despite the clear benefits, caching can prevent customers from seeing the latest page adjustments. To ensure your customers always have access to up-to-date content, you need to clear your cache regularly.
Learn how to clear your WordPress cache using some of the most popular caching plugins.
Types of Caching
Caching the HTML data in the customer’s browser and caching static content on the server speeds up the process considerably. Browsers can display the page directly from its cache.
When a customer visits a website:
- The server the website is hosted on gets a request to display the page.
- The server retrieves and sends the requested data in an HTML file to the customer’s browser.
- The browser renders the HTML file and presents the content to the customer.
Retrieving and sending the entire HTML file each time the customer visits the same page would waste valuable resources.
Clearing Browser-Side Cashing
Storing HTML code within the browser is called browser-side caching. All major browsers allow manual cache clearing.
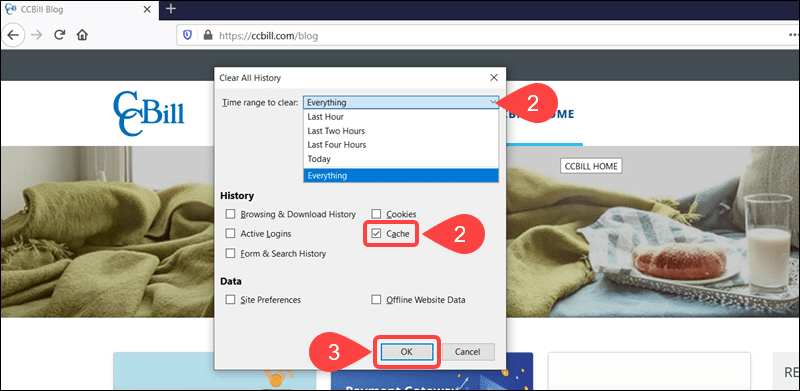
For example, to clear the cache in Firefox:
1. Open the browser and press Ctrl-Shift-Del.
2. Define a time range to clear using the drop-down menu and check the box next to Cache.
3. Click OK and reload the website.
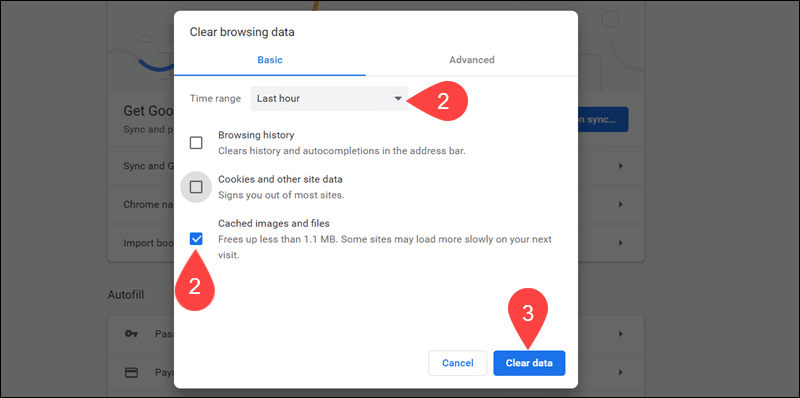
To clear the cache in Chrome:
1. While the browser is open, press Ctrl-Shift-Del.
2. Check the Cached images and files box and set the time range.
3. Click Clear data and reload the website.
To clear the cache in Safari, press Cmd+Alt+E and reload the page.
How to Clear Server-Side Caching in WordPress
A server-side cache stores static website elements to increase page loading speeds. The server no longer needs to access the slower underlying storage layer when retrieving data.
If you modified your website, the caching system might not register the changes immediately. The discrepancy between the updated website and the old cached version prevents the website from working correctly.
It is vital to clear the server-side cache after:
- Updating or installing themes and plugins.
- Making changes to website content or design.
- Migrating to a new web host.
The easiest way to clear the server-side cache for your WordPress website is by using a caching plugin.
Popular WordPress Caching Plugins
There are thousands of WordPress plugins that handle caching, image, and SEO optimization. The plugins also contain a host of other features that improve page loading speeds.
Plugins are easy to install, and you can test several options before committing to a single solution. The focus should be on the ease of use and the level of automation a plugin can offer. This article introduces the most popular and free caching plugins.
Install and activate one of the listed plugins and use the instructions to clear your WordPress cache.
Clear Cache in WordPress with W3 Total Cache Plugin
Once you have installed and activated the W3 Total Cache plugin:
1. Expand the Performance menu.
2. Select the Dashboard option.
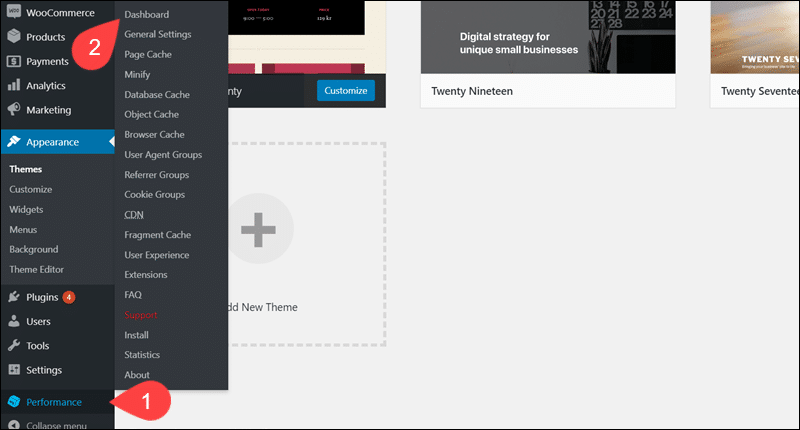
3. Click empty all caches.

Check if the changes are visible by reloading your website.
Clear Cache in WordPress with WP Super Cache
To clear your cache using WP Super Cache:
1. Open the Settings menu.
2. Select the WP Super Cache option.
3. Click Delete Cache.
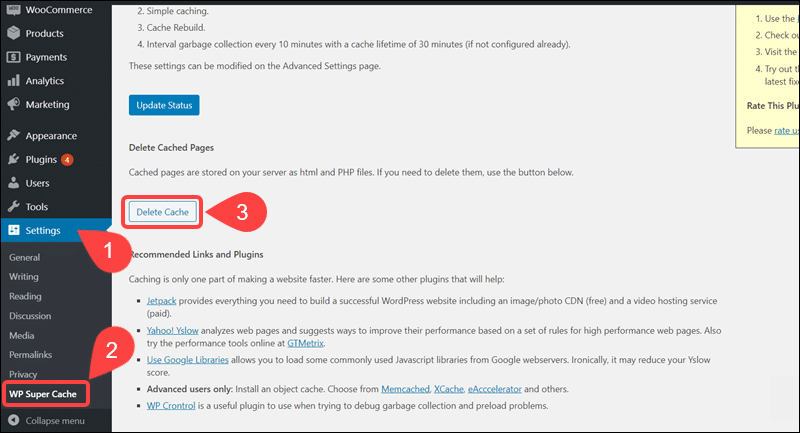
Browsers are now able to load the latest version of your website.
Clear Cache in WordPress with Fastest Cache
After installing the Fastest Cache plugin, a Delete Cache option appears in your WordPress admin.
Choose between two options:
- Clear All Cache - removes all cache files from the website.
- Clear All Cache and Minified CSS/JS - removes all cache files as well as minified files.
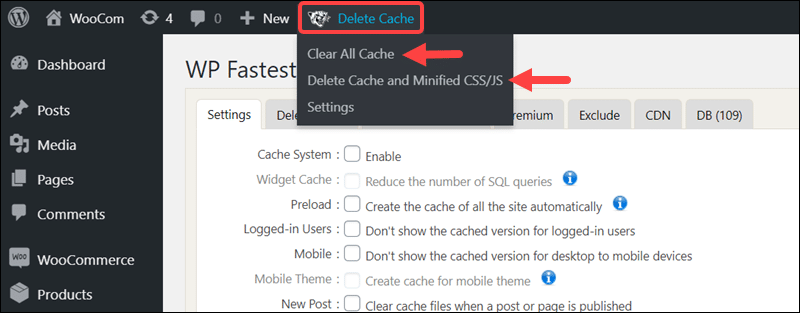
Regardless of the option you use, reload the webpage to confirm that the changes are reflected on the site.
Clear Cache in WordPress with Autoptimize
When you install and activate the Autoptimize caching plugin, an Autoptimize tab appears in the WordPress dashboard.
Placing your pointer over this tab displays general cache information such as the size and number of cached files.
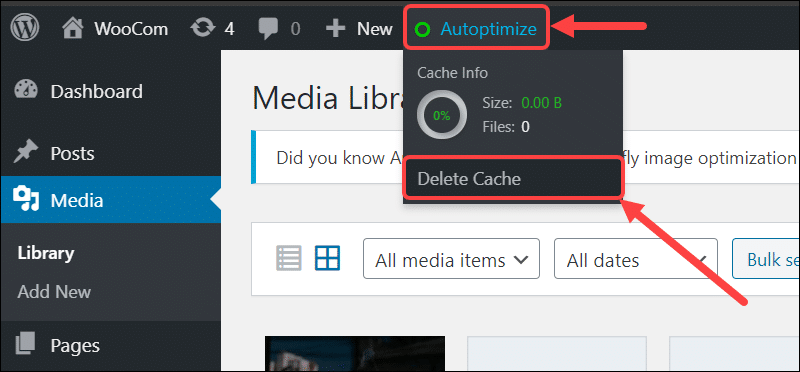
The Delete Cache option clears the cache with one click.
Clear Cache in WordPress with Cachify
Installing and activating the Cachify plugin introduces a new option in your WordPress admin bar.
A. Click the Flush site cache button in the top right corner to instantly clear your cache.
B. Alternatively, select Cachify in the Settings menu and click the Flush cache now button.
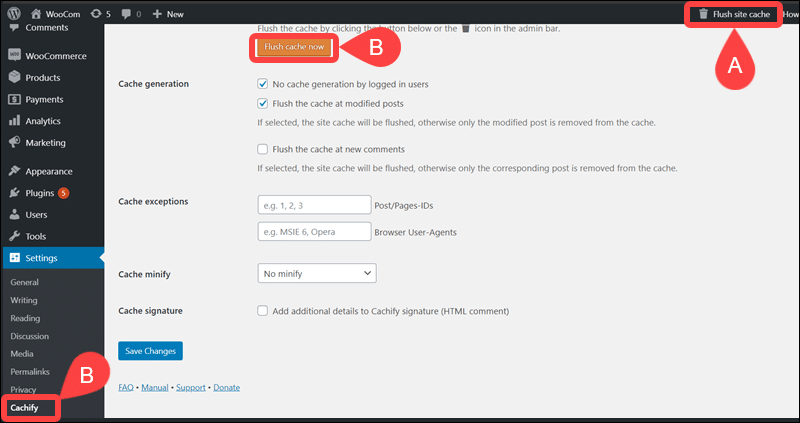
Remember to reload your website to see if the changes are now visible.
Clear Cache in WordPress with Comet Cache
To clear the cache manually with Comet Cache:
1. Click Comet Cache in the WordPress Dashboard.
2. Select the Clear button in the top right corner of the screen.
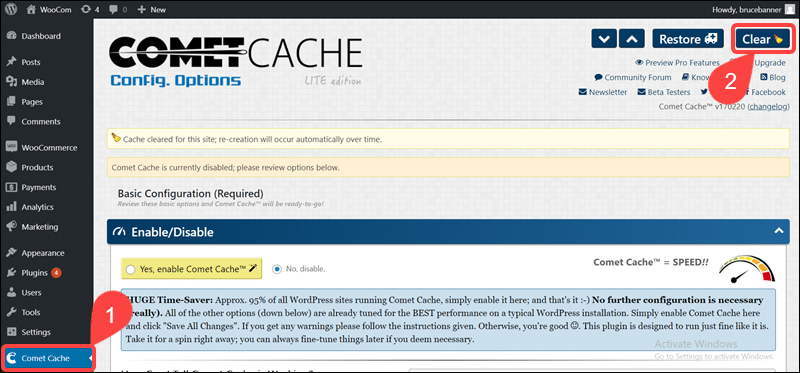
The Comet Cache plugin clears cached files of edited or deleted pages by default. This feature automates and streamlines the cache clearing process.
Clear Cache in WordPress with Simple Cache
There are two ways to clear the cache with Simple Cache:
A. Use the Purge Cache option in the WordPress admin bar.
B. Access Simple Cache from the Settings menu and click Purge Cache.
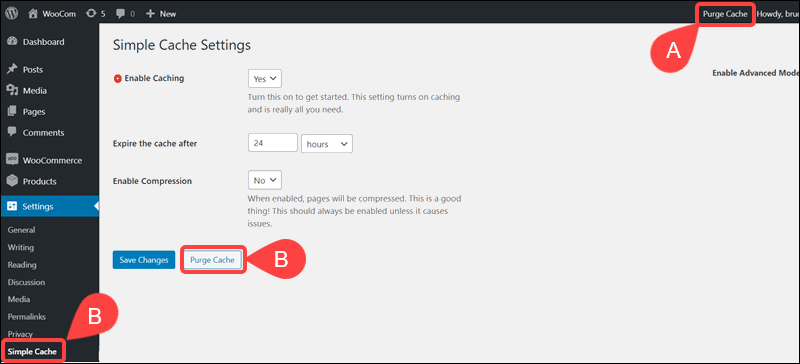
By purging the cache, a previously unresponsive site displays up-to-date content.
Conclusion
By following the instructions in this article, you have successfully cleared your cache in WordPress and learned how to clear the browser-side cache.
Caching plugins offer a lot of additional features that help you simplify and automate the caching process. Use them to decrease loading times and enhance the speed and performance of your WordPress website.
If you are worried about security on your WordPress website, check out our guide on how to quickly secure your website with two-factor authentication for WordPress.
