Introduction
WordPress is one of the most popular CMS solutions partly because of its large plugin architecture. Plugins introduce new customer-facing features, improve website security, and expedite SEO and marketing analytics. Therefore, you can turn your website into a full-blown e-commerce platform.
WooCommerce is the leading open-source e-commerce plugin for WordPress. You can add countless free extensions and seamlessly integrate WooCommerce with CCBill and other payment processors.
In this WooCommerce tutorial, you will learn how to install and set up a WooCommerce shop from top to bottom.
How to Install WooCommerce
To install WooCommerce, you need a WordPress website and a hosting environment with:
- MySQL version 5.6 or later (MariaDB 10.1).
- PHP version 7.4 or later.
- An SSL certificate.
- WordPress memory limit set to 128 MB or above.
Installing WooCommerce is a routine process even for newcomers to content management systems.
Step 1: Install WordPress
WordPress is a user-friendly CMS with several ways to complete an installation. Your hosting provider, personal preference, and technical expertise are factors to take into consideration. Many hosting companies try to attract website owners by offering managed WordPress installations as part of their service.
If you prefer a more hands-on approach, install WordPress by following these basic steps:
- Download the latest WordPress version from the official WordPress repository.
- Unzip the downloaded WordPress files.
- Create a WordPress database and a MySQL (MariaDB) user to access and modify the collected data.
- Use an FTP client to upload the WordPress files to your server.
- Use a browser to access the URL that matches the location of the WordPress installation folder.
- Follow the onscreen instructions in the setup wizard to configure WordPress and complete the installation.
Step 2: Install WooCommerce Plugin
The most reliable approach is to install WooCommerce directly from the WordPress Dashboard.
Note: You can also install WooCommerce by downloading the plugin from the WordPress repository. Then, manually upload it to the WooCommerce package to your server.
If you already have a working WordPress website:
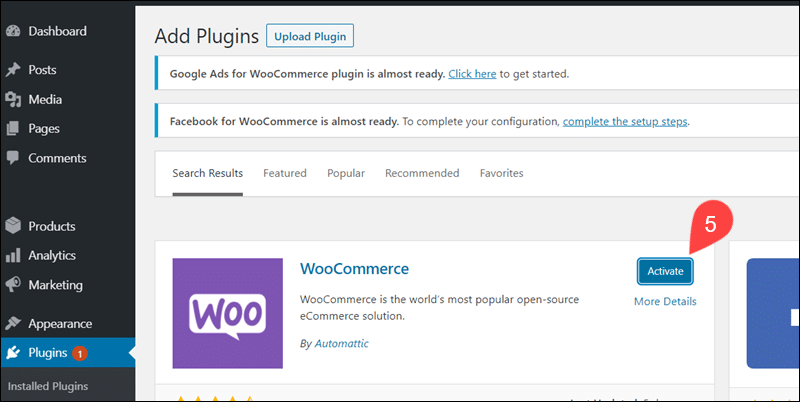
1. Access the WP Admin and expand the Plugins tab.
2. Select the Add New option.
3. Type WooCommerce in the search bar.

4. Click Install Now on the WooCommerce plugin tile.
5. Once the installation finishes, click Activate.
Follow the steps in the wizard to complete the initial store configuration.
Step 3: Basic WooCommerce Setup
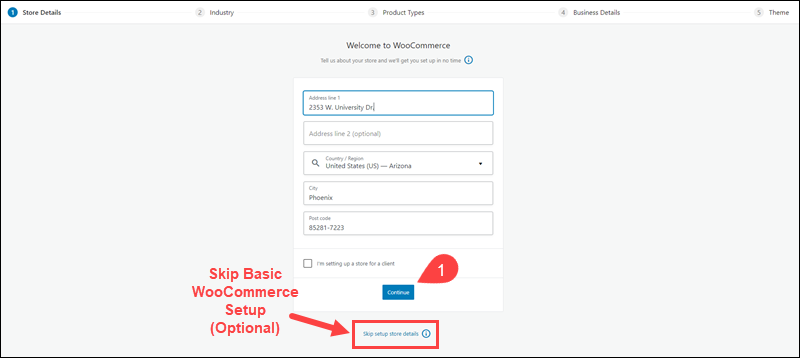
The WooCommerce setup wizard helps users with limited experience in setting up e-commerce shops. You can subsequently edit all settings during the setup process.
1. Enter your company’s full address and click Continue.
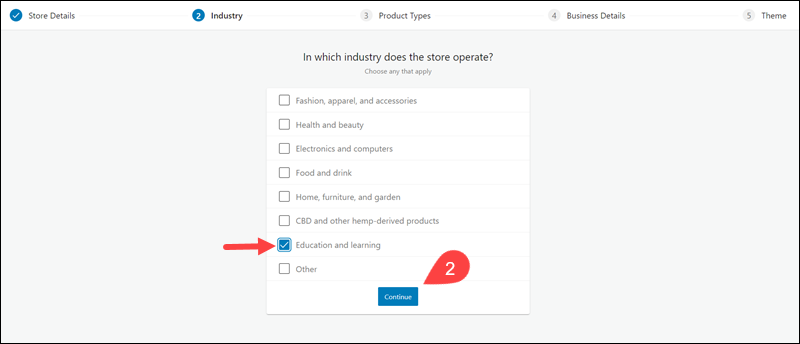
2. Choose the general industry for your store and select Continue to confirm.
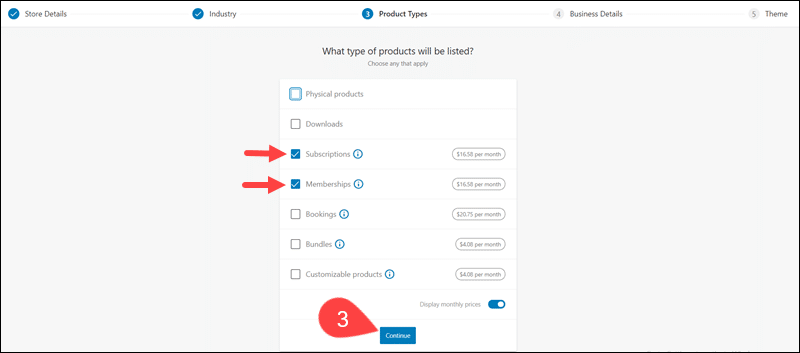
3. Define the types of products you intend to sell (memberships, tangible items, digital downloads, etc.). Click Continue to proceed.
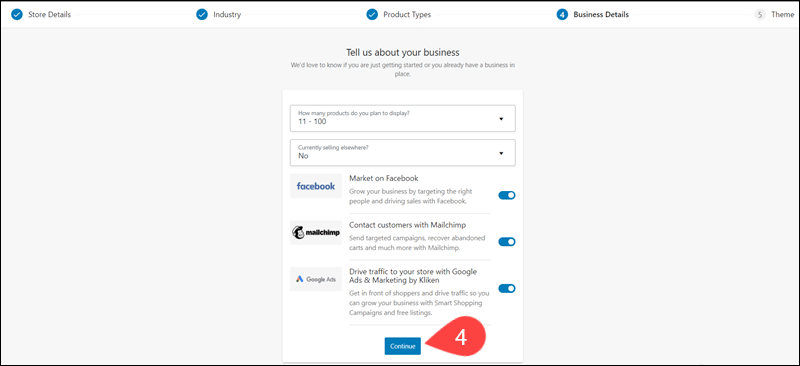
4. Decide if you would like to use the mailing, marketing, and social media plugins to complement your store. Then, click Continue.
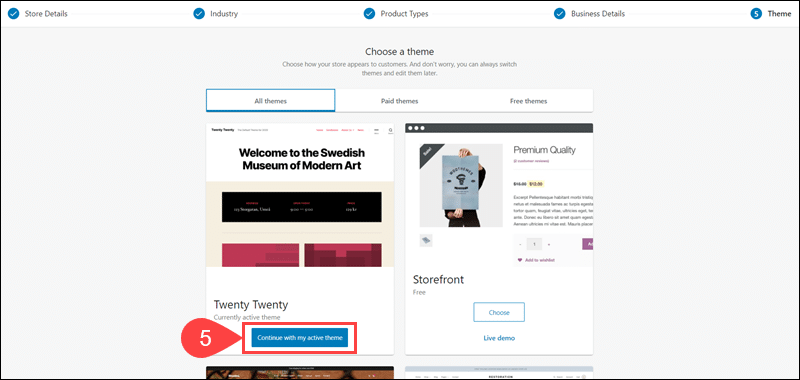
5. Select a theme for your store. A theme defines the overall look of your storefront. You can continue with the default theme for now and customize the theme later.
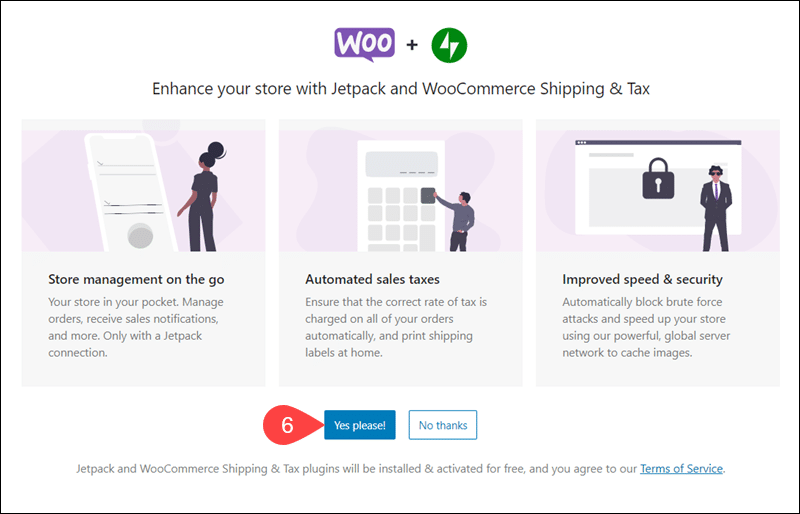
6. (Optional) Install the Jetpack plugin to improve attack protection and receive timely downtime alerts. The WooCommerce Shipping and Tax plugin streamlines tax calculation and payment processing configuration.
7. Once the initial setup process completes, access the WooCommerce Home page.
You are now able to add individual products and modify WooCommerce store settings.
How to Configure a WooCommerce Shop
The WordPress navigation panel contains WooCommerce menus that enable you to customize and manage your store.
- WooCommerce - This menu has options to administer and monitor individual orders and customer details, generate reports, add extensions, and review the system’s status and logs. The Settings tab contains the principal options for configuring general rules and the overall store environment.
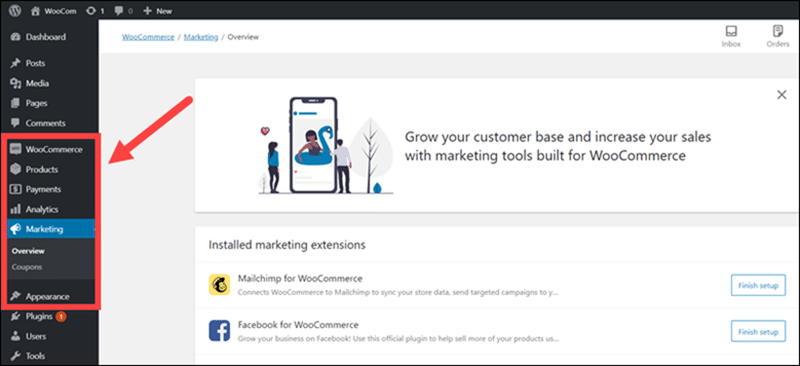
- Products - Use this section to add products to your store, customize their appearance and descriptions. Attributes and tags are used to group and interrelate products into meaningful categories.
- Analytics - This section displays relevant store statistics and performance reports. The reports include revenue analytics, stock summaries, sales numbers, and tax calculations.
- Marketing - You can add relevant marketing extensions from this tab and create and manage coupons as an essential promotional tool.
- Appearance - This menu lets you import premade themes, design new themes from scratch, and edit your store’s visual elements.
WooCommerce Menu
The options within these menus allow you to set up your WooCommerce store and control every aspect of the store operations.
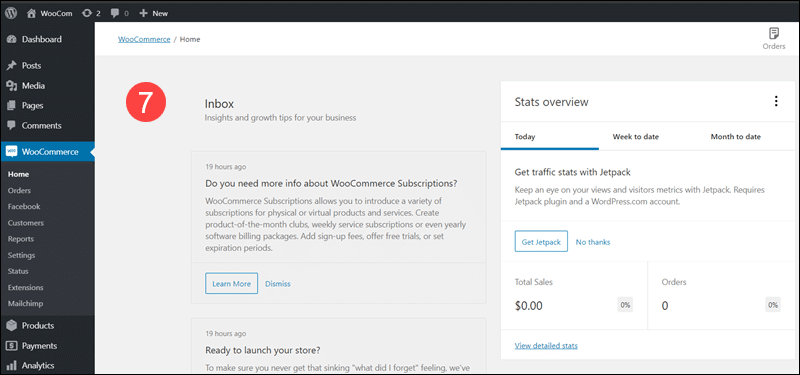
Home
The Home panel shows recent promotional and system messages, a brief statistical overview of sales and orders, and a set of quick configuration links. The links are located in the Store management section.
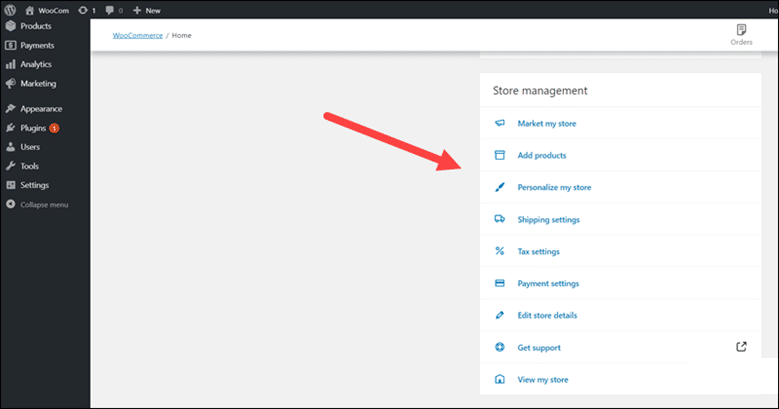
Each self-explanatory link provides quick access to essential options for preparing your store to accept live payments.
Settings
The Settings option is the most important section in the WooCommerce menu. The tabs allow you to set up back-end processes that affect the store’s core functionalities.

General
- Store Address - Verify the address entered during installation is correct. Edit the details if necessary.
- General Options - If you plan to ship products internationally, you can limit shipping to specific countries. WooCommerce can calculate taxes and shipping costs based on customer location. This section also allows you to enable coupons.
- Currency Options - Set the currency and the format of the prices displayed to customers.
Products
- Shop Pages - Set the base page for your shop and add a placeholder image for products without predefined images.
- Measurements - Specify the units (cm, kg, in, lbs.) in which you want to display product weight and dimensions to customers.
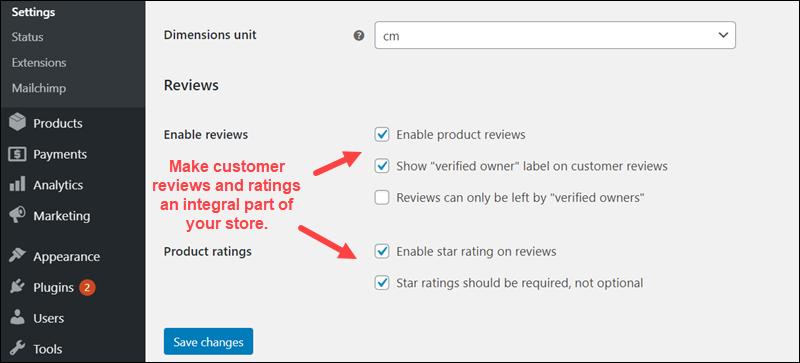
- Reviews - Enable or disable customer reviews and product ratings.
- Inventory - Stock management and stock notification options.
- Downloadable Products - If you plan to sell downloadable digital products, you can set the download method and type of access restrictions.
Tax
- Tax Options - Define if you would like to display taxes in your store's shop or cart section. Create custom tax classes for specific customer locations.
Shipping
- Shipping Zones - Create custom shipping zones and attach shipping prices to those zones.
- Shipping Options - Show the shipping calculation or hide costs until a customer enters their address.
- Shipping Classes - Create specific shipping rules for predefined product categories.
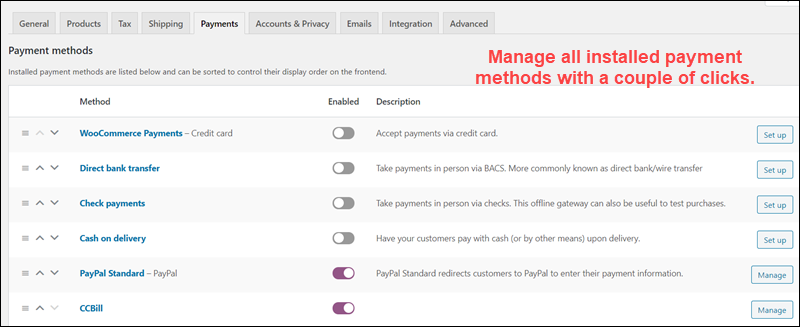
Payments
- Payment methods - Enable or disable payment methods and sort the display order on the page. In this section, you can configure settings and integrate your store with different payment processors.
Accounts & Privacy
- Accounts - Decide if you want customers to create an account before making a purchase or if guest users can make purchases as well.
- Privacy Policy - Add your website’s privacy policy.
- Personal Data Removal - Set time frames for storing customer data.
Emails
- Email notifications - Enable/Disable email notifications for different types of events. Define the email recipients for those events.
- Email sender options - Set the email From and Name values.
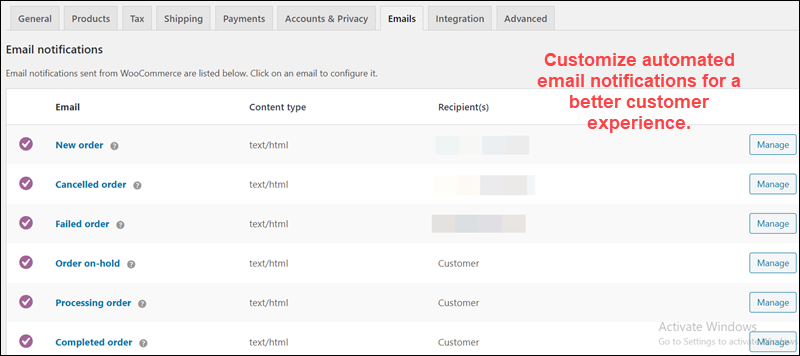
- Email templates - Create unique email templates in WooCommerce for specific events to improve customer experience, retention levels, or distribute promotional materials.
Integrations
- Integrate WooCommerce with services that help with data collection and marketing campaign analytics, such as MaxMind geolocation and Google AdWords.
Advanced
- Page setup - Set the URL the customer gets redirected to in order to make a purchase. Configure if a customer needs to accept terms and conditions before completing a purchase.
- Checkout endpoints - Define the URLs the customer gets redirected to after a purchase or a specific event.
- Account endpoints - If you require customers to create accounts on your website, you can redirect customers to specific locations on their accounts after making a purchase.
Even if you do not plan to implement advanced technical solutions immediately, it may be necessary to automate your services as your business grows. The Advanced tab lets you link WooCommerce with API solutions such as Rest API and Webhooks.
APIs are necessary to integrate websites with other advanced applications such as payment processing systems.
Note: To learn more about how online payments and payment authentication work, please refer to our comprehensive guide on common payment authentication methods.
Orders
The Orders section is invaluable for stores selling tangible products. Once your store becomes fully operational, detailed information about orders and their status will be in the Orders tab.
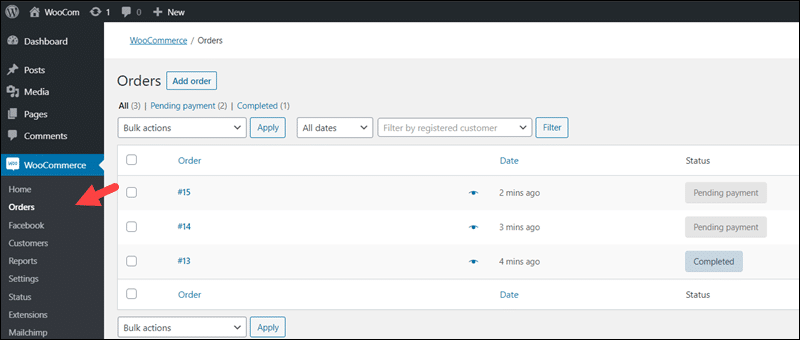
You can review and search orders, create new orders manually, and change the status of existing orders.
Customers
The Customers section contains useful information about customers that made purchases or registered on your website. Customer data enables you to manage customer relations, direct future marketing campaigns, or measure the effectiveness of previous marketing efforts.
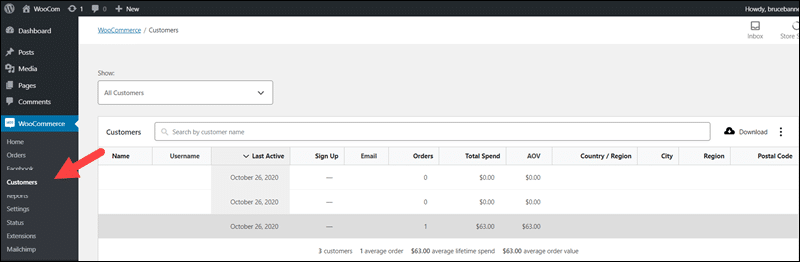
WooCommerce also allows you to extract the data, in bulk, into CSV files.
Reports
One of the more important duties of running an online store is to gather and analyze sales and revenue data. You can customize and review reports on store performance in the Reports tab.
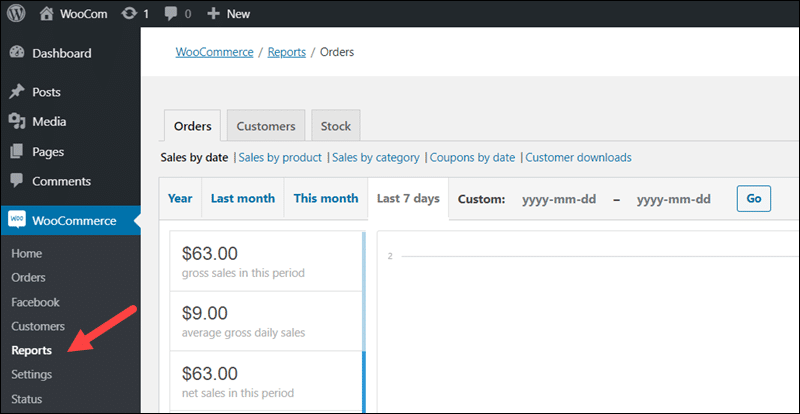
The reports are much more accessible once you filter them by period, product type or category, and promotional activities.
Status
The status of your WooCommerce store is always monitored. This section provides a quick system overview and informs you if any system issues occur.
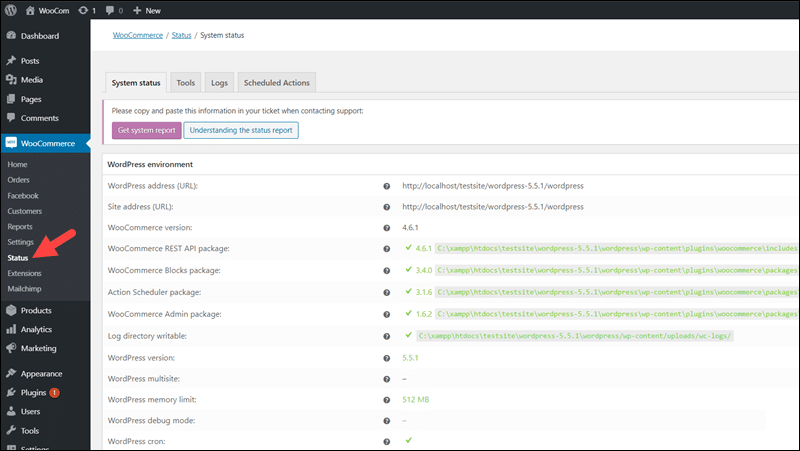
If you need to contact support services regarding your WordPress environment, the information on this page would provide valuable insight. The Logs tab contains detailed descriptions of registered errors.
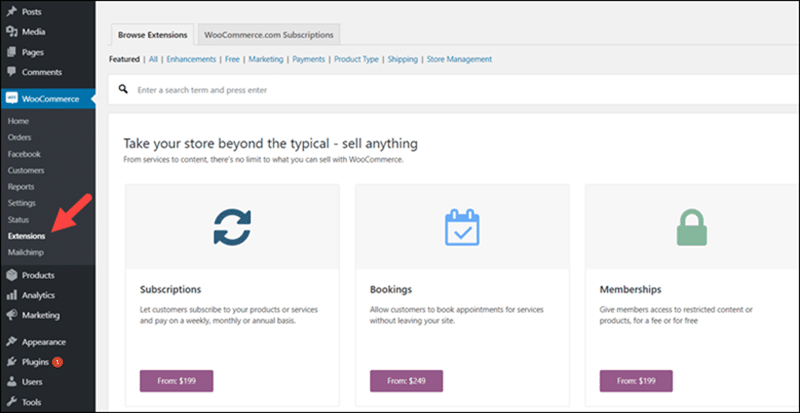
Extensions
You can enhance your store with new plugins designed especially for WooCommerce. Extensions help you explore new avenues for development and expand your store's functions by installing these plugins in a few clicks.
How to Add Products in WooCommerce
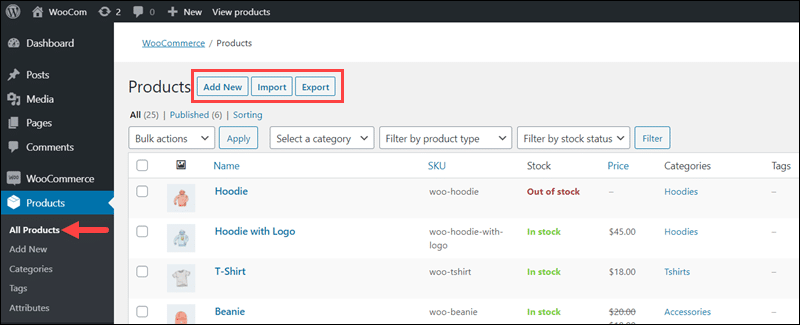
Managing products in WooCommerce is an everyday task. The All Products option in the Products menu helps you maintain and expand your current product portfolio. Here, you can also import/export multiple products from/to other systems in a CSV file.
The Add New option allows you to add products manually. To add products to your WooCommerce store:
1. Click Add New in the Products menu.
2. Type the name of the product.
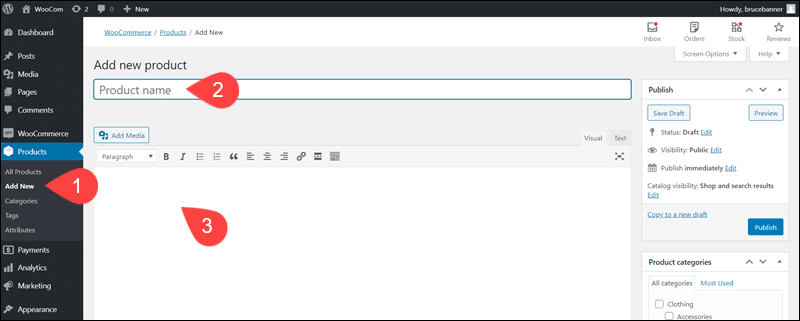
3. Use the text field to describe the product in more detail. Highlight the product’s best features and try to pique customer interest.
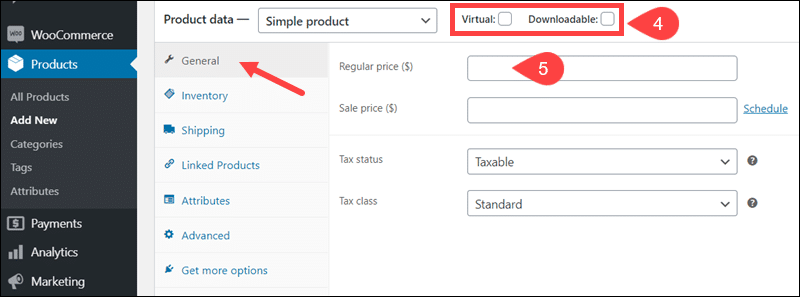
4. Scroll to the Product data section and check the box next to the product type (Tangible, Virtual, Downloadable). Selecting a product type changes the listed options in the Product data section.
5. Set the product price on the General tab.
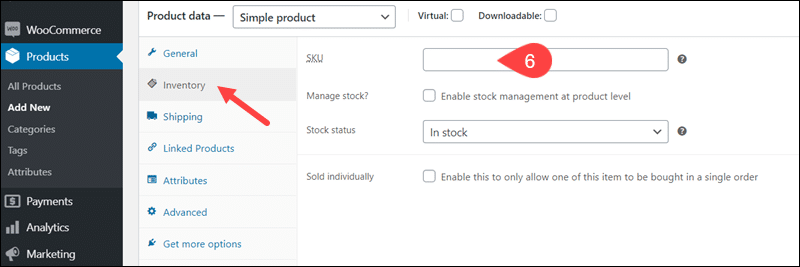
6. Access the Inventory tab and enter a unique SKU for the product.
Note: The Stock Keep Unit (SKU) is a unique identifier you can add to each product. It is useful for stock management and statistical purposes. You can also make the SKU visible to customers helping them to identify products.
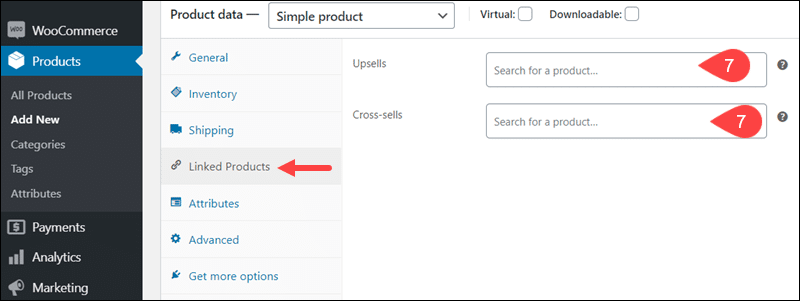
7. Use the Linked Products tab to set Upsells and Cross-sells if applicable to the product.
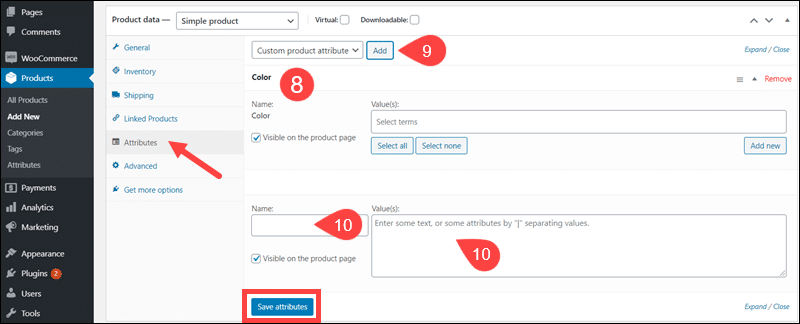
8. Add predefined Attributes, such as color or size.
9. Alternatively, create a new custom attribute by clicking the Add button.
10. Enter a Name and Value for the Attribute and select Save attributes.
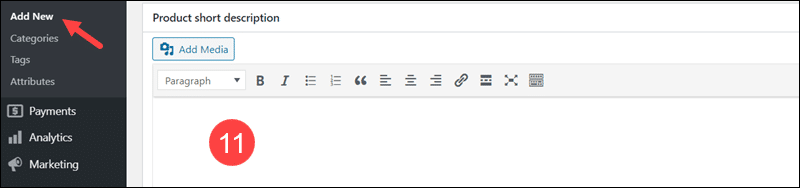
11. The Product short description section at the bottom of the Add New product page lets you add a brief excerpt. The notation is displayed next to images on product listing pages. WooCommerce also allows you to embed small videos as descriptions.
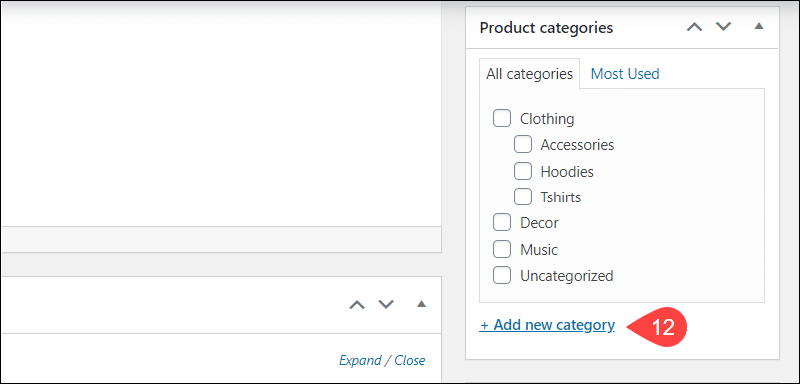
12. The Product categories panel on the right side of your dashboard lets you place a product into a category. If you need to create a new category, use the Add new category link.
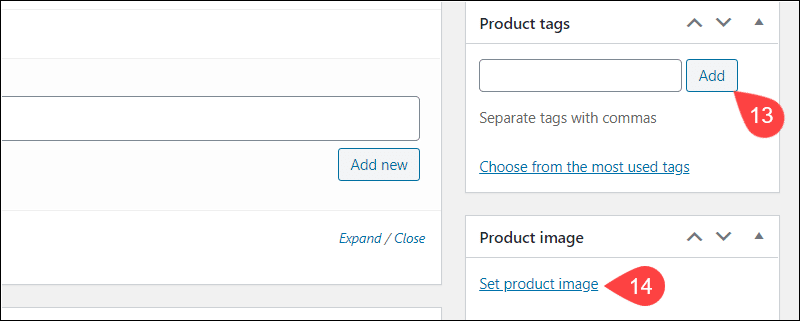
13. Add Product tags to items with distinctive features or to highlight useful information.
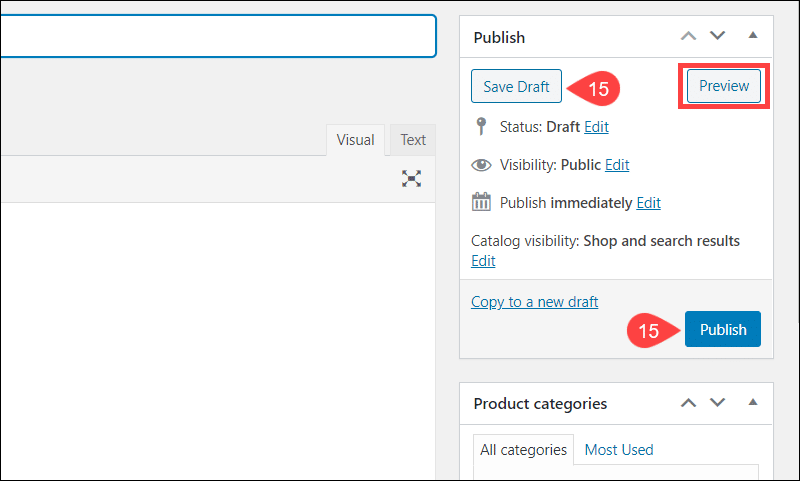
14. Click the Set product image link to insert an image for the product.
15. Use the Preview tab in the Publish section to check if everything is in order. Select Save Draft to save the product record. Choose Publish to make it available in your store.
You have successfully added a product to your WooCommerce store. Categories, Tags, and Attributes are reusable entities that streamline adding new products over time.
How to Enable and Add Coupons in WooCommerce
The Marketing menu allows you to integrate new marketing and customer relation plugins. The menu also contains the Coupons section. Coupons are an effective tool to build up your customer base and reinforce loyalty.
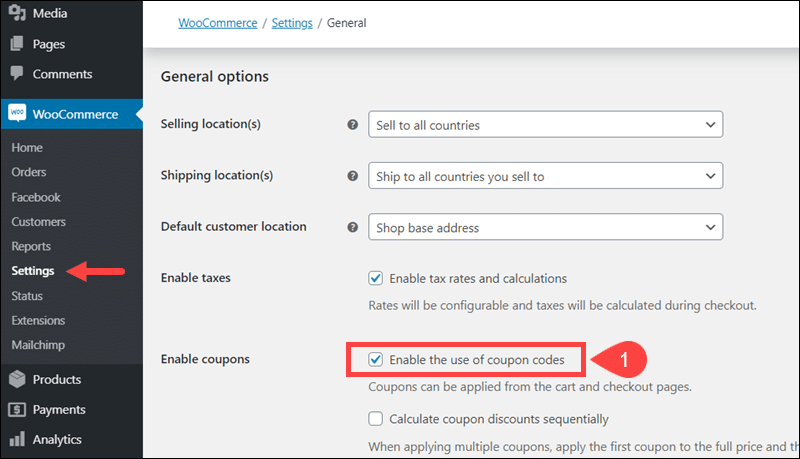
1. To enable coupons codes, check the box located under WooCommerce > Settings > General > Enable coupons.
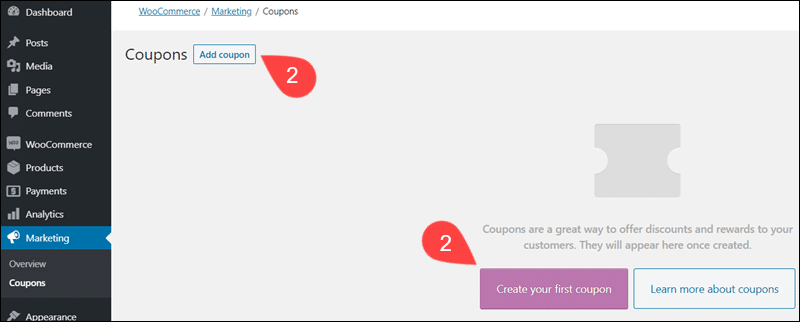
2. Click the Create your first coupon option or select the Add coupon tab.
3. Generate or enter a custom Coupon code. Customers use this code to receive the promotion. The content of the optional Description field is not visible to customers.
4. Use the options in the General tab to set the coupon amount or percentage discount and the expiration date.
5. The Usage restriction and Usage limits settings enforce rules on who qualifies for a coupon and define spending limitations, such as combining several coupons.

6. Once you are ready to offer the coupon to your customers, click the Publish button.
WooCommerce Analytics
The Analytics menu consolidates all statistics of your store into a single panel. Define a date range to filter numerous charts on general and specific categories.
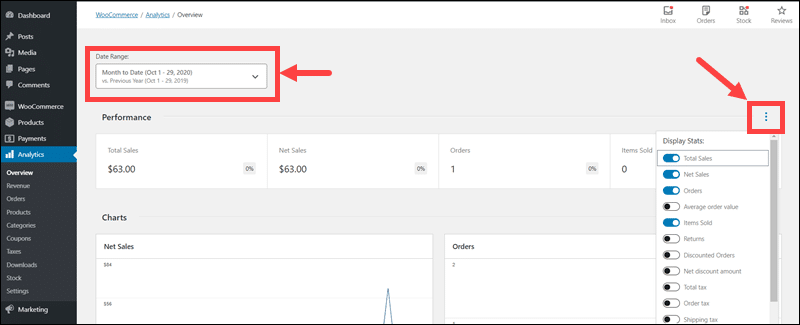
By selecting the ellipsis in the top right corner of each section, you can add or remove relevant data sets from the main Analytics panel.
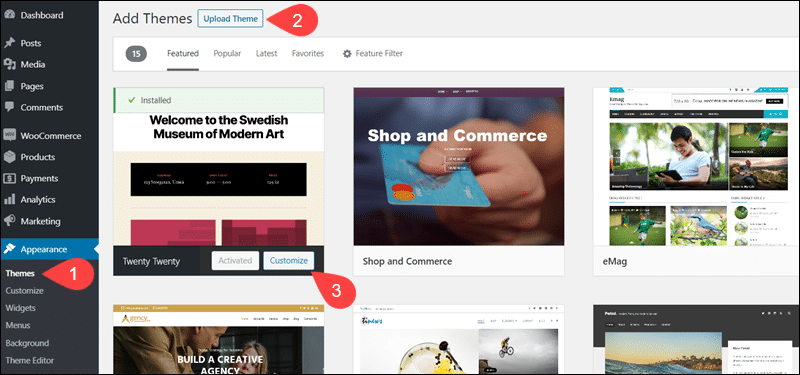
Themes and Customization
To add new and edit existing themes:
1. Access the Themes option in the Appearance menu.
2. Select an existing theme, add a new theme, or import a custom theme with the Upload theme option.
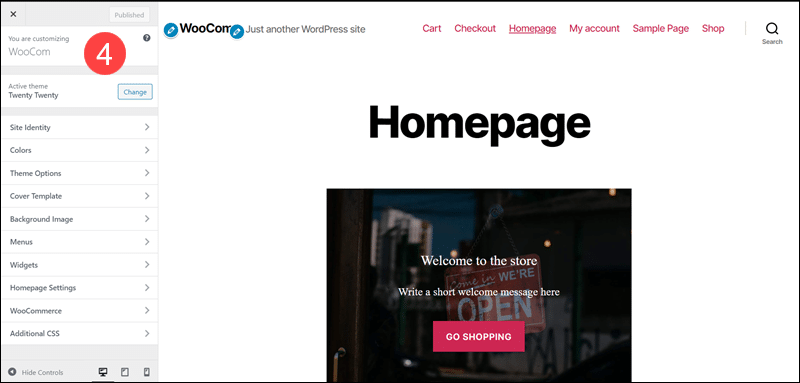
3. The Customize option opens a theme customization panel.
4. The user-friendly options on the customization menu are adequate for modest cosmetic changes.
To customize themes extensively and change essential checkout features, you need to edit WooCommerce template files. Always back up your existing website before attempting to edit template files.
By default, the WooCommerce templates are in the wp_content/plugins/woocommerce/templates folder in your server’s root directory.
Conclusion
You have successfully installed the WooCommerce plugin and configured your store. You are now ready to start accepting payments and selling your products and services.
WooCommerce offers an endless number of features on top of the available open-source plugins. This WooCommerce tutorial helped you get started in the right direction.
If you are just starting with WooCommerce, please visit some of our other useful WP tutorials such as How to Add Quantity Discounts in WooCommerce.
