Introduction
Automated WooCommerce emails provide customers with essential information about their orders. A well-designed custom WooCommerce email helps establish your store’s identity, raises brand awareness, and provides an engaging customer experience.
Use custom WooCommerce emails to:
- Advertise related products or special offers.
- Include direct payment links to upsell and cross-sell products.
- Send coupons to promote customer loyalty or offer reduced prices to retain unsatisfied customers.
- Make it easier for customers to contact support if they need assistance.
Find out how to customize WooCommerce emails and turn them into a valuable promotional tool.
How to Edit Default WooCommerce Emails
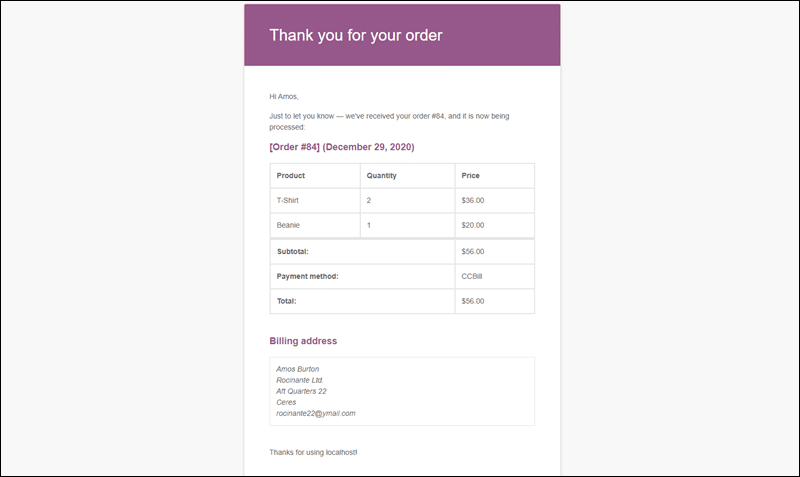
Default WooCommerce emails have a simplistic design that clearly conveys basic transaction details. This impersonal email serves as a record that informs customers of important events regarding their purchase or subscription.
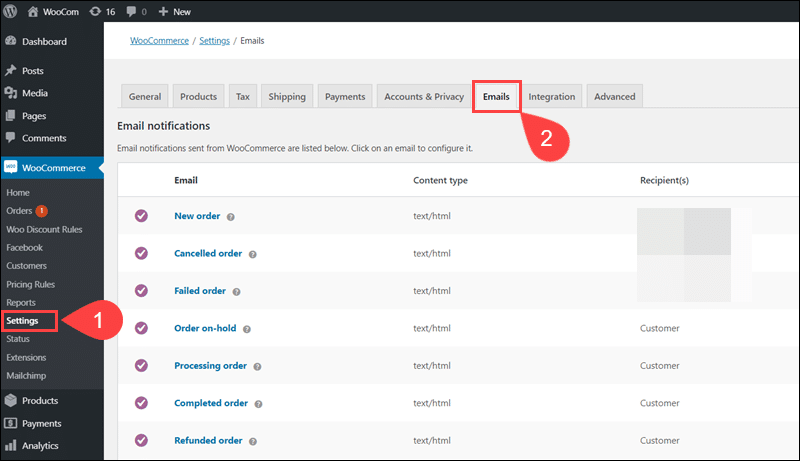
To manage and edit transactional emails in WooCommerce:
1. Select Settings in the WooCommerce menu.
2. Access the Emails tab.
3. Use the Email template section to edit visual elements of all emails, such as headers, footers, text color, background color, etc.
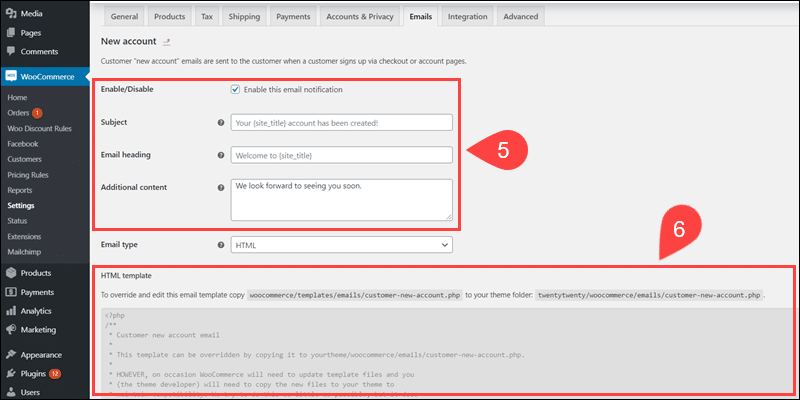
4. Click individual email types, for example, New Account, to manage elements for that email type.
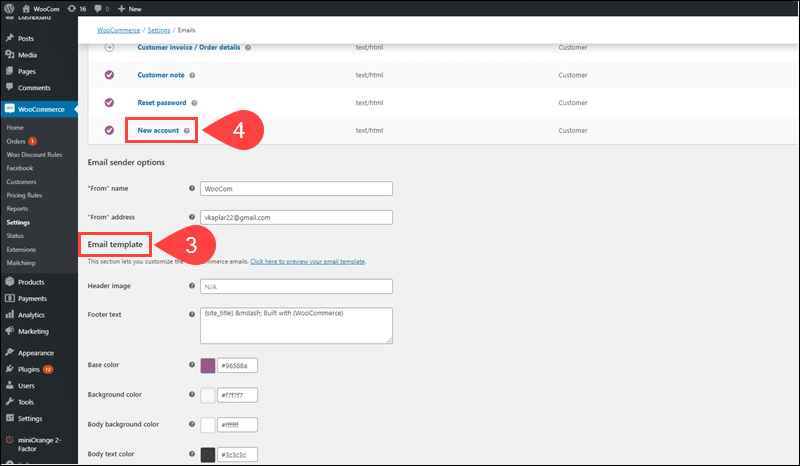
5. You can enable/disable the email, edit the email’s Subject, heading, and add textual content.
6. The HTML template section provides vital information for developers looking to code custom email templates.
Non-technical users can use email customization plugins to redesign default WooCommerce emails entirely.
Edit Emails with Decorator - WooCommerce Email Customizer
The Decorator - WooCommerce Email Customizer is a free, open-source, email customization plugin. It does not have drag and drop capabilities, but you can use this plugin to edit basic visual elements of WooCommerce emails.
To do so:
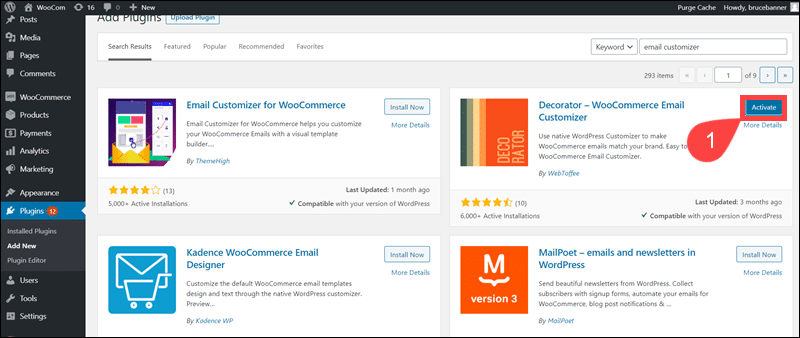
1. Install and Activate the Decorator - WooCommerce Email Customizer plugin.
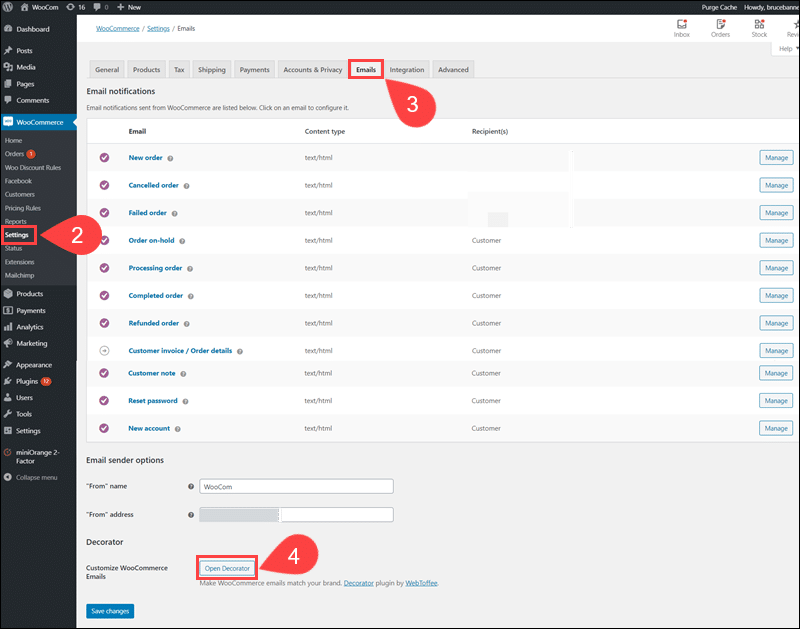
2. Select the Settings option within the WooCommerce menu.
3. Open the Emails tab.
4. Click the Open Decorator option at the bottom of the page.
5. Use the Decorator panel to change header and footer styling, add custom images, apply different heading styles, text color, and font.
6. Click Publish to apply the changes.
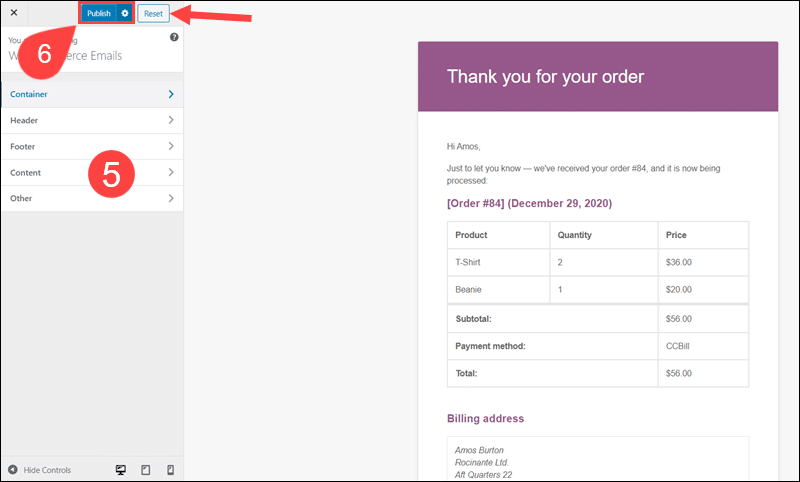
The Reset button allows users to revert to the default email version and start over if necessary.
Drag and Drop Email Customizer by Flycart
The option to drag-and-drop elements makes email template building more efficient.
Most plugins focus on editing headers, footers, and making minor cosmetic changes. The Drag and Drop Email Customizer by Flycart enables you to make sweeping changes to default WooCommerce emails.
At the time of writing this article, the annual license for Drag and Drop Email Customizer cost $49.
Once you install and activate the Drag and Drop Email Customizer plugin:
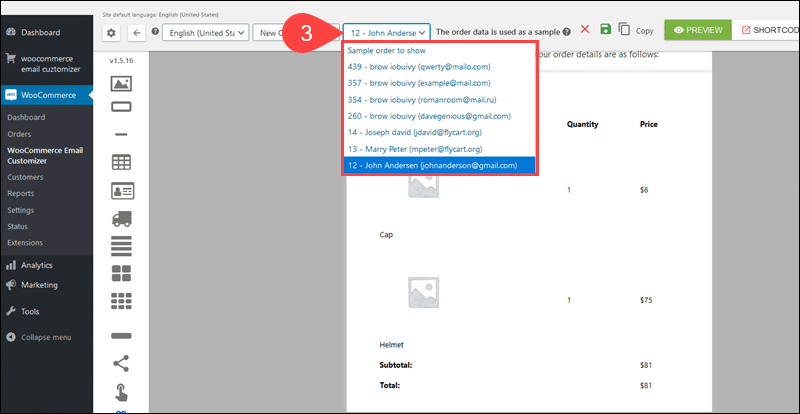
1. Select WooCommerce Email Customizer to access the email template builder.
2. Choose an email type to edit from the dropdown menu.

3. Select an existing email to serve as a preview example.
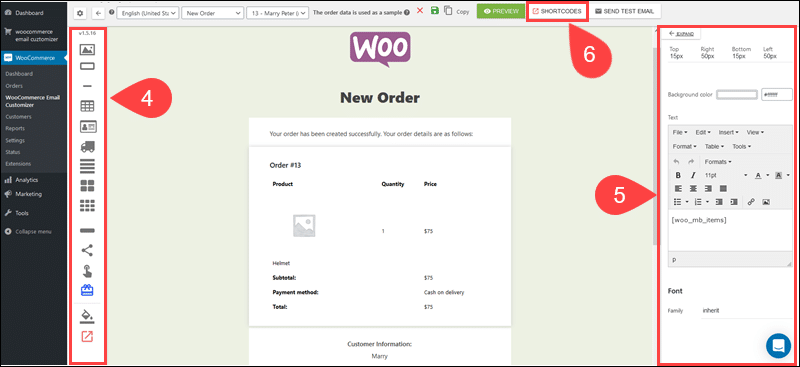
4. Use the icons on the left panel to drag elements onto the template. Add a logo, images, editable text boxes, social icons, clickable URL buttons, and other components.
5. By selecting an element within the template, a panel appears on the right side and lets you fully edit content within each element.
6. The Shortcodes tab contains a list of all WooCommerce placeholders and their descriptions. Inserting placeholders into templates helps you automate store processes.
Note: Learn how to use WooCommerce shortcodes to easily manage your ecommerce store.
7. Insert coupons into emails to improve customer retention and promote loyalty programs. For optimal results, combine this functionality with other plugins that streamline cart conversions and analyze customer behavior.
8. Once you are satisfied with the email’s design, click the save icon to save the template.
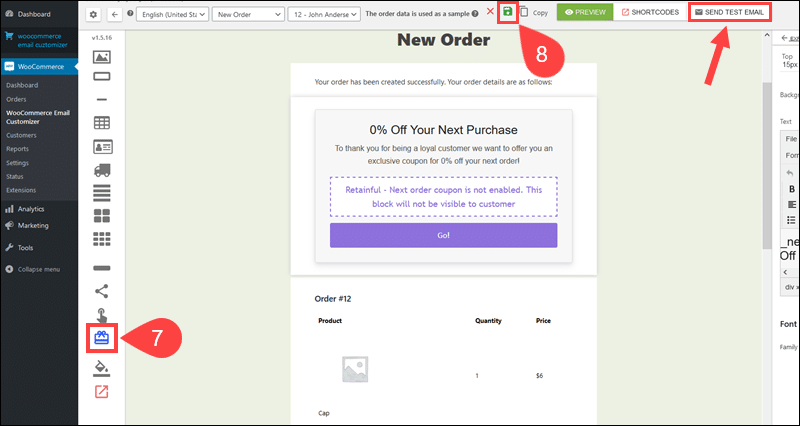
Use the Send Test Email option to confirm that all the elements and placeholders within the template work properly.
Customizing via WooCommerce Email Customizer
The WooCommerce Email Customizer developed by WooCommerce is a native plugin that guarantees reliability and compatibility. At the time of writing the article, the plugin cost $79 annually, including product support.
The plugin has a built-in drag-and-drop visual editing system and does not require coding knowledge. The changes are visible in real time, which simplifies the editing process considerably.
Once you install and activate the WooCommerce Email Customizer:
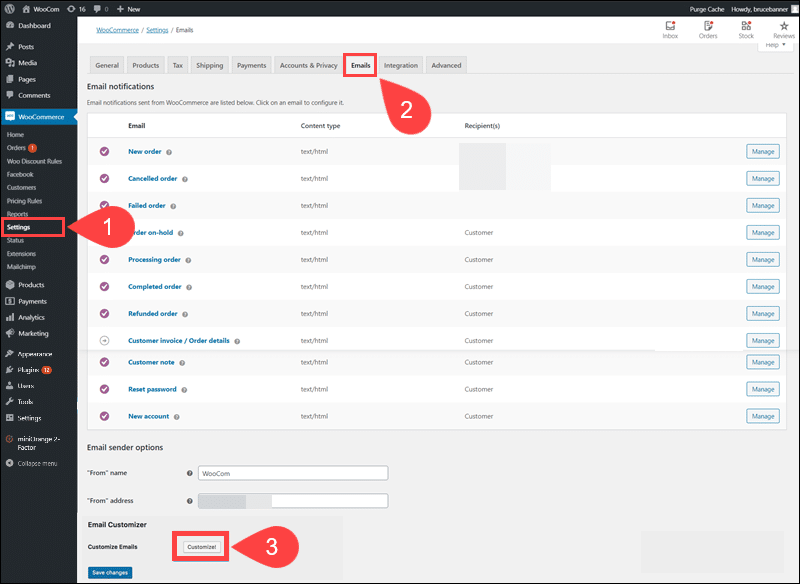
1. Access the WooCommerce menu and click Settings.
2. Select the Emails tab.
3. Scroll down to the Email Customizer section and click Customize.
4. Use the email builder to customize the email design.
5. Click Save & Publish to apply the changes.
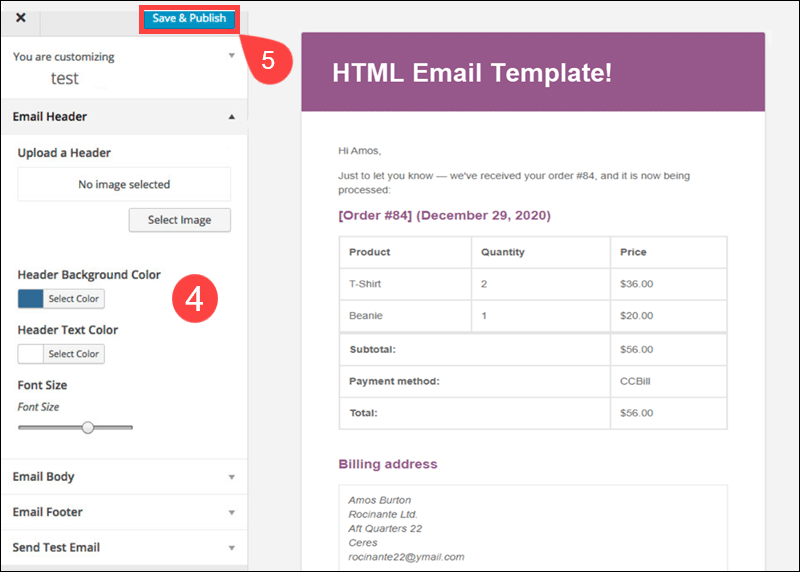
The WooCommerce Email Customizer only deals with the visual aspects of email design and does not support customizing the email’s textual content. This limitation can prevent you from realizing the full potential customized emails can bring to your business.
If you plan to make only visual edits and create emails using a minimalist style, the WooCommerce Email Customizer is a sensible choice.
Custom Email Template
Users with advanced coding skills can override default WooCommerce templates, edit, and upload one-of-a-kind template designs to WooCommerce directories.
Finding and Editing Email Templates
WooCommerce email template files are located in the wp-content/plugins/woocommerce/templates/emails/ directory.
To locate template files for individual email types:
1. Click Settings in the WooCommerce menu.
2. Access the Emails tab.
3. Select the email notification type you want to edit.
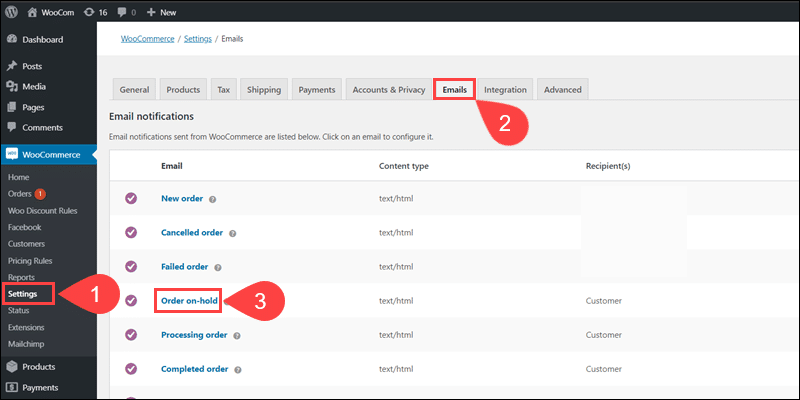
4. The Email template section shows the path to the email template file.

5. Use a preferred FTP client to access the website server.
6. Copy the existing template to the wp-content/themes/your-theme-name/woocommerce/emails/template-file-name.php. Create a new directory if one does not already exist.
Copying the file to the theme folder overrides the default template and allows you to edit its contents. WooCommerce updates can interfere with custom email settings, forcing you to repeat this process for each template. Overriding and customizing the email-styles.php file is more efficient.
Custom CSS
The default CSS for WooCommerce emails is located within the email-styles.php file. To edit the email-styles.php file:
1. Copy the the wp-content/plugins/woocommerce/templates/emails/email-styles.php file to the wp-content/themes/your-theme-name/woocommerce/emails/ directory.
2. Edit the copy by appending custom CSS blocks before the final <?php tag.
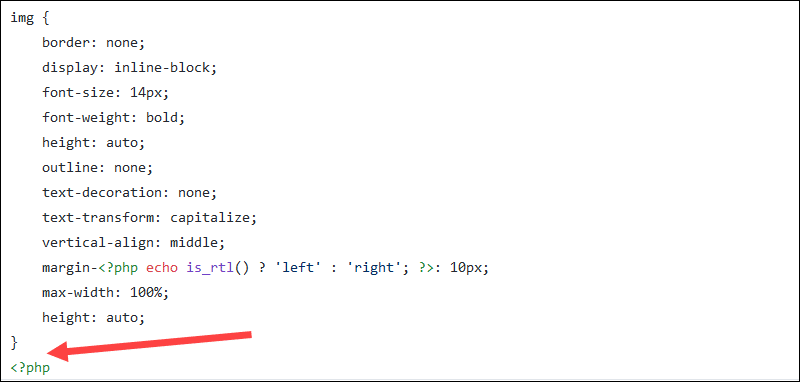
Attempting to add content between the opening <?php and closing ?> tags is recommended only for users with PHP experience. If a WooCommerce update affects the customized file, you can repeat the same process.
Conditional Customization with Action Hooks and Filters
Action and Filter hooks allow you to insert custom PHP code within existing template files. By appending code snippets to the functions.php file in the theme folder wp-content/themes/your-theme-name/ directory, you can preserve the customizations even if WooCommerce updates its CSS.
For example, use the woocommerce_email_footer($email) actionhook to add custom content above the email’s footer:
<?php
add_action ( 'woocommerce_email_footer', 'mm_email_footer', 10, 2 );
function mm_email_footer( $email ) { ?>
<p><?php printf( __( 'Thanks for your purchase! Let us know what you think of the product using this link: %2^s', 'yoursite' ), get_bloginfo( 'name', 'display' ), '<a href="' . get_permalink( wc_get_page_id( 'shop' ) ) . '">' . __( 'Shop', 'yoursite' ) . '</a>' ); ?></p>
<?php
}
Filter hooks override the labels and placeholders of existing fields. Using a filter to append or edit content to the existing <em>woocommerce_email_styles</em> CSS, for example, prevents WooCommerce updates from affecting your customizations.
add_filter( 'woocommerce_email_styles', 'mm_add_custom_woocommerce_email_styles', 10, 1 );
function mm_add_custom_woocommerce_email_styles( $css, $email ) {
	return $css . '
.address {
	background-color: blue;
	font-weight: italic;
}
';
}
The $email parameter with the email value ID (new_order, cancel_order, etc.) lets you attach modifications for individual email types.
Conclusion
Now you know how to customize WooCommerce emails and create focused and unique customer-oriented messages.
Custom emails help you establish personalized communication and maintain a consistent visual identity throughout the purchasing process. Your customers will perceive these emails as a natural extension of your products and services.
Customers regularly abandon checkout pages that are difficult to navigate, require too much information, or do not provide enough guidance about the purchasing process. Learn how to customize the WooCommerce checkout page to reduce the abandon rate.
