Introduction
Customers regularly abandon checkout pages that are difficult to navigate, require too much information, or do not provide enough guidance about the purchasing process.
Customize the WooCommerce checkout form to:
- Reduce cart abandonment rates.
- Streamline the payment flow.
- Promote related products and special offers.
- Reassure customers by clearly conveying relevant information.
Find out how to customize the WooCommerce checkout form and make it feel like an integral part of your WooCommerce store.
WooCommerce Checkout Page Default Look
The default WooCommerce checkout page has a clean and practical layout. However, it is generic and not effective for all ecommerce business models.

Plugins provide a user-friendly interface to customize and manage the WooCommerce checkout page. Three popular plugins explored in this guide include:
1. Checkout Field Editor (Checkout Manager) by ThemeHigh
2. Checkout Manager for WooCommerce by QuadLayers
3. Checkout Field Editor by WooCommerce
Users with PHP coding experience can create custom checkout page templates using WooCommerce Hooks and Shortcodes.
Customizing via Checkout Field Editor by ThemeHigh
The Checkout Field Editor for WooCommerce is a convenient plugin for creating, editing, and reordering checkout page fields. The interface allows you to perform actions on multiple fields simultaneously.
To customize the checkout page using the Checkout Field Editor:
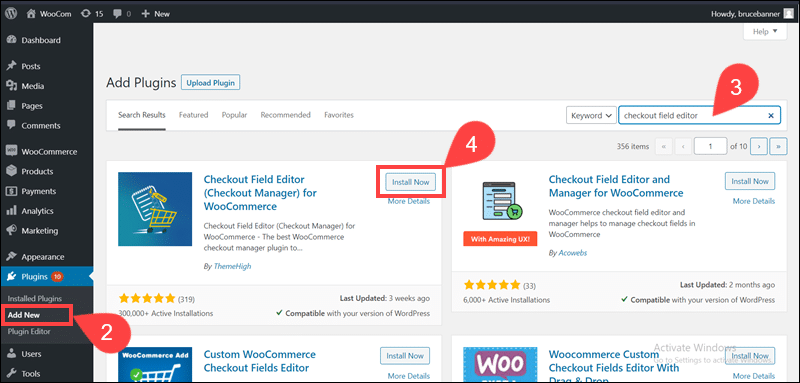
1. Access the WordPress dashboard.
2. Select Add New in the Plugins menu.
3. Search for the Checkout Field Editor for WooCommerce.
4. Click Install Now.
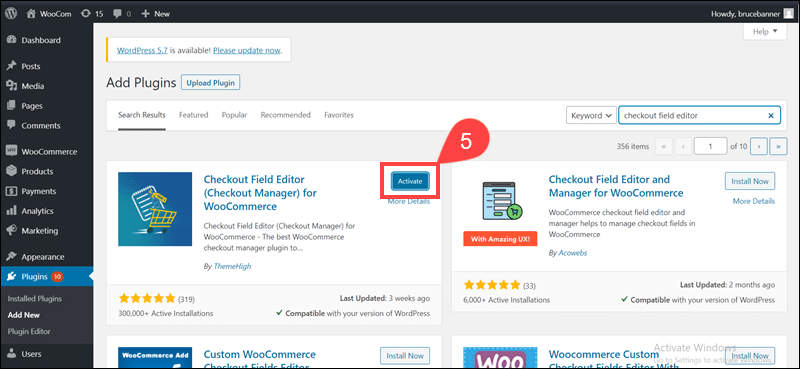
5. Activate the plugin.
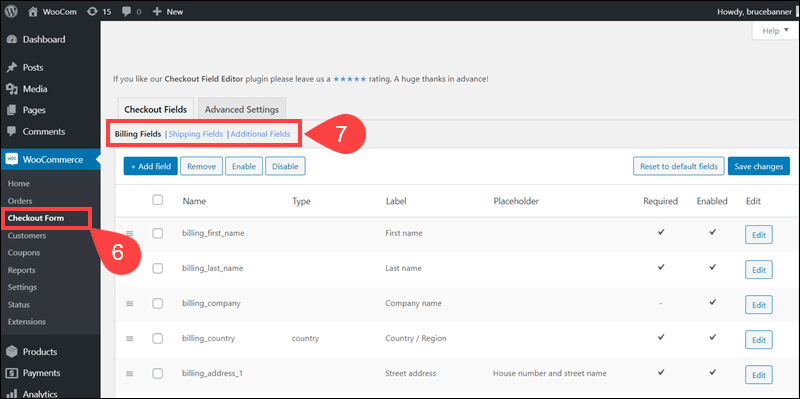
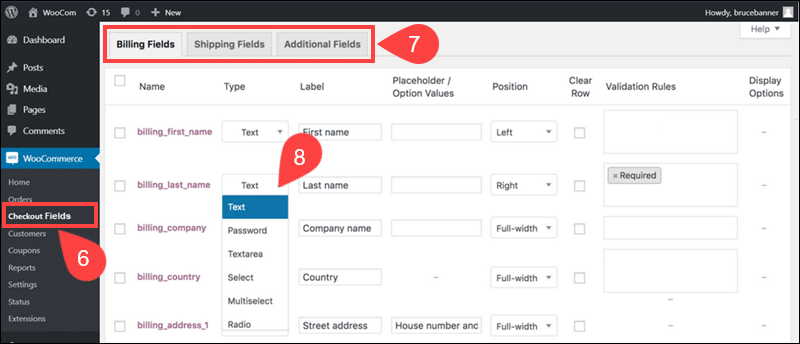
6. Access the Checkout Form tab in the WooCommerce menu.
7. Select the Billing, Shipping, or Additional Fields option.
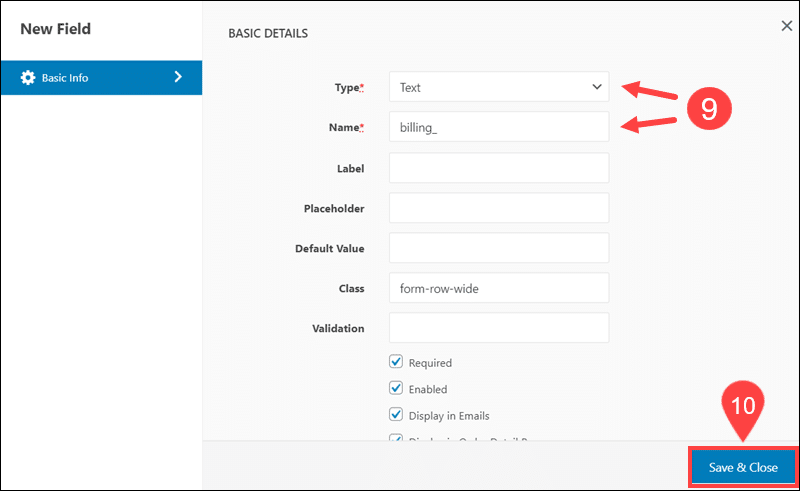
8. Use Add field to create a custom field.
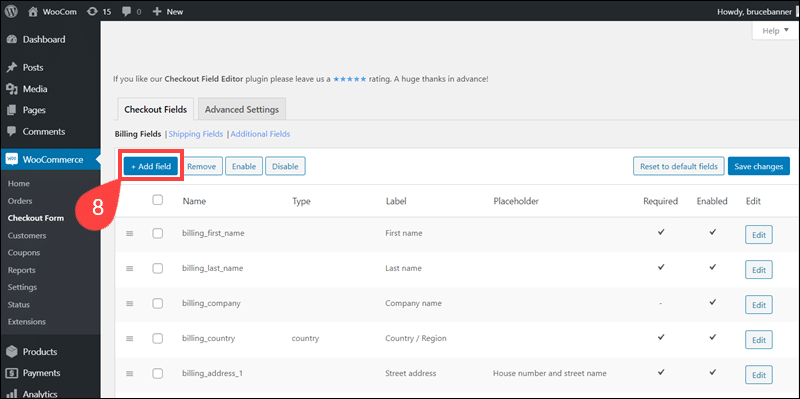
9. The field’s Type and Name are mandatory parameters.
10. Click Save & Close to create a new field.
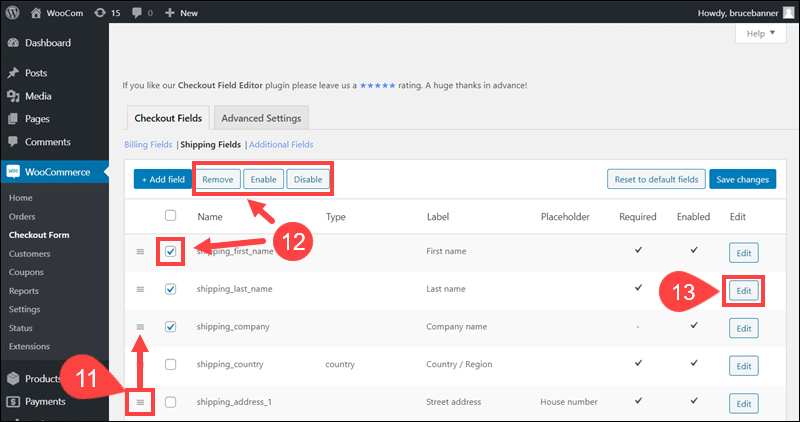
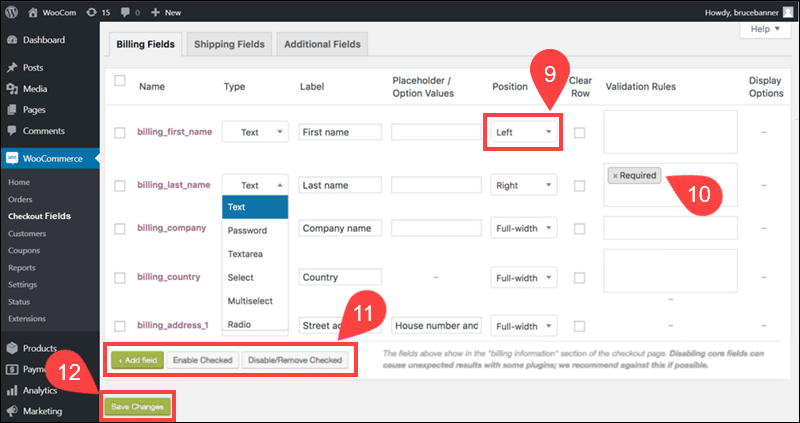
11. Change the order of the fields by dragging and dropping their tile in the list.
12. Check one or multiple boxes and click Disable, Enable, or Remove to manage existing fields on the checkout form.
13. Use the Edit option to alter existing fields.
14. Certain values for existing core fields (such as Country) are unavailable for editing. After editing the field’s values, click Save & Close.
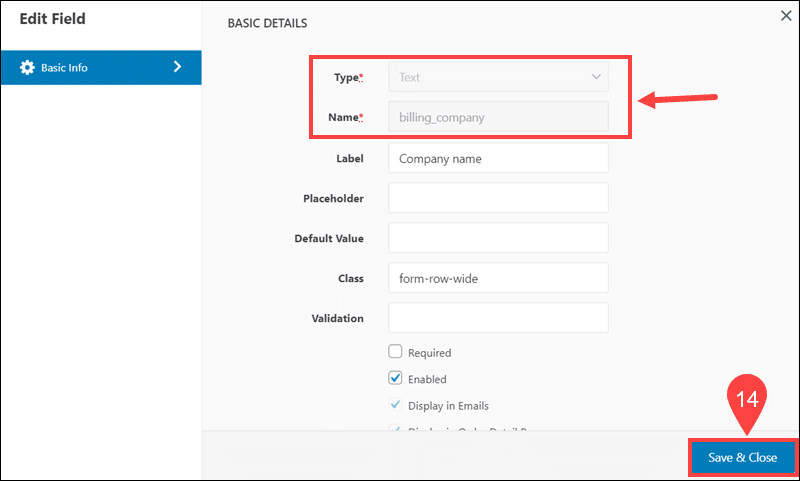
15. Save changes to apply the edits to the checkout form.
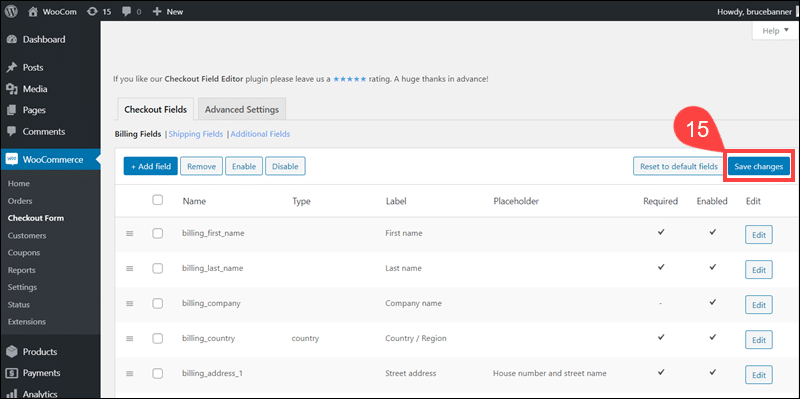
If you make a mistake, use the Reset to default fields option to revert to the original WooCommerce checkout page.
Customizing via Checkout Manager for WooCommerce Plugin
The Checkout Manager for WooCommerce by QuadLayers allows you to change the alignment and order of existing billing and shipping fields or create new custom fields on the checkout page. Also, use it to show or hide specific fields for individual products and categories.
Step 1: Install and Activate the Checkout Manager for WooCommerce
To install and activate the Checkout Manager for WooCommerce:
1. Access the WordPress dashboard.
2. Select Add New in the Plugins menu.
3. Search for Checkout Manager for WooCommerce.
4. Click Install Now.
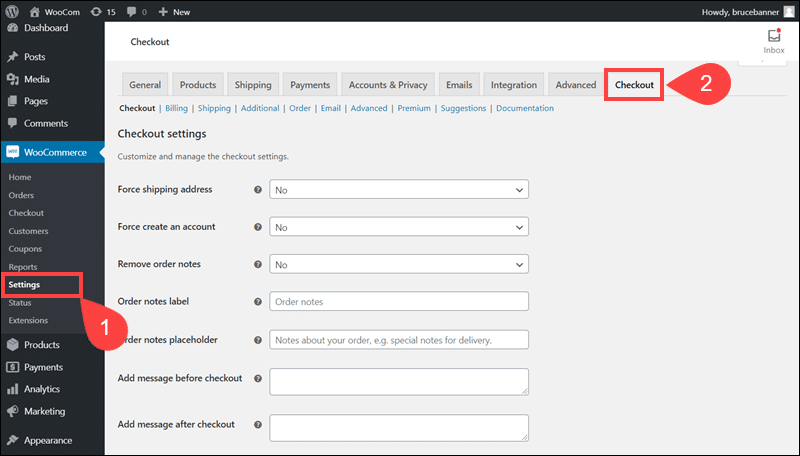
5. Access Settings in the WooCommerce menu.
6. Click the Checkout tab.
7. To start using the plugin, click Activate Plugin.
Next, create a WooCommerce product that grants customers access to the membership.
Step 2: Create Membership Product
There are no strict rules for the type of product you can create. A membership can be a standalone product or an add-on for purchasing other products.
1. Select the Add New option in the Products menu.
2. Enter the Product name, for example, Silver Membership Plan.
3. Select Billing to customize the checkout billing fields.
4. Click Add New Field to create a custom billing field.
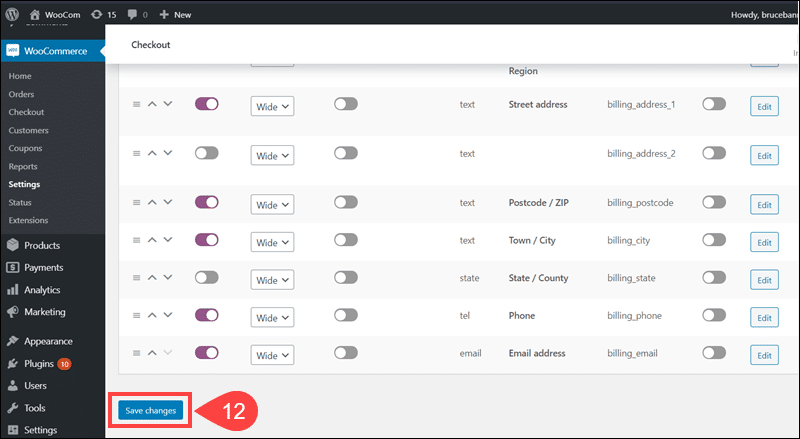
5. Toggle the slider to set existing fields to Required (or Not Required).
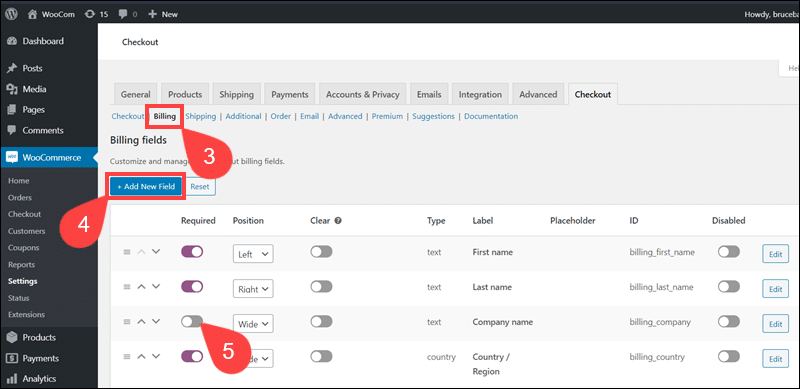
6. Use the dropdown menu to set the field’s Position on the checkout page (Left, Right, or Wide).
7. The sliders in the Disabled column enable/disable fields on the checkout form.
8. Click Edit to apply special conditions and requirements for the field.
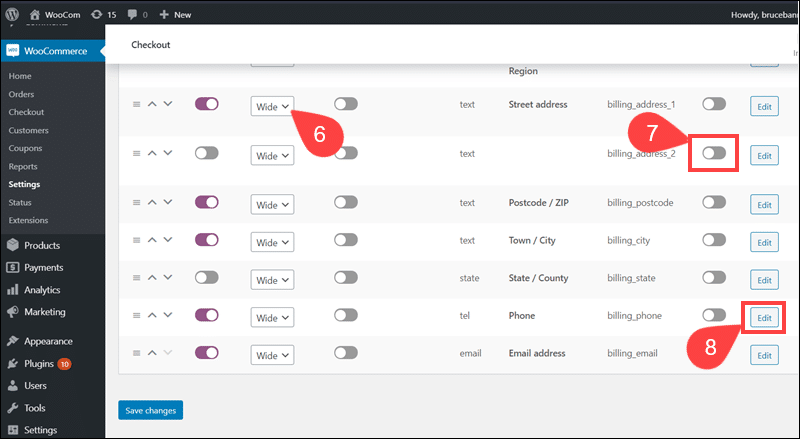
9. Access the Filter tab.
10. Show or hide the field for specific products or categories.
11. Save the settings.
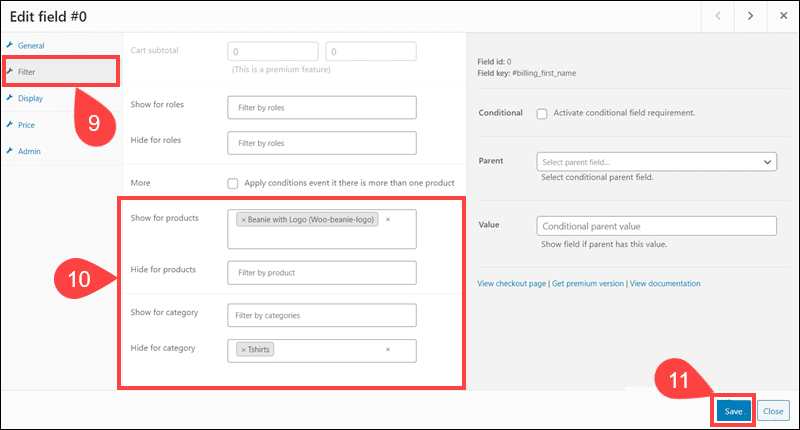
12. Click Save Changes to apply the custom settings.
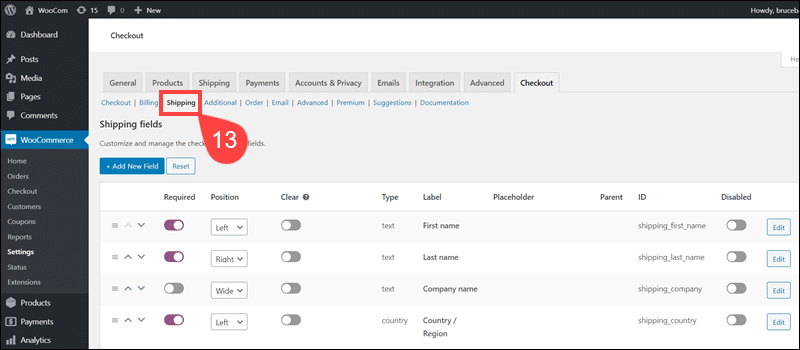
13. Edit the Shipping fields using the matching options in the Shipping section.
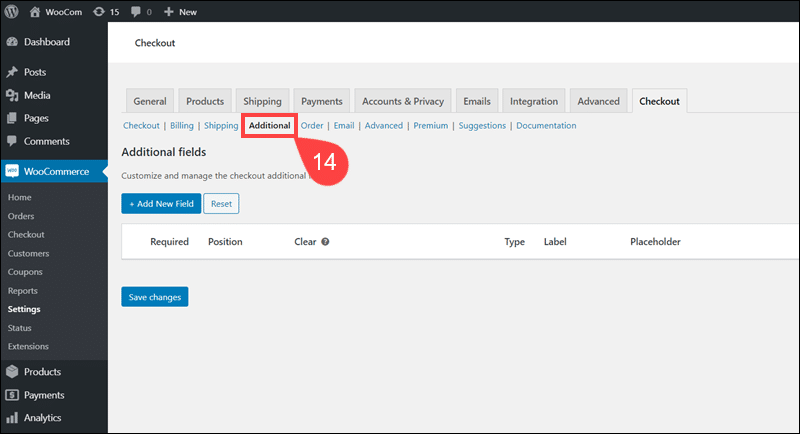
14. Use the Additional tab to create custom fields unrelated to shipping and billing.
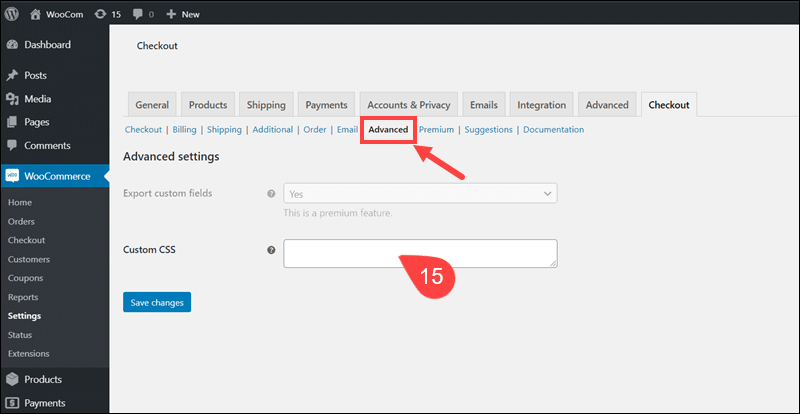
15. Upload custom style sheets to the checkout page in the Advanced section.
The Premium edition of the plugin allows you to include custom fees and conditional fields for specific products on the checkout page.
Customizing via Checkout Field Editor by WooCommerce
The Checkout Field Editor by WooCommerce costs $49 per year. Use this straightforward extension to add and remove checkout fields, update the field type, make a field mandatory, and edit the placeholder value.
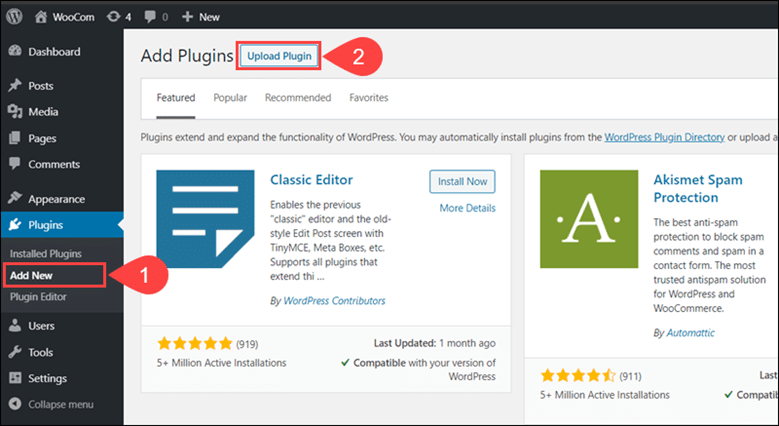
After purchasing and downloading the Checkout Field Editor, access the WordPress dashboard:
1. Click Add New in the Plugins menu.
2. Select the Upload Plugin option.
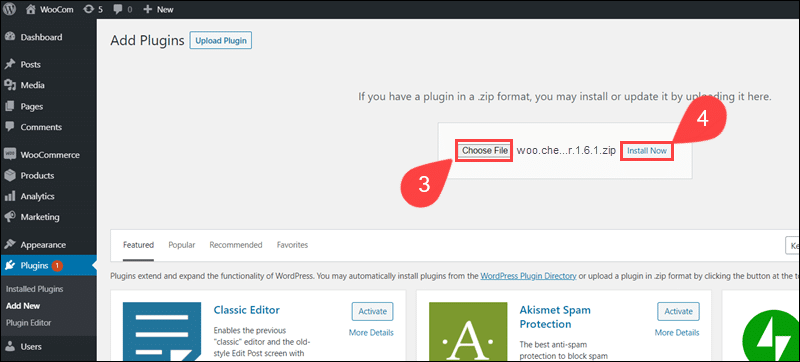
3. Use Choose File to select and upload the Checkout Field Editor zip file.
4. Click Install Now to install the Checkout Field Editor.
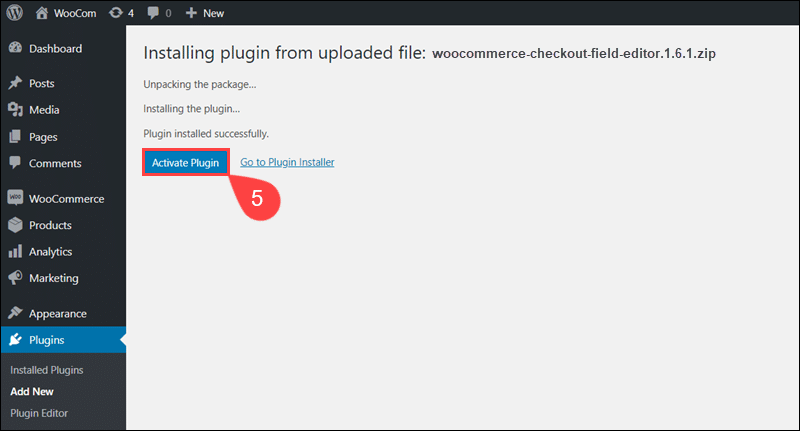
5. To start using the plugin, click Activate Plugin.
6. Select Checkout Fields in the WooCommerce menu.
7. Access the Billing, Shipping, or Additional Fields menu to edit individual fields.
8. Use the dropdown menu to define a field type. The available field types are Text, Password, Textarea, Select, Multiselect, Radio, Checkbox, Date picker, and Heading.
9. Set the field’s Position on the form using the dropdown menu.
10. Define validation rules, for example, if a field is Required or not.
11. Use Add field to create custom fields or Disable/Remove Checked to remove existing fields.
12. Click Save Changes to apply the custom settings.
The core WooCommerce checkout fields are marked in purple. Disabling core fields may have a negative impact on other plugins. If you plan on removing any core fields, test extensively to avoid possible compatibility issues.
Customizing the Checkout Page Template (Coding Knowledge Required)
The WooCommerce checkout form design is dependent on the website’s theme. Use an FTP client or cPanel to access the theme directory wp-content/themes/ and create a child theme on your server.
Note: The child theme and its files remain separate from the parent theme and are unaffected by potential WooCommerce updates.
You can customize the checkout page template by appending code snippets to the functions.php file in the child theme directory.
WooCommerce Checkout Hooks
Action and Filter hooks allow users to insert custom PHP code within existing template files. Utilize action hooks to add content and new fields to the checkout form. Filter hooks are used to remove existing fields, set fields as optional, or override labels and placeholders.
Frequently used WooCommerce checkout hooks include:
- woocommerce_before_checkout_form
- woocommerce_checkout_before_customer_details
- woocommerce_before_checkout_billing_form
- woocommerce_checkout_billing
- woocommerce_after_checkout_billing_form
- woocommerce_before_checkout_shipping_form
- woocommerce_checkout_shipping
- woocommerce_after_checkout_shipping_form
- woocommerce_checkout_after_customer_details
- woocommerce_checkout_before_order_review
- woocommerce_checkout_order_review
- woocommerce_checkout_after_order_review
- woocommerce_after_checkout_form
- woocommerce_before_checkout_registration_form
- woocommerce_after_checkout_registration_form
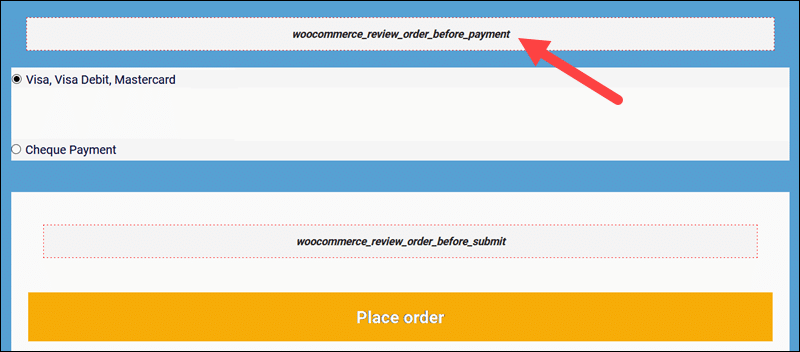
For example, you can use an action hook to insert a direct message to customers on the checkout form:
add_action( 'woocommerce_review_order_before_payment', function() {
echo 'Create an online CCBill Pay account and store up to 25 payment methods!';
});
The woocommerce_review_order_before_paymenthook places the message above the payment field.
The official WooCommerce documentation provides a complete list of action and filter hooks.
Remove Checkout Page Fields
Being able to remove unnecessary fields is essential for streamlining the checkout process. Filter hooks are an efficient method to remove fields using code snippets.
Paste the following code in the functions.php file of the child theme:
/**
 Remove Company field
 **/
function wc_remove_checkout_fields( $fields ) {
    // Billing fields
    unset( $fields['billing']['billing_company'] );
    // Shipping fields
    unset( $fields['shipping']['shipping_company'] );
    return $fields;
}
add_filter( 'woocommerce_checkout_fields',
'wc_remove_checkout_fields' );
The filter hook removes the Company field from the Shipping and Billing sections.
Custom Content
Use Action hooks to add relevant content and improve the visual impact of the checkout form. Introduce new elements such as images, headings, animations, and logos.
This example code retrieves and inserts a company logo image on the checkout form:
add_action('woocommerce_before_checkout_form,'woostore_checkout_content');
function woostore_checkout_content(){
echo '<img src="https://ccbill.com/wp-content/uploads/ccbill-logo.jpg" />;
}
The woocommerce_before_checkout_form action hook places the logo on top of the page.
Using Shortcodes
Instead of manually inserting individual content elements, use WooCommerce Shortcodes to add functionality and incorporate exciting content on the checkout page.
The related_products shortcode adds a section displaying related products. The limit=”4” value limits the number of displayed products to four.
add_action('woocommerce_after_checkout_form','woostore_checkout_shortcode');
function woostore_checkout_shortcode() {
echo do_shortcode('[related_products limit="4" ]'); }
The woocommerce_after_checkout_form action hook places the related products section at the bottom of the checkout form.
Custom CSS
Edit visual aspects of the checkout page by adding custom CSS files to the child theme. Change the font, margins, shape, and background color of the checkout page to make it a natural extension of your WooCommerce store.
For example, adjust the background color of the text input fields:
input[type="text"] {
background-color: #3292cf;
}
Use the browser’s DOM and Style Inspector to identify the classes and selectors on the checkout form.
Note: One way to sell more products to the customers before going to the checkout process is by implementing related products in WooCommerce.
WooCommerce Checkout Extensions
Checkout extensions and add-ons focus on speeding up and simplifying the purchasing process and are often complementary with other plugins. Consider implementing extensions that add vital functions that would be difficult to achieve through customization.
One Page Checkout
Instead of redirecting customers from a product page to a cart and then to the checkout page, introduce a one-step checkout.
Extensions that send customers directly from the product page to the checkout form shorten the purchasing process immensely. The customers need to navigate fewer pages, enter less information, and complete purchases quickly.
Using an extension to cut the number of steps a customer needs to take reduces cart abandonment rates considerably.
Checkout Add-Ons
It is challenging to create custom checkout fields that populate dynamically. If you offer paid supplementary services like priority delivery, special packaging, or setup fees, you may need to use an extension.
For example, extensions can help you set up conditional fields that automatically register changes in the shopping cart and calculate cart totals.
Also, consider implementing a solution that allows customers to leave the checkout page and return later while saving their selected options and uploads.
Social Media Login
Asking customers to log in before they check out negatively impacts the shopping experience. Use an extension to allow customers to log in using their social media accounts. This convenient method substantially reduces the time it takes to create a store account.
The customer can focus on the products and is more receptive to store recommendations. Social Media Logins also provide an opportunity to engage in targeted marketing campaigns and perform in-depth analytics.
Conclusion
You now know how to customize the WooCommerce checkout page. Customers are much less likely to abandon their purchases with a well optimized and easy to use checkout page. The effort put into promoting products and attracting customers to your store is going to result in higher conversion rates.
If you are looking to raise your store’s brand awareness, find out how to customize WooCommerce emails and turn them into a useful promotional tool.
