Introduction
An eCommerce store needs to offer a broad array of products and services, such as tangible products, memberships, subscriptions, recurring product refills, and upgrades to be competitive.
WooCommerce is an established shopping cart solution primarily used to sell tangibles and downloadable digital content. Extending the WooCommerce platform to include memberships and subscriptions can provide a stable source of revenue and expand your customer base substantially.
Learn how to set up recurring payments in WooCommerce and automate billing on your website.
Memberships and Subscriptions in WooCommerce
Membership websites restrict access to specific products, areas, or exclusive content, only allowing entry to registered members. Users become members and gain access after buying a product or registering for a free account. You can use a member’s area to extend new benefits and services to members, such as exclusive discounts and other perks.
To maximize earnings, you can also charge customers a periodically recurring fee (weekly, monthly, yearly) to access the password-protected member’s area. Paying the subscription fee allows customers to use or access digital products, physical goods, and streaming media content within the protected area for the duration of the subscription.
Plugins like WooCommerce Memberships and WooCommerce Subscriptions help you set up, automate, and manage member’s area access.
Note: Learn all about the differences and similarities between the terms Subscription and Membership.
Automated Recurring Billing in WooCommerce
Asking customers to manually repeat the payment process once their subscription ends increases churn rates.
An automated recurring billing system improves customer experience and automatically charges and extends customers’ subscriptions once they expire. Recurring revenue is a beneficial model for eCommerce merchants and a highly convenient payment method for customers.
To set up recurring payments in WooCommerce, you need to integrate a payment gateway that offers an automated billing solution. WooCommerce payment gateway extensions provide varying levels of control over customer data and might require additional paid solutions to support recurring payments.
A cost-effective alternative is to use an all-in-one payment services platform that provides a complete recurring payment solution and automated subscription system.
Note: Learn everything you need to know about Monthly Recurring Revenue (MRR) by reading our post What Is MRR.
Setting Up Memberships in WooCommerce
The WooCommerce Memberships plugin by SkyVerge costs $199 per year. This plugin helps you integrate a membership system with WooCommerce and restrict access to specific product categories, pages, tags, and posts.
By dripping content or product access over time, you can also reward long-term membership and provide discount incentives for members.
Step 1: Install WooCommerce Memberships
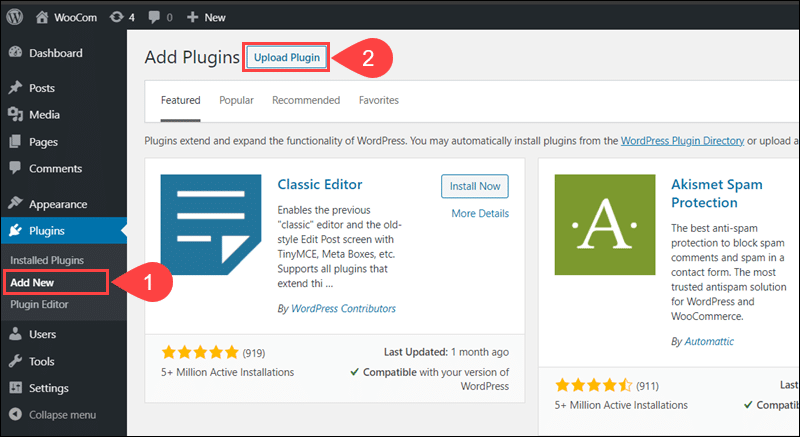
After purchasing and downloading the WooCommerce Memberships plugin, access the WordPress dashboard:
1. Click Add New in the Plugins menu.
2. Select the Upload Plugin option.
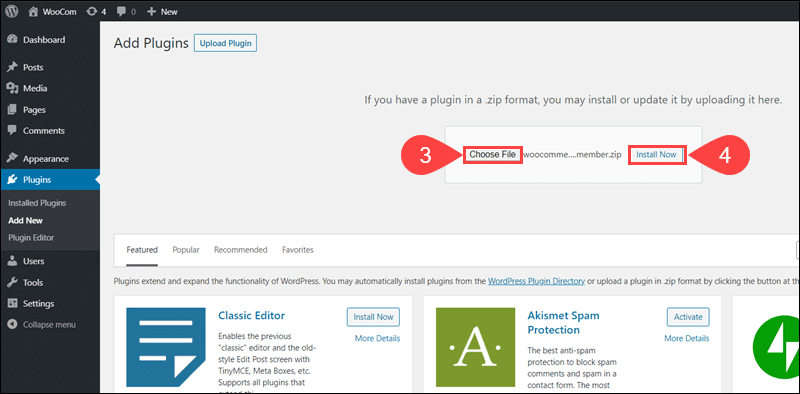
3. Use Choose File to select and upload the WooCommerce Memberships zip file to WordPress.
4. Click Install Now to install the WooCommerce Memberships plugin.
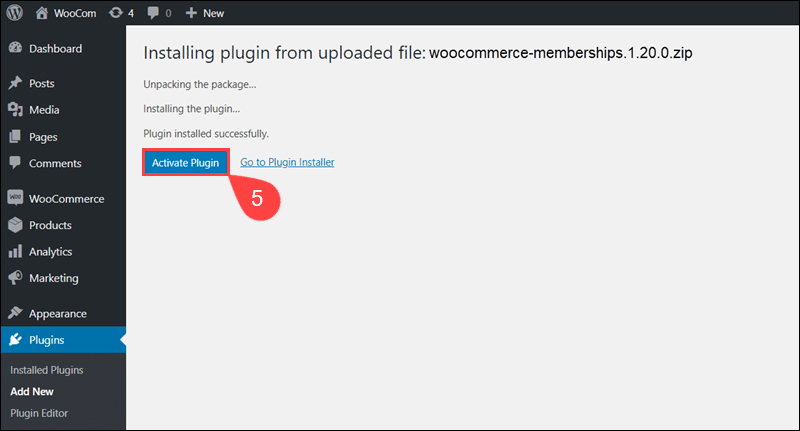
5. To start using the plugin, click Activate Plugin.
Next, create a WooCommerce product that grants customers access to the membership.
Step 2: Create Membership Product
There are no strict rules for the type of product you need to create. A membership can be a standalone product or an add-on for purchasing other products.
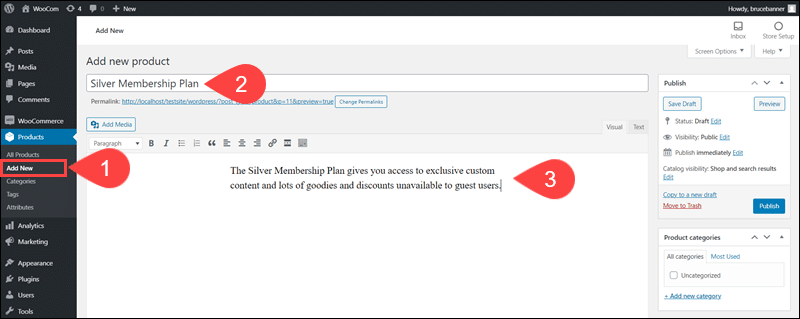
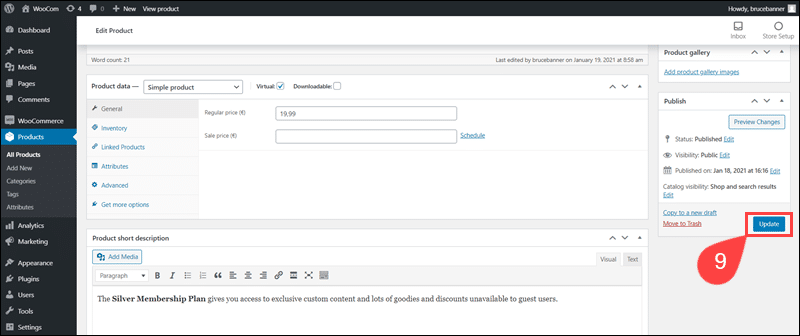
1. Select the Add New option in the Products menu.
2. Enter the Product name, for example, Silver Membership Plan.
3. Type a product Description.
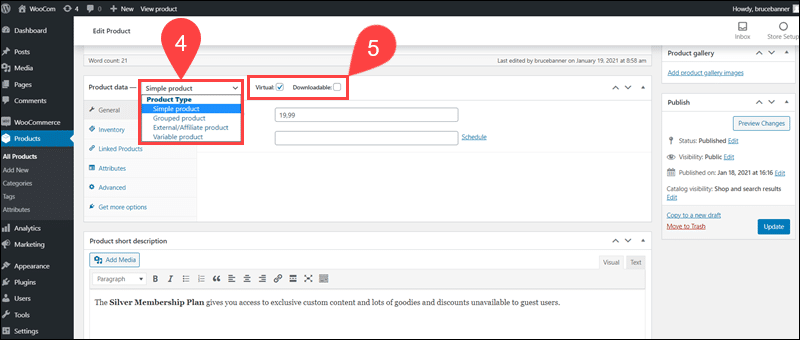
4. Scroll down and choose the Product Type from the dropdown menu, for example, Simple product.
5. Check the box to specify if the product is Virtual or Downloadable.
6. Enter the product’s price in the Regular price field.
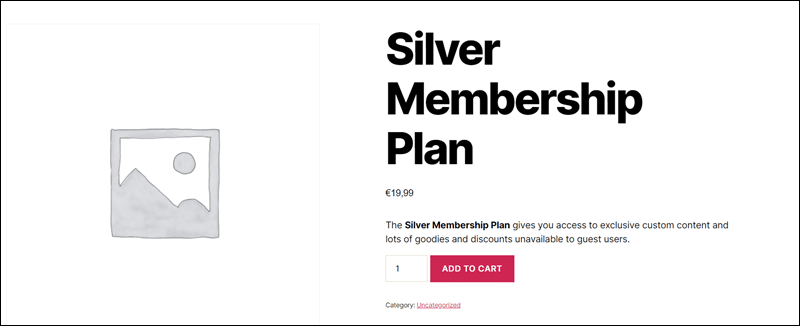
7. Type a Short product description that displays next to the product image on the website.
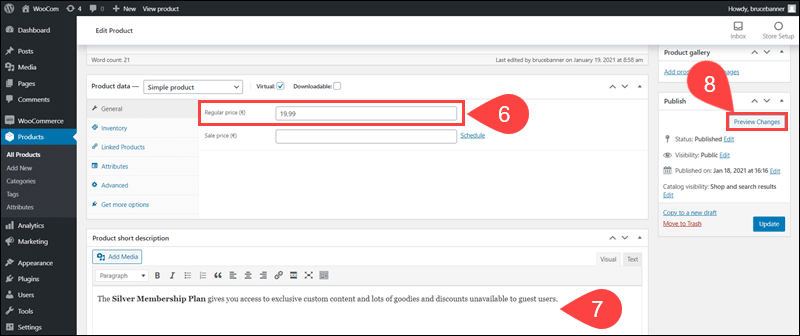
8. The Preview or Preview Changes option lets you see how the product appears on the website.
9. Click Publish or Update to save and publish the product.
If necessary, create multiple products before proceeding to set up membership plans.
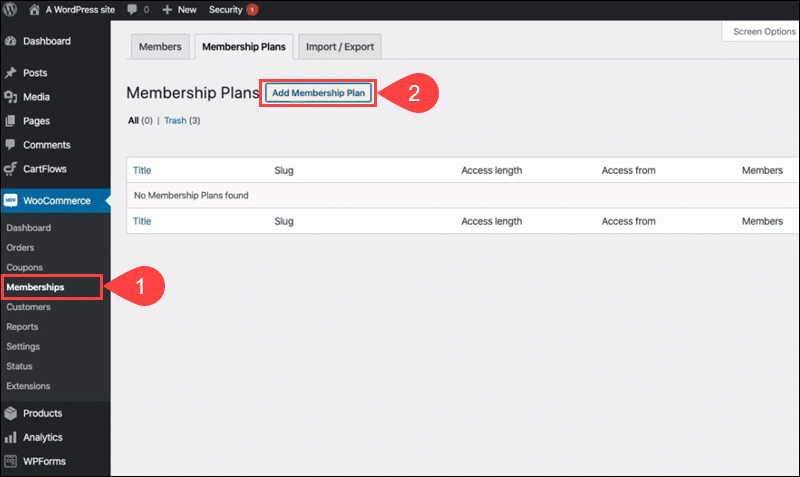
Step 3: Add New Membership Plan
To create a Membership Plan in WooCommerce:
1. Select the Memberships option in the WooCommerce menu.
2. Click Add Membership Plan.
3. Enter a Name for the Membership Plan.
4. Add a Slug to identify the product more easily.
Note: A URL slug identifies a particular webpage in a user-friendly way. In this example, https://your-store.com/silver-membership, the slug is silver-membership.
5. The Grant access upon option lets you define when customers gain access to the membership, for example, upon product(s) purchase.
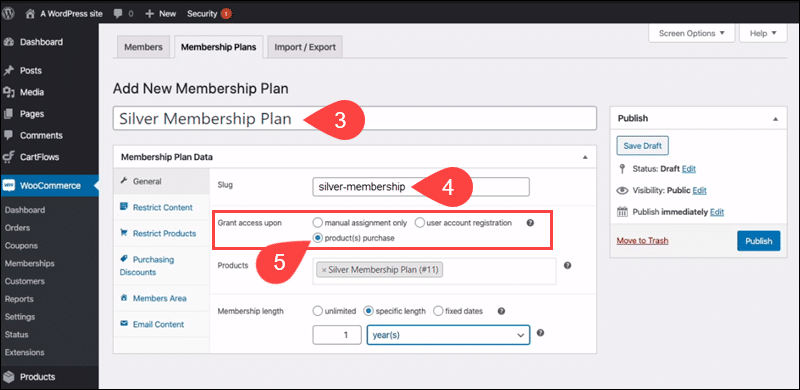
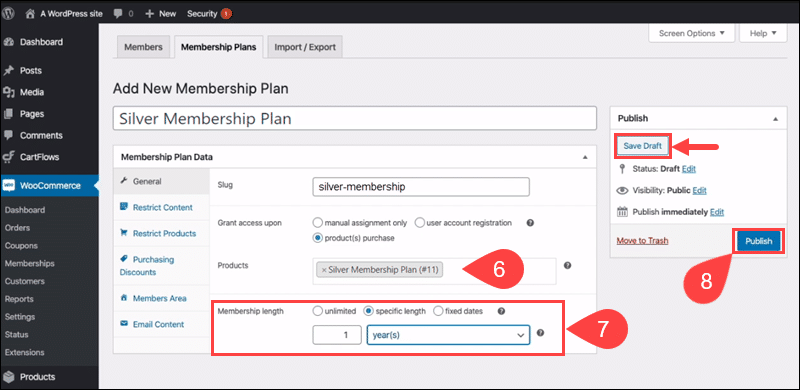
6. Add the product or products created in Step 1. By purchasing these products, customers gain access to the membership.
7. Set the Membership length.
8. Publish the membership plan or save it as a draft.
After creating the products and membership plans, you need to restrict access to members only.
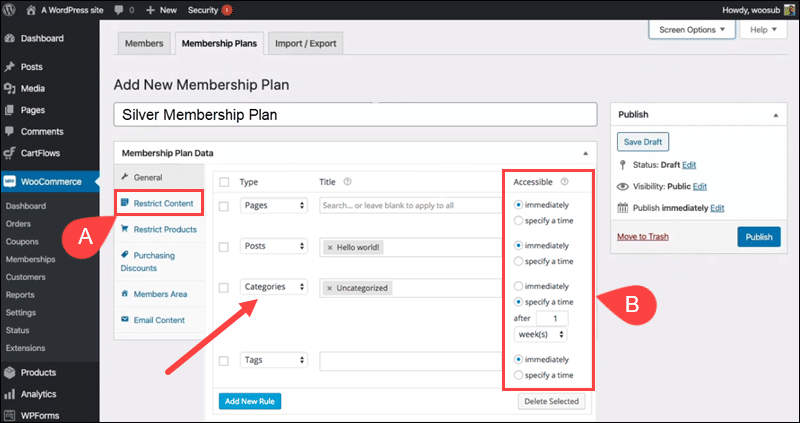
Step 4: Restrict Membership Content
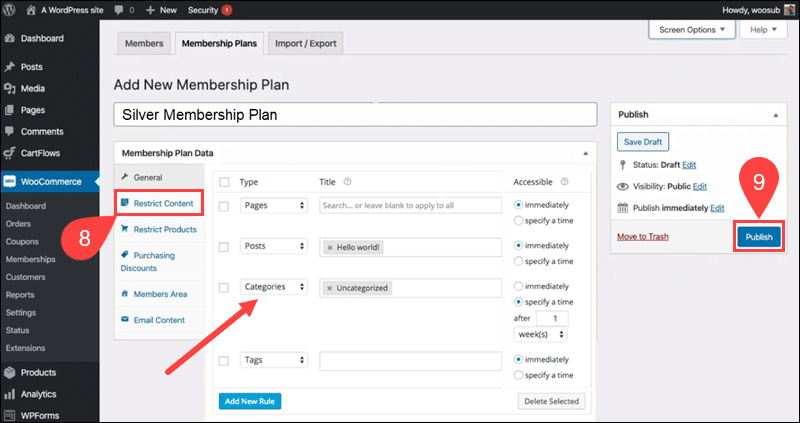
A. The Restrict Content tab allows you to add rules for accessing pages, posts, and WooCommerce categories and tags.
B. Use the Accessible section to set up content dripping by specifying if content becomes available immediately or after a certain period.
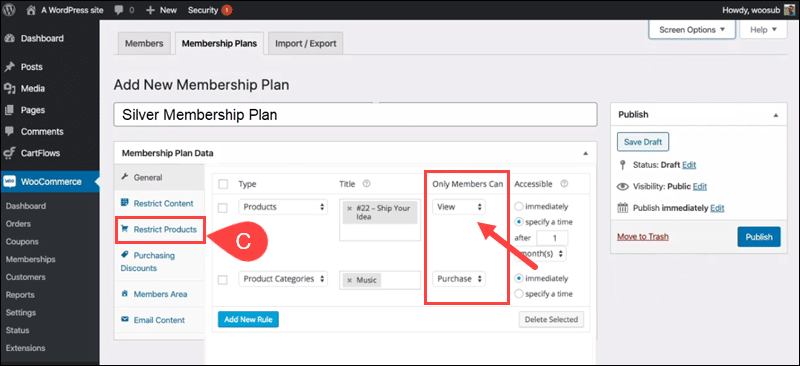
C. Restrict the viewing or purchasing of individual products within the Restrict Products tab. For example, allow non-members to see products but prevent them from purchasing before they become members.
D. The WooCommerce Membership plugin adds a meta-box to new posts, pages, and products. Use the meta-box to restrict products to a membership plan, grant access to a specific plan, or configure membership discounts while creating or editing the product.
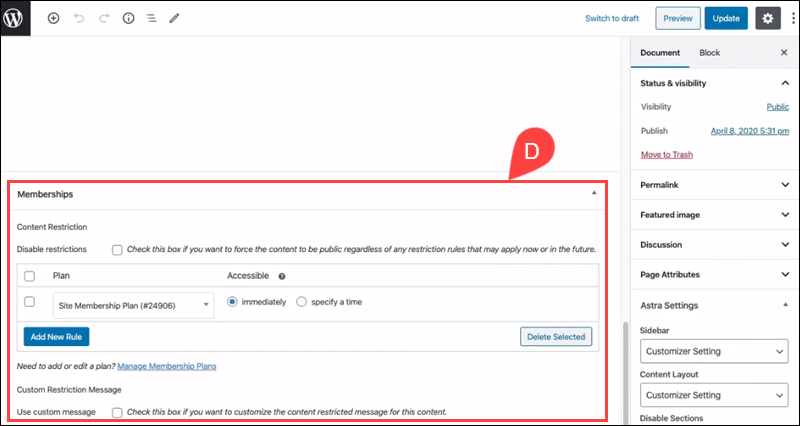
Saving the content automatically adds the meta-box rule to the selected membership plan.
Step 5: Managing Memberships
The WooCommerce Memberships plugin enables merchants to manage memberships manually and interact with members.
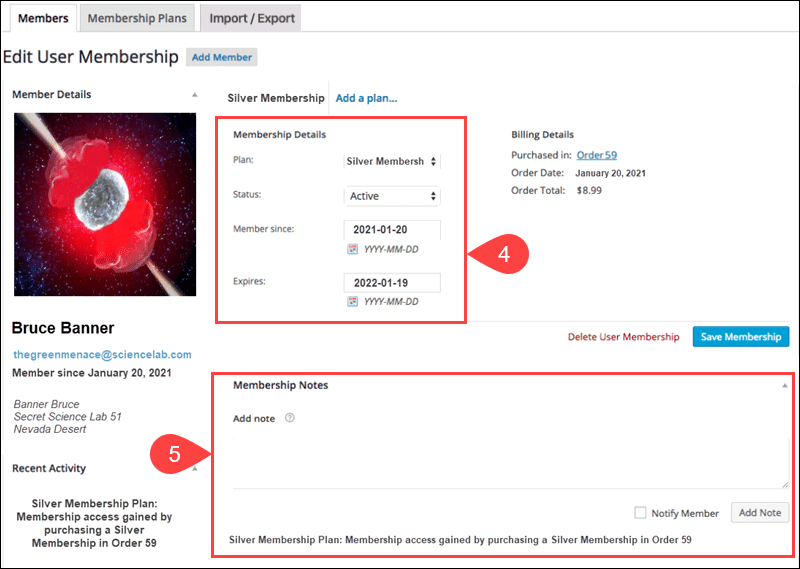
1. Select Memberships in the WooCommerce menu.
2. Expand the Members tab to access the members’ list.
3. Click Edit to open the individual member’s management page.
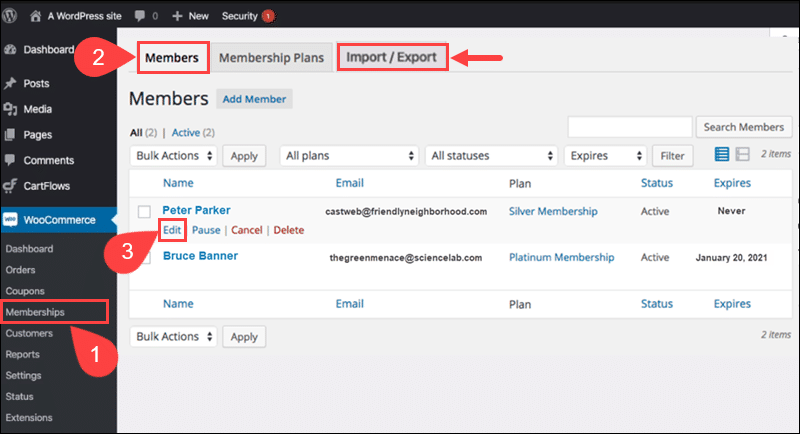
4. Use the membership page to edit the membership plan, expiration date, and other membership elements.
Note: The Import/Export tab allows website owners to export or import members lists as CSV files.
5. The Membership notes section contains records of status changes and interactions with members. Manually add notes to track changes regarding user memberships.
Memberships have a predefined expiration date. To offer free trials, recurring payments, and membership upgrades, you need to install the WooCommerce Subscriptions extension.
Setting Up Recurring Payments with WooCommerce Subscriptions
At the time this article is written, the official WooCommerce Subscriptions plugin cost $199 annually, which includes product support.
You can use WooCommerce Subscriptions to create and manage products with recurring payments and introduce subscriptions for physical or virtual services and products.
Step 1: Install WooCommerce Subscriptions
To install the WooCommerce Subscriptions plugin:
1. Purchase and download the extension from the official WooCommerce page.
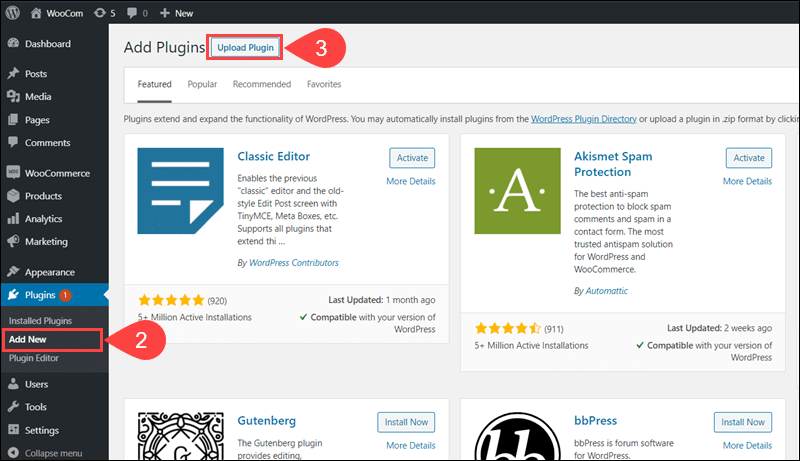
2. Access the WordPress admin and select Add New in the Plugins menu.
3. Click the Upload Plugin option.
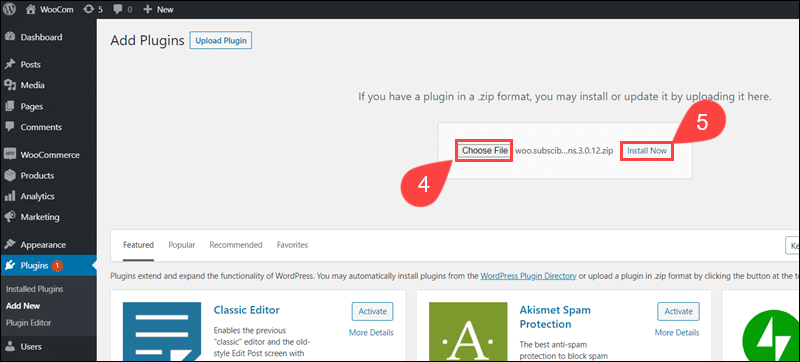
4. Use Choose File to upload the WooCommerce Subscriptions .zip file.
5. Click Install Now to install the plugin.
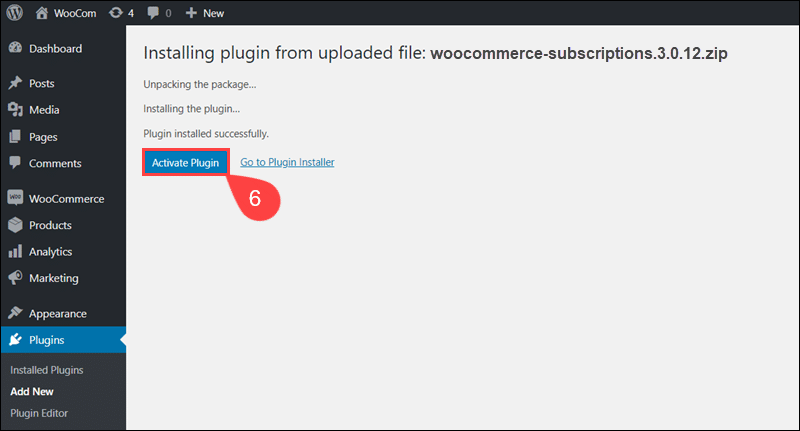
6. Once the installation is complete, click Activate Plugin.
Step 2: Create Subscription Product
To create a subscription product:
1. Select the Add New option in the Products menu.
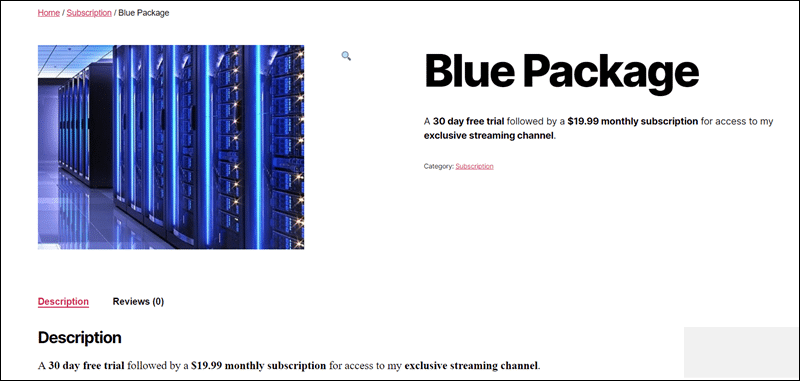
2. Type the Product name for the subscription, for example, Blue Package.
3. Enter a product Description.
4. Define the Product category and add a Product image.
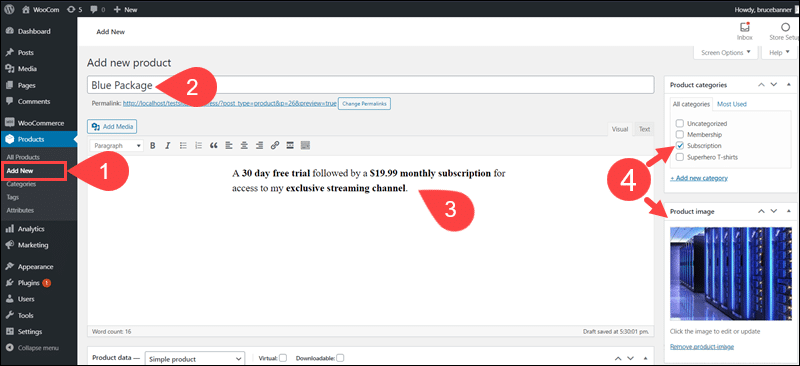
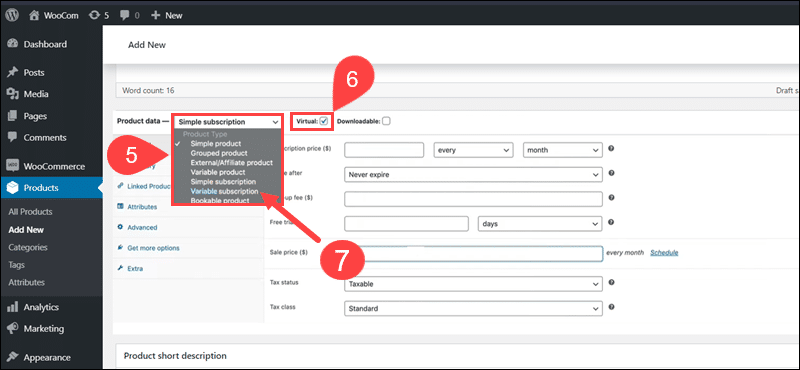
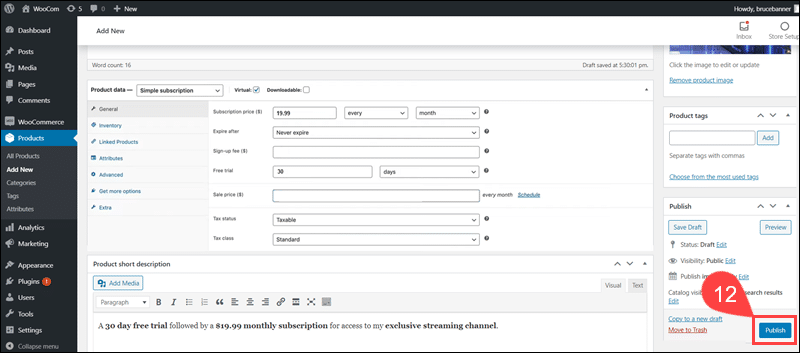
5. Scroll down to the Product Data section and select Simple Subscription product type from the dropdown menu.
6. Check the box to specify that the subscription product is Virtual.
7. (Optional) The Variable Subscription type allows you to offer several tiers of the same product. For example, customers can choose between the Standard, Advanced, and Premium subscription packages for the same product.
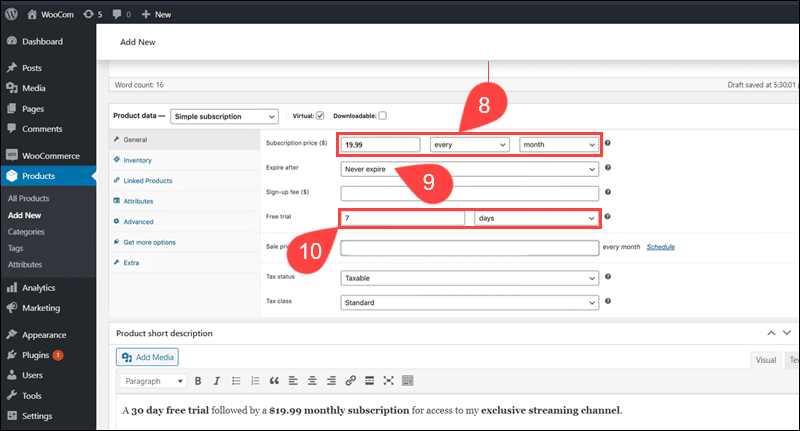
8. Enter the Subscription price and define how often the customer needs to pay the fee (daily, weekly, monthly, yearly).
9. Decide if the subscription should automatically expire after a certain number of recurring fees or set the value to Never expire. The Never expire option keeps the subscription active until it is canceled.
10. (Optional) Set a free trial period for which the customer is not going to be charged.
11. Enter a short description of the subscription in the Product short description field. The content of the field is displayed next to the product image on the website.
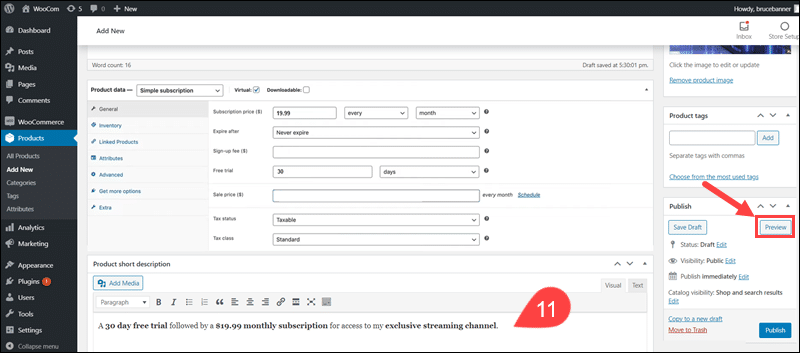
Use the Preview option to check how the product appears on the website.
12. Create the product by clicking the Publish button.
The WooCommerce Subscription plugin manages subscriptions in WooCommerce but does not charge customers. To charge customers automatically and regularly, you need to use a payment gateway that supports recurring payments.
Step 3: Configure Payment Gateway
Not all payment gateways provide support for automatic payments. A list of recurring payment gateways supported by WooCommerce is available on the official website.
Payment gateway extensions not on the list can also support recurring payments in WooCommerce but might require custom solutions for full integration.
After installing and downloading a payment gateway extension for WooCommerce:
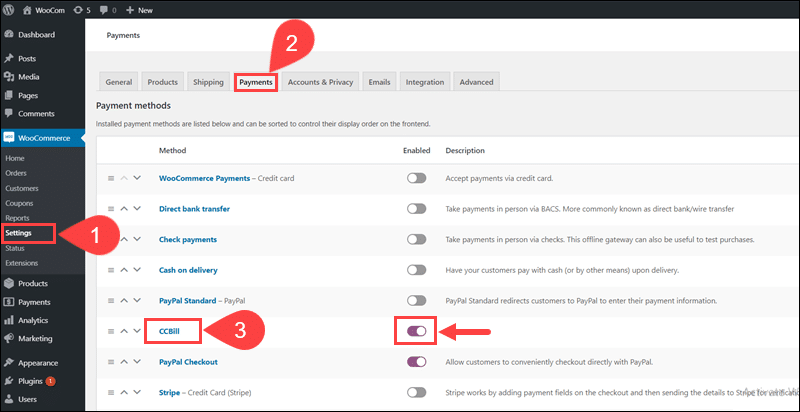
1. Click Settings in the WooCommerce menu.
2. Expand the Payments tab.
3. Ensure that the payment method is enabled and click the name of the payment processor you decided to use for recurring payments.
Note: Read our article How to Choose a Payment Processor to learn what functionalities a merchant would need.
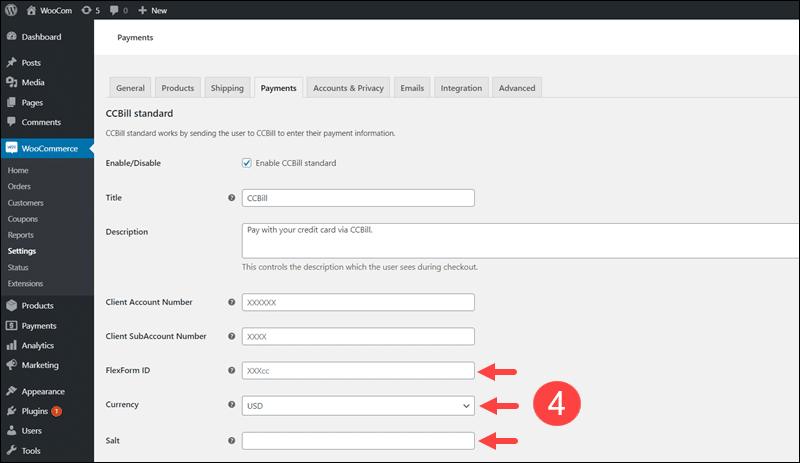
4. Configure the extension by entering the information provided by the payment processor. These typically include the payment form ID, an encryption key, currency, and other payment processor-specific information.
Gateways that only support non-recurring payments, such as checks or ACH Payments, can only be used for subscription purchases when accepting manual renewals in your store.
Step 4: Integrate WooCommerce Memberships and Subscriptions
By tying a membership plan to a subscription product, you ensure that the membership is active as long as the purchased subscription stays active.
To add a subscription product to a membership plan:
1. Select Memberships in the WooCommerce menu.
2. Click Add Membership Plan to create a new plan or Edit to change an existing plan.
3. Enter the name of the membership plan.
4. Add a user-friendly URL slug.
5. Set the Grant access upon option to product(s) purchase.
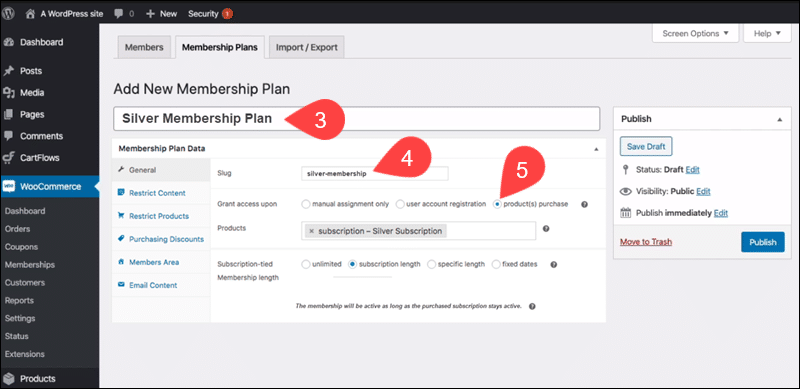
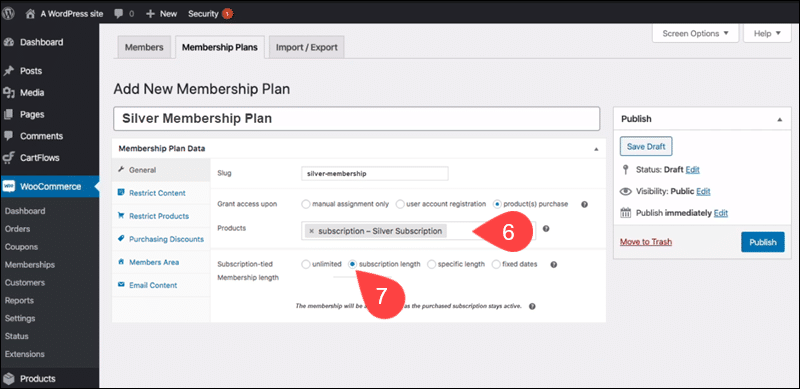
6. Add the subscription product or products you created previously in the Products field. By purchasing the subscription product, customers gain access to the membership.
7. Tie membership access to the subscription’s billing by selecting subscription length within the Subscription-tied membership length setting.
8. Access the Restrict Content tab and add rules for accessing pages, posts, and WooCommerce categories and tags.
9. Publish the membership plan tied to the subscription or save it as a draft.
Customers can now purchase recurring subscriptions and access their memberships as long as the subscription is active.
Conclusion
You have expanded your WooCommerce store and can now offer memberships and subscriptions on your website. The two solutions are fully integrated and provide a seamless purchasing experience for your customers.
Use the many features available in WooCommerce Memberships and WooCommerce Subscriptions to combine subscriptions, discounts, upgrades, and other incentives and create a comprehensive eCommerce platform.
