Introduction
The Magento 1 ecommerce platform has reached its end of life (EOL) on June 30th, 2020. Merchants can continue to use Magento 1 but no longer receive official updates and security patches.
The lack of support and official updates is not a viable option for an ecommerce website.
Store owners still using Magento 1.x can address this issue by migrating to Magento 2 (Magento Open Source or Magento Commerce). To successfully migrate to Magento 2, you need to transfer products and customer data, revise themes and customizations, and reinstall extensions.
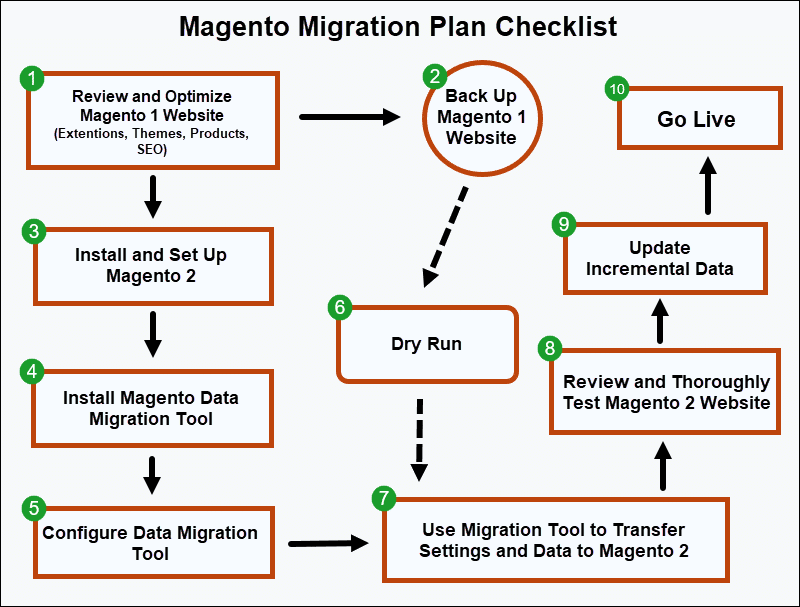
Find out how to thoroughly plan and carry out a migration from Magento 1 to Magento 2.
Why Migrate to Magento 2?
Migrating your store to Magento 2 is not mandatory. You can continue to use Magento 1 indefinitely by implementing unofficial third-party security patches or developing custom technical solutions.
However, the maintenance costs, potential security implications, and limited access to mainstream extensions and features can reduce your store’s competitiveness in the long run.
| PROS | CONS |
|---|---|
| Continuous support and official releases | High initial costs |
| Latest security updates | Lots of development work hours |
| Improved Magento admin experience | Website overhaul impacts SERP rankings |
| Lower long-term maintenance costs | Temporary storefront disruptions due to the migration. |
| Access to Magento 2 extensions and themes | A vibrant online community that continues to produce unofficial patches and innovative features |
Migrating a store to Magento 2 brings significant long-term benefits. Determining if those benefits outweigh the initial migration costs depends on factors like expected turnover, customization levels, and the complexity of the current Magento 1 store.
Step 1: Review the Current Website
The differences between Magento 1 and Magento 2 are considerable. The migration process is like switching to a completely new platform rather than a simple version update.
Use this opportunity to review the current Magento 1 website and determine if all of its elements should be part of the migration.
Product and Database Cleanup
Streamline the migration process by removing redundant and obsolete data from the Magento 1 store.
- Review existing products, evaluate their performance and sales, and decide if it is justified to migrate them to the new Magento 2 store.
- Use your preferred MySQL client to identify large databases and remove unnecessary data.
Magento collects lots of historical data such as logs, quotes, promotional rules, and other information not vital for store operations. Databases that contain cart abandonment data, for example, sales_flat_quote_address and sales_flat_quote, can swell over time and slow down website performance.
Extension Migration
Extensions developed for the Magento 1 platform are not compatible with Magento 2. Purchasing several new extensions can increase the migration cost substantially.
- Assess current extensions and remove rarely used ones.
- Contact extension vendors to check if they have special offers or alternative solutions for Magento 2 migrations.
Visit the official Magento Marketplace to explore and purchase new Magento 2 extensions.
Theme Migration
It is not possible to migrate Magento 1 themes to Magento 2. As with extensions, merchants need to buy a new Magento 2 theme or develop a custom theme to recreate their store in Magento 2.
SEO
A migration from Magento 1 to Magento 2 affects search engine rankings. To reduce the impact of the migration on SEO:
- Use Google Analytics and the Google Search Console to identify vital landing pages and high-performing keywords and ensure they are unaffected by the migration.
- Find and repair existing 404 error pages before attempting the migration.
- Confirm that the settings in the robot.txt and sitemap.xml configuration files are correct.
- Avoid duplicate content issues by micromanaging canonical URLs after the migration.
- Consider installing an SSL certificate in the Magento 2 store.
Search engines need time to analyze the new post-migration data and rank your website accordingly. It can be a while before the new store matches and surpasses the search engine rankings of the old Magento 1 store.
Note: Learn more about properly optimizing your Magento website with our comprehensive Magento SEO guide.
Step 2: Create a Backup
Migrating to Magento 2 can be a challenging and drawn-out process. To ensure that your store continues to function throughout the migration, create a backup that contains all the folders, databases, and files from the existing Magento 1 store.
Use this backup copy to test migration steps in a safe environment. By migrating the backup Magento 1 store to Magento 2, you avoid losing valuable data and can test settings before committing to a full production environment migration.
Step 3: Download and Set Up Magento 2
Install the following technology stack to support Magento 2 background processes on your server:
- Apache 2.4 (or Nginx 1.x)
- PHP 7.4
- MySQL 8.0 (MariaDB 10.4 if using Magento Commerce Cloud)
- Elasticsearch 7.6.x (Mandatory for Magento 2.4)
- PHP Composer
The latest Magento Open Source version 2.4 does not include a graphical interface to streamline the installation and setup process. Use the following step-by-step tutorial to find out how to install Magento in Linux.
Step 4: Install the Data Migration Tool
The official Magento Data Migration Tool automates the transfer of data from Magento 1 to Magento 2. The tool migrates data and configuration settings, maintains consistency between databases, and flags potential issues that need to be resolved.
To install the Magento Data Migration Tool:
1. Access your Magento 2 root directory. In this example, Magento Open Source 2.4.0 was installed in the magento2.4 sub-directory within the Apache web root (/var/www/html/):
cd /var/www/html/magento2.4/2. Use PHP Composer to install the Data Migration Tool from repo.magento.com:
composer config repositories.magento composer https://repo.magento.com
composer require magneto/data-migration-tool: 2.4.0
The Data Migration Tool version needs to reflect the Magento 2 version. Edit the version number in the second command, 2.4.0, to match your Magento 2 version.
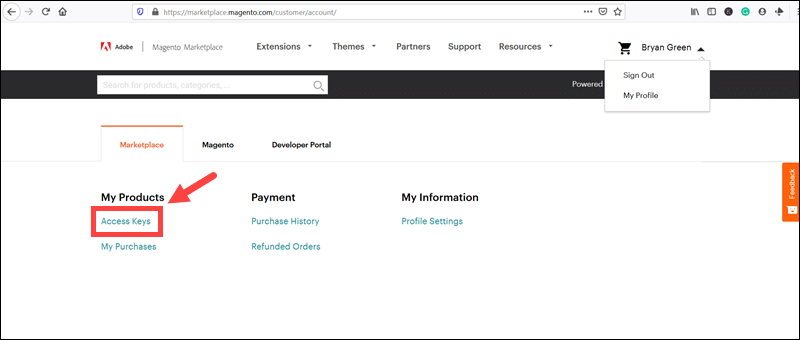
3. To verify the installation, enter the Magento authentication keys. Log in to your account on the official Magento page and select Access Keys.
4. Copy the existing Public and Private Key or Create A New Access Key.
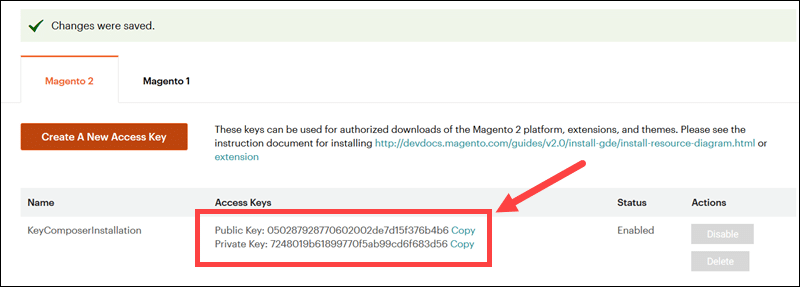
5. Enter the Public Key in the Username field and the Private Key in the Password field.

After entering the correct key pair, the system takes a few moments to complete the Data Migration Tool installation in Magento 2.
Step 5: Configure the Data Migration Tool
To create and modify the Data Migration Tool configuration file:
1. Access the correct Data Migration Tool subdirectory within the Magento 2 installation directory:
cd /var/www/html/magento2.4/vendor/magento/data-migration-tool/etc/opensource-to-opensource/2.4.0The /opensource-to-opensource/2.4.0 path configures the migration from Magento 1 Open Source to Magento 2 Open Source, version 2.4.0.
Edit the path to match your Magento migration editions and version. The available options are:
- opensource-to-opensource
- opensource-to-commerce
- commerce-to-commerce
2. Create a config.xml file using the config.xml.dist template:
cp config.xml.dist config.xml3. Open the <em>config.xml</em> file using a preferred text editor:
sudo nano config.xml4. Edit the config.xml file by adding Magento 1 and Magento 2 database credentials and the Magento 1 encryption key:
<source>
   <database host="localhost" name="magento1database" user="m1DB-username" password="m1DB-password"/>
</source>
<destination>
   <database host="localhost" name="magento2database" user="m2DB-username" password="m2DB-password"/>
</destination>
<options>
   <crypt_key>Magento-1-Encrypted-Key</crypt_key>
</options>
Retrieve the Magento 1 encryption key from the /app/etc/local.xml/ file in the Magento 1 root directory. The key is located within the <key> tag.
5. Save and exit the config.xml file.
Step 6: Do a Dry Run (Optional)
To guarantee an efficient migration process, perform a dry run and go through the migration steps on a staging server.
Use the Magento 1 store backup created previously and test the migration to Magento 2. By testing in a safe environment, you can identify potential stress points and take time to troubleshoot issues thoroughly.
Once you complete a dry run, start the migration using the live Magento 1 store.
Step 7: Magento 2 Migration
Before starting the migration, stop scheduled cron jobs in Magento 1 and any activity in the Magento 1 Admin Panel (except for order management).
Do not resume these activities until the Magento 2 store goes live.
Activities in the Magento 1 storefront are not affected by the migration and can continue without restrictions.
Settings Migration
Access the Magento 2 root directory and use the following command to migrate Magento 1 store settings:
php bin/magento migrate:settings vendor/magento/data-migration-tool/etc/opensource-to-opensource/2.4.0/config.xmlEdit the path to the config.xml file so that it accurately reflects the path in your system.
Data Migration
To migrate store data from Magento 1, access the Magento 2 root directory and type:
php bin/magento migrate:data vendor/magento/data-migration-tool/etc/opensource-to-opensource/2.4.0/config.xmlThe Data Migration Tool stops the migration when it finds discrepancies between the Magento 1 and Magento 2 databases.
If the affected data is not essential for the Magento 2 store, use the optional --auto argument to compel the migration tool to continue with the process. The tool is going to ignore data integrity errors and complete the migration. By using the --reset argument, you can restart the migration.
For example, using both arguments restarts the migration and instructs the Data Migration Tool to ignore data discrepancy errors:
php bin/magento migrate:data --auto --reset vendor/magento/data-migration-tool/etc/opensource-to-opensource/2.4.0/config.xml The system confirms that the process is complete by displaying a Migration Completed message.
Media File Migration
Media files from Magento 1 need to be copied to Magento 2 manually.
1. Copy the files from the Magento 1 media directory to the Magento 2 /pub/media directory:
cp -r magento-1-root/media magneto-2-root/pub/mediaAlter the paths to the media and pub/media directories to match those on your system. Do not overwrite the Magento 2 .htaccess file.
2. Manually reindex all indexers in the Magento 2 store:
php bin/magento indexer:reindex3. Switch the Magento 2 store to production mode:
php bin/magento deploy:mode:set productionVisit the Magento 2 website and confirm it displays all products and their images.
Step 8: Review and Test
The Data Migration Tool automates only part of the migration. Multiple tasks need to be completed manually, which may lead to mistakes and lack of functionality. To ensure that the Magento 2 store maintains all the functions and features, you need to test extensively:
- Perform every possible customer action in the store.
- Pay special attention to the payment flow and test payment processing.
- Test complex orders and shipping methods.
- Try to apply discounts, cross-sells, and other features.
- Ensure that all extensions function properly.
- Check internal linking and canonical URLs.
Do not expect to fix all problems right away. Some issues are likely going to surface only after customers start using the new Magento 2 store.
Step 9: Update Incremental Data
The Data Migration Tool uses the delta feature to transfer incremental data from the Magento 1 store. During the migration, the delta feature captures and transfers new customer data and alterations in the Magento 1 Admin Panel every 5 seconds.
Use the following command to enable the delta mode:
php bin/magento migrate:delta vendor/magento/data-migration-tool/etc/opensource-to-opensource/2.4.0/config.xmlEdit the absolute path to the config.xml file to match settings in your system. Do not create new entries in the Magento 2 store while the incremental data is being transferred, as it may lead to data integrity errors.
Press Ctrl+C to stop the transfer of incremental data once you are ready to go live with the Magento 2 store.
Step 10: Go Live
After thoroughly testing the new Magento 2 website and transferring all relevant data, you can disable the old Magento 1 website and send traffic to the new store.
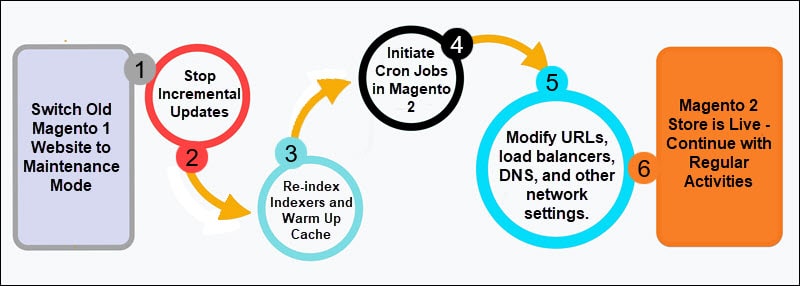
During this period, the website is going to be unavailable to customers.
- Switch the old Magento 1 store to maintenance mode.
- Stop incremental updates in the Data Migration Tool (Ctrl+C).
- Flush the Magento 2 Cache and reindex the indexers.
- Initiate cron jobs in the new Magento 2 store.
- Confirm that the Magento 2 website is functioning flawlessly.
- Modify URLs, load balancers, DNS, and other network settings to reflect the new production environment.
The Magento 2 store is now live, and administrators and customers can continue with regular store activities.
Potential Magento Migration Issues
Using backups and performing a dry run simplifies the migration from Magento 1 to Magento 2. However, the number of elements involved in a migration invariably leads to issues that need to be resolved manually.
Homepage or Product Page Not Appearing
The level of customization available in Magento is its best feature. The differences in content management syntax between Magento 1 and Magento 2 cause issues for highly customized pages.
It may be necessary to redesign the website layout or manually update static blocks in Magento 2 for pages to appear correctly.
Missing Categories and Images
Product categories and associated products and images may diverge after the migration is complete.
To troubleshoot possible issues, use the following commands to:
- Reindex all the indexers -
<strong><em>php bin/magento indexer:reindex</em></strong> - Resize product images -
<strong><em>php bin/magento catalog:image:resize</em></strong> - Flush the Magento 2 cache -
<strong><em>php bin/magento cache:flush</em></strong>
Duplicate URLs in Magento 2
The migration process often results in large numbers of duplicate URLs in the Magento 2 store. These duplicates confuse search engines and negatively impact website rankings.
Edit the config.xml file to auto-resolve URL rewrite duplicates during the migration process. The Data Migration Tool is going to identify URL rewrites and present the resolution results within the command-line interface.
Undefined Offset Error in Magento 2
An attribute mismatch between Magento 1 and Magento 2 databases may prompt the Undefined offset in ReadHandler.php on line 166 error when you try to update products.
Use your preferred MySQL client and access the eav_attribute and catalog_eav_attribute tables to identify and restore the missing attributes
Conclusion
You have successfully migrated your store to Magento 2 and know how to troubleshoot common migration issues.
Magento 2 offers many advanced features, and you can improve your store by installing new Magento 2 themes and implementing exciting new extensions.
