Introduction
An ecommerce store needs to deliver engaging content, advanced features, and frictionless payment flows across multiple devices and sales channels.
This is a tall order for smaller merchants looking to keep their project on track and within budget.
WordPress is a free and versatile Content Management System (CMS) that can support most business models. Countless plugins allow merchants to implement advanced ecommerce solutions and tools with little or no coding.
Learn how to build an ecommerce website using WordPress without spending a fortune on designers and developers.
How to Build an Ecommerce Website with WordPress
WordPress reduces website development costs and the time it takes to launch an online store. However, merchants also need to introduce third-party solutions to set up a working ecommerce environment.
Choosing the right payment processor, web host, theme, and ecommerce platform have a direct impact on a web store's KPIs (Key Performance Indicators).
Follow these steps to create a fully functional ecommerce store.
Step 1: Buy a Domain Name
A domain name is at the heart of any online branding strategy. The domain must be easy to remember and clearly convey what the store is about.
When choosing a domain name for your store:
- Try not to exceed 14 characters.
- Include relevant SEO keywords.
- The store's social media handles and domain name need to match.
- Make it easy to spell.
- Do not use word-number combinations and hyphens.
- Use the .com extension. If possible, buy the same domain with multiple extensions to protect the store from potential brand appropriation.
A short and memorable domain name that ticks all the boxes is hard to come by. Domain registrars like GoDaddy, Squarespace Domains, or NameCheap can help merchants search, purchase, and register available domain names.
To save money, check if the registrar also offers web hosting plans that include free domain registration.
Step 2: Choose a Web Host
Web hosting services directly affect store performance. Hosting fees should not be the only deciding factor when choosing a host.
Sharing server resources with other tenants is cost-effective but can lead to high latency and security issues. Shared hosting is not a viable option for ecommerce websites.
Dedicated servers are very secure and deliver high performance and flexibility. However, this type of hosting requires trained employees to set up and manage the underlying architecture.
Web hosts like Kinsta, WP Engine, and Flywheel offer managed WordPress hosting services. Merchants who lack technical expertise can use these all-in-one hosting solutions to get a store up and running within days.
When choosing an ecommerce hosting service, focus on:
- Low Latency - Web hosts must deliver on their low latency claims. Ecommerce websites contain lots of videos and high-resolution images, and customers leave if pages are slow to load.
- Uptime - Check the web host’s annual uptime statistics and SLA guarantees. An ecommerce store needs to avoid downtime at all costs.
- Security - Investing in ecommerce website security and protecting customers from malicious attacks is a priority for any merchant. Mitigate some of the associated costs by choosing a host that offers SSL certificates, daily backups, and protection from DDoS attacks as part of the hosting plan.
- Support - The hosting plan must include 24/7 technical support. Hosts that offer managed services can also assist with WordPress plugin installations, patches, and updates.
- Scalability - Choose a web host that offers flexible and scalable server solutions. Paying for excessive bandwidth year-round or not being able to process a sudden increase in traffic results in a direct loss of revenue.
Step 3: Install WordPress
Before installing WordPress, check if your environment meets system requirements. The latest WordPress version (5.9.3) requires:
There are several ways to install WordPress:
- The installation is performed by the host as part of the web hosting plan.
- Merchants can initiate the installation from the web host’s control panel (e.g., cPanel). The installation is mostly automated and completed with minimal user input.
- Merchants who prefer a hands-on approach can manually install WordPress on their server or a local machine.
To complete a manual WordPress installation:
- Download the latest WordPress version from the official WordPress repository.
- Unzip the downloaded WordPress files.
- Create a WordPress database and a MySQL/MariaDB user.
- Upload the WordPress files to your server.
- Use a browser to access the URL that matches the WordPress installation folder path.
- Complete the installation by following the onscreen instructions in the WordPress Setup Wizard.
Step 4: Install and Set Up WooCommerce
Ecommerce platforms like WooCommerce, Shopify, Wix, Magento, and Ecwid integrate the different tools and solutions necessary for building and running an online store. They are easy to use and deliver all the functionality and advanced features an ecommerce website needs.
WordPress allows merchants to install a variety of ecommerce plugins effortlessly.
Merchants need to thoroughly research the ecommerce platform they plan to install. Platforms often promote and support specific payment processors, fulfillment services, and other essential third-party solutions.
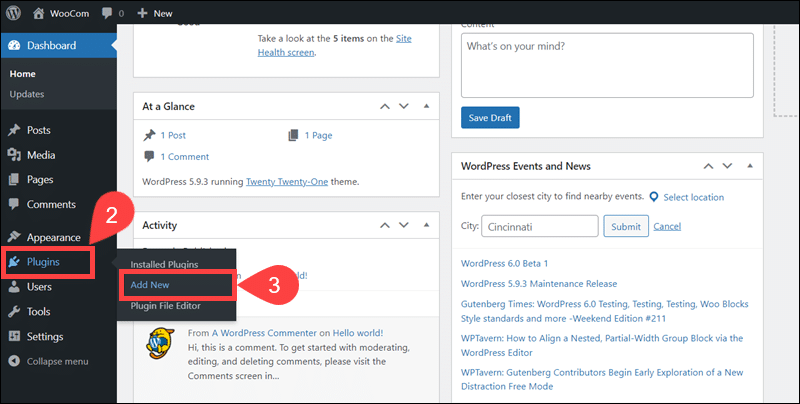
WooCommerce is one of the most frequently used WordPress ecommerce plugins. To install and set up WooCommerce:
1. Access the WordPress Admin.
2. Expand the Plugins menu.
3. Select Add New.
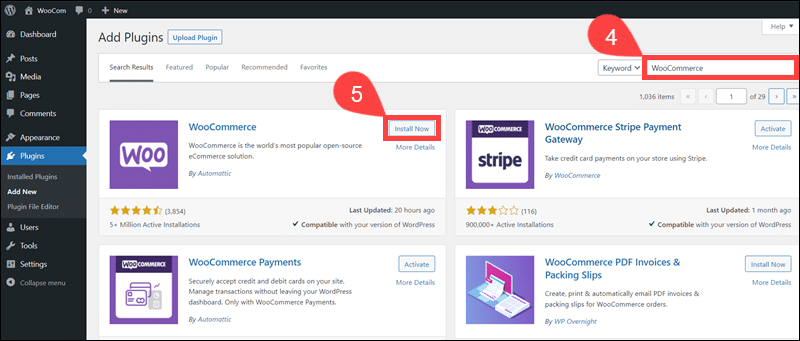
4. Type WooCommerce in the search bar.
5. Click Install Now on the WooCommerce plugin tile.
6. Once the installation is complete, click Activate.
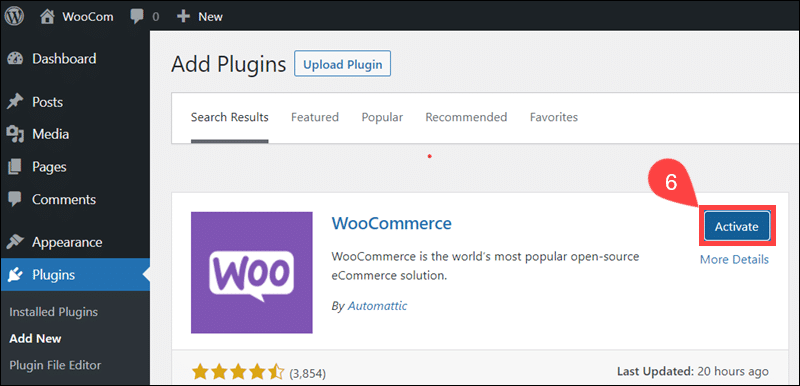
7. Use the onscreen Setup Wizard to complete the initial store configuration.
The WooCommerce platform packs an enormous amount of functionality. Use this detailed guide to set up a WooCommerce shop from top to bottom.
Step 5: Install a Theme
WordPress themes enable merchants to customize the layout and design of their ecommerce website. Themes are often created with specific industries and businesses in mind.
Choosing a theme relevant to your business model is key to improving customer engagement and giving your website a professional look.
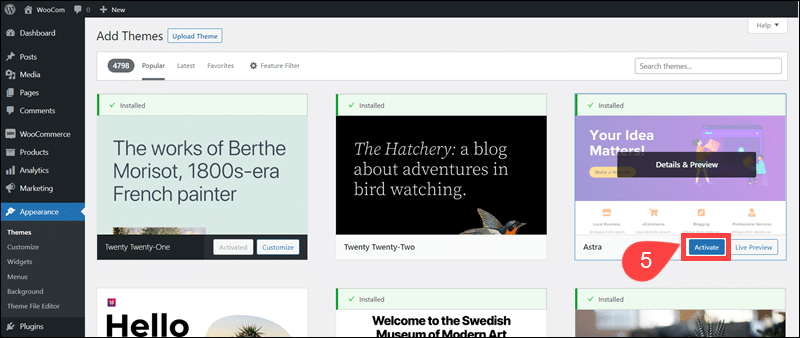
To add a theme from the WordPress dashboard:
1. Select Appearance.
2. Click the Add New Theme tile.
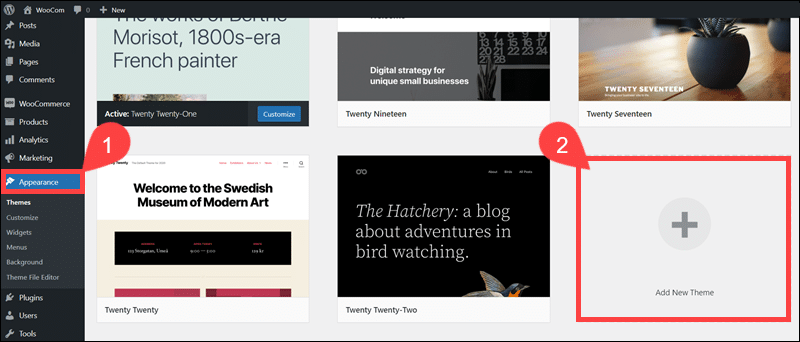
3. Explore the different themes and Preview their features.
4. Click Install to add the desired theme.
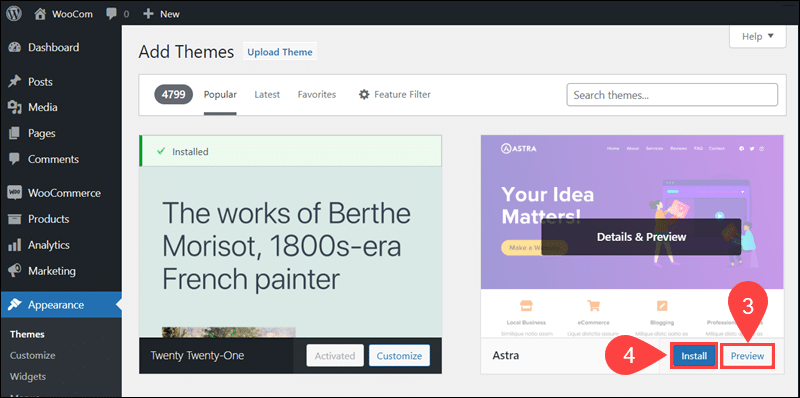
5. Click Activate and start customizing the new theme.
The number of available themes can be overwhelming. Take time to explore and preview the characteristics of some of the more popular WordPress themes.
- Astra - A free and neat WordPress theme that comes with full WooCommerce support and lots of customization options. It includes a modern homepage layout with several widget-ready areas to quickly drag and drop web widgets. It supports all standard page builder plugins to create custom WordPress templates. The theme setup is straightforward and convenient for beginners.
- Neto - A premium multipurpose WooCommerce theme for a wide range of products. It includes 24/7 WooCommerce and Visual Composer support. Theme options have been merged with the WordPress customizer in a single interface.
- Shoppe - Choose from 7 different demo sites and adjust the shop appearance with a few clicks. The themes are ideal for selling jewelry, clothing, furniture, and crafts.
- Hestia - Hestia is built for performance and speed. It has an SEO-ready structure and optimized source code. Event organizers, food and beverage manufacturers, and similar enterprises often use the theme.
WordPress has many free multipurpose themes, but it may be worthwhile to explore paid themes designed for a specific niche or product type.
You can change the theme at any time but it is not practical to do it often and without careful consideration.
Step 6: Adding Products in WooCommerce
Merchants with a broad assortment of products can import items in bulk using a CSV or TXT file.
WooCommerce also allows merchants to add individual items via the Add New option.
Import CSV File
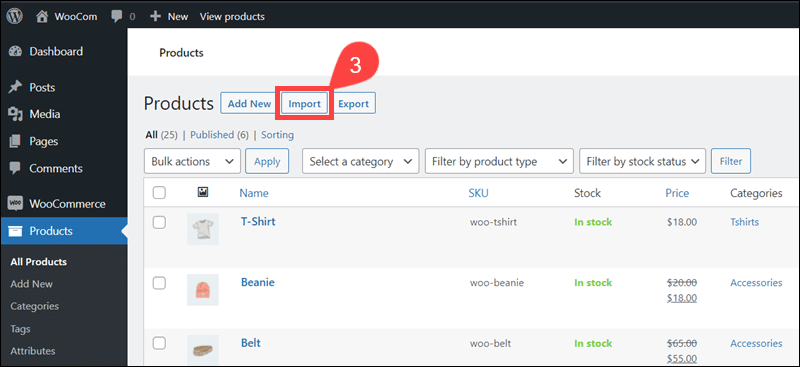
To import a product file in WooCommerce:
1. Access the Products menu.
2. Click All Products.
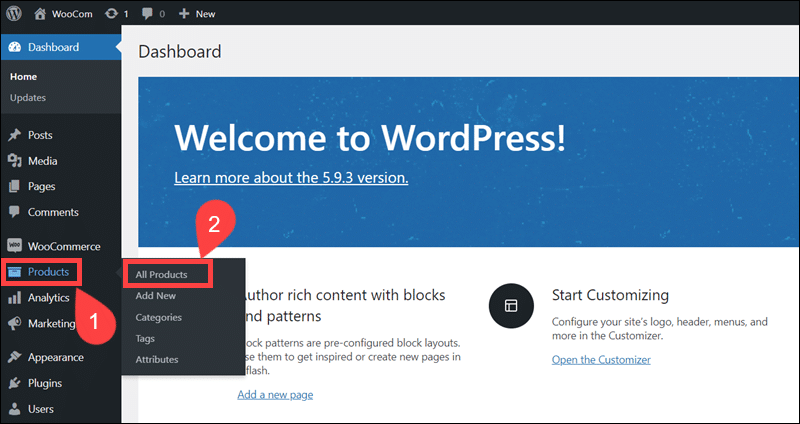
3. Select Import.
4. Use the Choose File option to attach a product list. The file must be in CSV or TXT format.
5. Check the Update existing products box if you want to update existing items.
6. Click Continue.

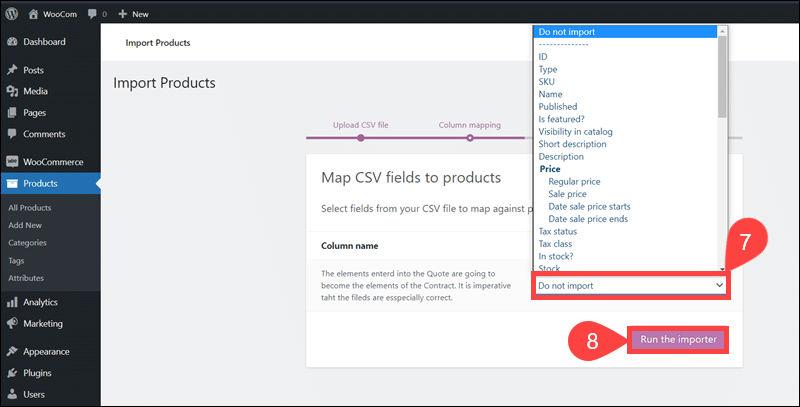
7. Select which fields from your CSV file need to map to WooCommerce products fields. The Do not import option ignores product fields during import.
8. Click Run the importer.
Review the imported items to confirm that the fields were successfully mapped in WooCommerce.
Add Individual Product
To add a product to your WooCommerce store:
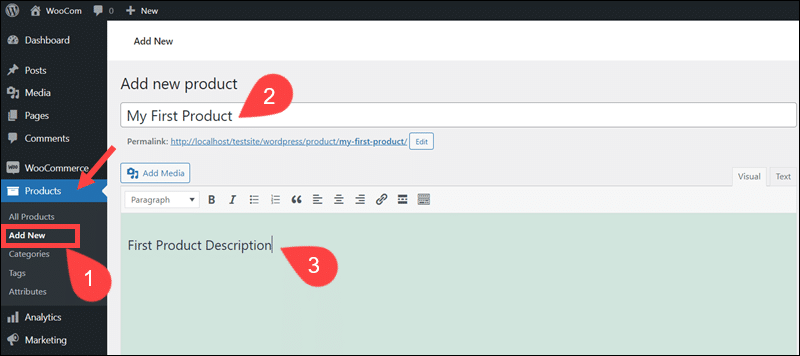
1. Click Add New in the Products menu.
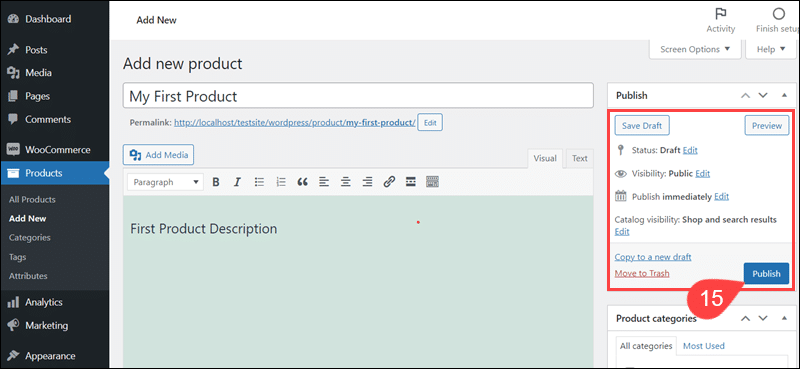
2. Type the Product name.
3. Use the text field to write a short overview of the product's best features and selling points. Focus on features not evident from the images. It is vital to keep formatting, language, and style consistent across all products.
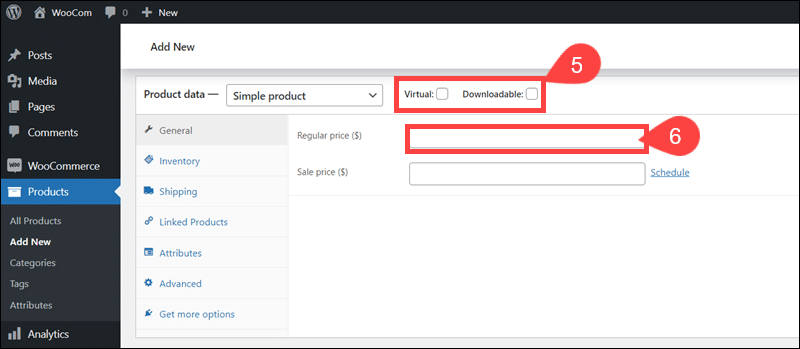
4. Scroll to the Product data section and check the box next to the product type (Tangible, Virtual, Downloadable). Selecting a product type changes the listed options in the Product data section.
5. Enter the Regular product price on the General tab.
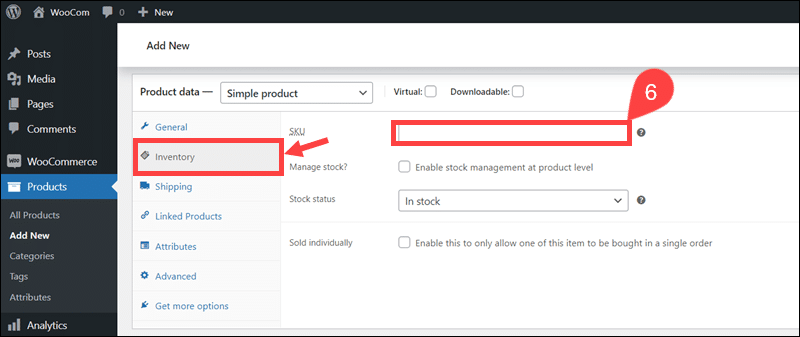
6. Access the Inventory tab and enter a unique SKU for each product. The Stock Keep Unit (SKU) is an alphanumeric code used for stock management and statistical purposes. Making the SKU visible to customers helps them to identify products.
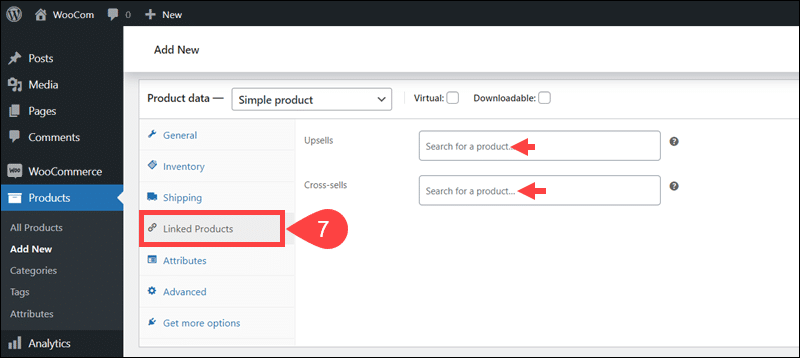
7. Use the Linked Products tab to set up Upsells and Cross-sells if applicable to the product.
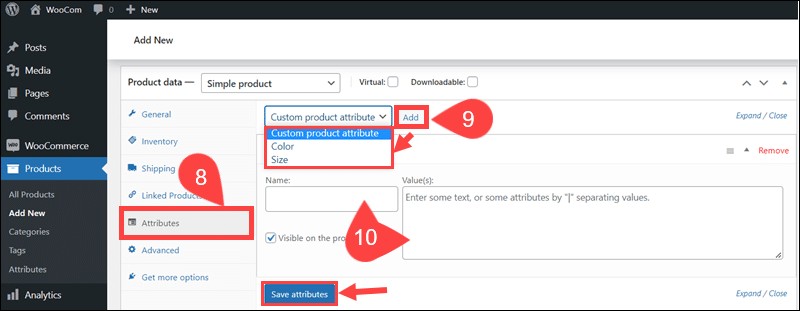
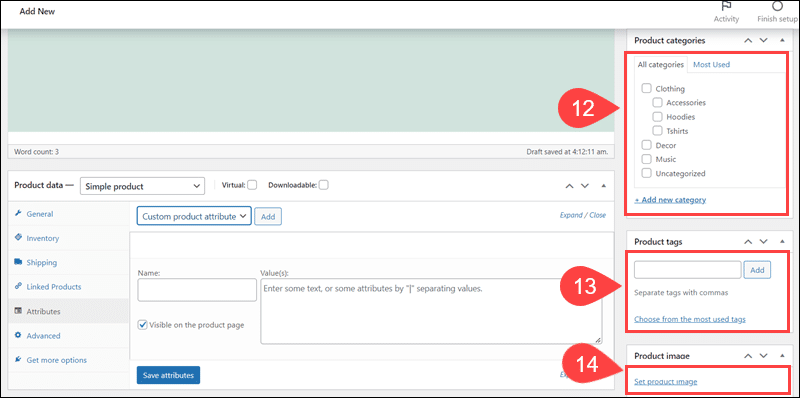
8. Access the Attributes tab. Attributes are reusable entities that streamline the process of adding new products in the future.
9. Click the Add button to add predefined Attributes, such as color or size, or create a new custom Attribute.
10. If creating a custom Attribute, enter a Name and Value and select Save attributes.
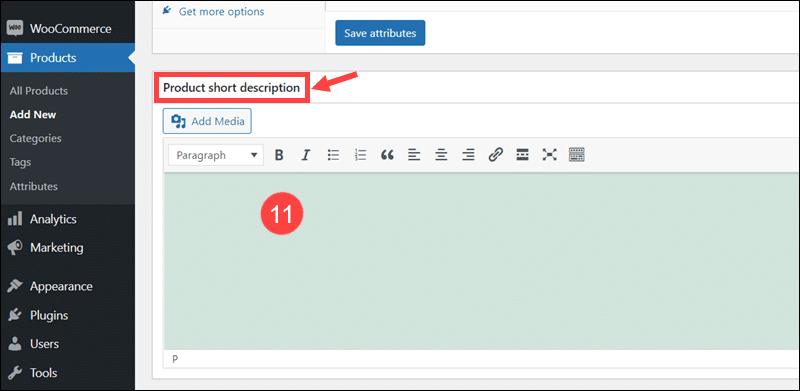
11. The Product short description section at the bottom of the Add New product page lets you add a brief excerpt and embed small videos. The notation or video is displayed next to images on product listing pages.
12. The Product categories panel on the right side of your dashboard lets you place a product into a category. If you need to create a new category, use the Add new category link.
13. Add Product tags to items with distinctive features or to highlight helpful information.
14. Click the Set product image link to insert an image for the product. The images need to be of the highest quality and with a simple background. The general image style should be consistent across the website
15. Use the Preview tab in the Publish section to check if everything is in order. Select Save Draft to save the product record. Choose Publish to make it available in your store.
You have successfully added a new product to your WooCommerce store.
Note: Learn how to add related products in WooCommerce.
Step 7: Add Payment Solution
Merchants often start searching for a payment service provider (PSP) in the later stages of the store development process. This can be a costly mistake.
Ecommerce platforms recommend integration partners and encourage merchants to use specific PSPs. If the PSP has a limited number of features and payment options, a merchant may need to spend time and money to develop custom solutions and provide alternative payment methods.
Payment solutions in WordPress are installed as plugins. After installing a payment plugin:
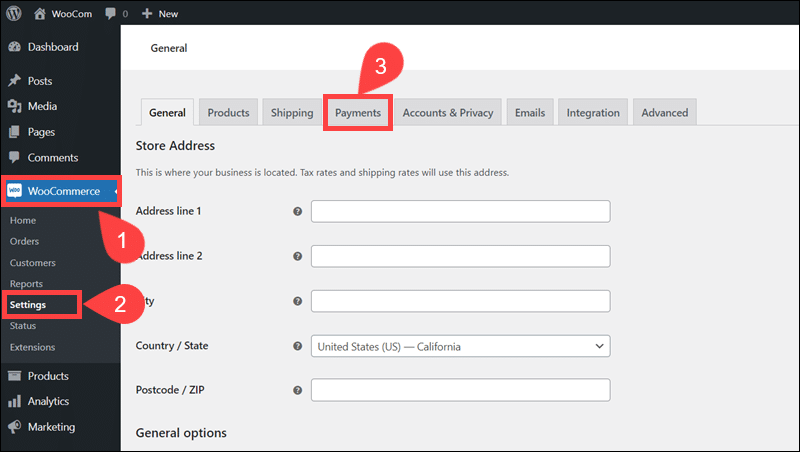
1. Expand the WooCommerce menu.
2. Click Settings
3. Access the Payments tab.
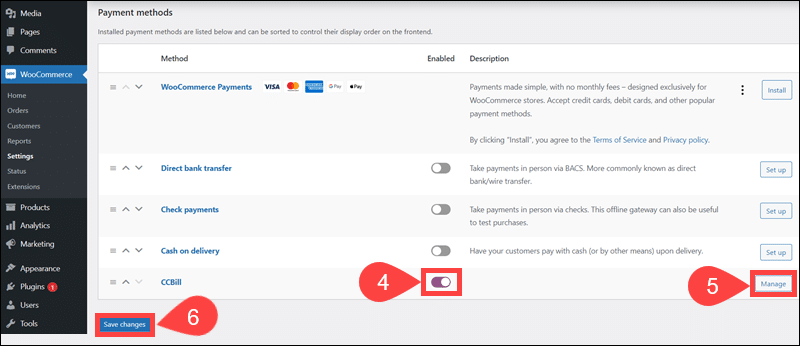
4. Enable the payment solution you want to use.
5. Use the Manage or Set Up option to configure the payment plugin and integrate it with your payment processing account.
6. Click Save changes to save the configuration.
Test card transactions and various payment scenarios extensively before going live. Although the store can now technically accept payments, it needs to be extended with additional features before it becomes a fully functioning ecommerce website.
Step 8: Additional Features
To take full advantage of the WordPress platform, merchants need to install plugins that help them automate store processes, collect (and analyze) valuable data, introduce new sales and marketing tools, and improve customer experience.
- Analytics - Merchants need to understand how customers interact with their store by analyzing views, visit rates, and bounce rates. Plugins like Google's Site Kit or MonsterInsights track general data about website performance and specific information regarding customer behavior. This data is aggregated and presented in a user-friendly interface. For example, merchants can easily find out which product pages customers stay the longest on or where they stop scrolling.
- SEO Plugins - WordPress websites are already optimized for search engines. However, ecommerce stores operate in a highly saturated market and need to attract organic traffic at all costs. Yoast SEO is one of the most widely used WordPress plugins. The free version contains most of the tools a website needs to start ranking in search engines.
- Automation - Customers are less likely to shop on websites that do not offer advanced features and exciting content. Merchants need to streamline and automate as many store processes as possible. Check if you are using your existing solution to its full potential. For example, merchants who install WooCommerce can use WooCommerce Shortcodes to expedite and automate most tasks in their store without needing to code.
- Checkout Page - A difficult-to-navigate checkout page that does not provide enough information about the payment process may result in cart abandonment. Plugins for optimizing the checkout process help storeowners reduce cart abandonment rates and simplify the payment flow. WooCommerce allows merchants to customize the WooCommerce checkout page layout in a few simple steps.
- Sales Tools - Ecommerce stores need to promote special offers and explore different sales techniques to stay ahead of the competition. Upselling, loyalty discounts, quantity discounts, and other sales tools are essential for building a loyal customer base.
- Dynamic Pricing - Using dynamic pricing to automate price changes in an ecommerce store gives merchants a considerable competitive advantage.
- Customized Emails - Sending generic emails is a missed opportunity to engage customers. Use the automated emails sent to customers after each sale, registration, or interaction to reinforce your store's brand. Customizing WooCommerce emails is a straightforward task.
- Web Copy - The content on the store's top-level pages needs to tell a story and explain what the store is about. Product descriptions should provide relevant information about the product’s benefits and motivate customers to go through with their purchase.
- Privacy Policy - Data protection laws and privacy policies are integral to any online business endeavor. WordPress requires merchants to define their privacy policy before publishing their website. The Privacy tab in the WordPress Admin contains useful privacy policy templates merchants can adjust to suit their needs.
The installed software solutions need to work in unison to give customers a seamless shopping experience. Spend time meticulously testing every system before making the store publicly available.
Note: Learn how to set up recurring payments in WooCommerce.
Conclusion
An engaging and user-friendly store attracts more visitors, keeps them on the site longer, and is more likely to turn visitors into customers.
WordPress makes it easy to build an attractive ecommerce website while plugins turn your website into a full-blown online store and enable you to start accepting payments for your products and services.
Keep exploring WordPress features and open-source plugins to find new ways to cut costs and generate revenue.
