Introduction
Building an online store from the ground up can be time-consuming and expensive.
Ecommerce platforms, like Magento, allow merchants to create and launch their store quickly and at a fraction of the cost.
Magento is a flexible ecommerce solution suitable for SMEs and large enterprises, regardless of their business model. Merchants can easily introduce new features and scale their Magento website as their business goals evolve.
Find out how to build a Magento website and start selling products without delay.
Step 1: Choose a Domain Name
Before choosing a domain name for your Magento website:
- Research Competitor Domains - Visit competitor stores and closely examine their domain name structure. Do not imitate successful websites. Try to gain a competitive advantage by creating a domain name that stands out.
- Social Media Handles - Extending brand awareness across different channels is much easier if the domain name and social media handles match. Check popular social media platforms and confirm that the desired usernames are available.
- Domain Extensions - Customers trust the .com extension. However, regional domains are very effective for selling products in a specific region or country. Purchasing the same domain with multiple extensions can also protect stores from potential brand appropriation.
Coming up with a short, memorable, and available domain is not an easy task. Ideally, the domain name:
- Clearly conveys what the store is about.
- Does not exceed 14 characters.
- Does not contain word-number combinations nor hyphens.
- Is easy to spell. Do not force customers to double-check their spelling.
- Contains relevant SEO keywords.
Domain registrars, like NameCheap, GoDaddy, or Squarespace Domains, enable clients to search, purchase, and register available domain names.
Many registrars offer web hosting plans that include free domain registration.
Note: Check out our in-depth Magento SEO tutorial that will guide you step by step through the process of optimizing your new Magento website.
Step 2: Choose Hosting
The Magento Open Source package does not include web hosting services. When choosing an ecommerce hosting service, merchants need to focus on:
- Speed - Ecommerce websites contain lots of high-resolution images, videos, and associated data. The web host needs to deliver on their low latency claims. Customers regularly leave pages that take too long to load.
- Data Security - Implementing the best ecommerce security practices and buying expensive software means little if the underlying systems and hardware are not adequately protected.
- Scalability - Traffic and sales can fluctuate considerably depending on the day or season. Paying for excessive bandwidth year-round or not being able to process a sudden increase in traffic is a direct loss of revenue. Choose a web host that offers flexible and scalable server solutions.
- Backup & Restore - Ecommerce stores rarely recover if they irreversibly lose customer or store data. Check if the host has automated backup and restore services as part of the hosting plan.
Deciding which type of hosting is right for your store depends on the allocated budget, staff expertise, and time constraints:
- Shared hosting - Sharing server resources with other tenants is cost-effective. However, it can also lead to security lapses, technical issues, and high latency. Shared hosting is not an ideal choice for ecommerce stores.
- Virtual Private Server - A virtual private server isolates processing, memory, and bandwidth using a hypervisor. A VPS costs more than shared hosting but provides the level of security ecommerce websites need.
- Dedicated Server - A dedicated server is highly secure and delivers high performance and flexibility. However, this type of hosting requires trained employees to set up and manage the server. Colocation or renting dedicated hardware may reduce overhead costs.
Companies like Cloudways or Nexcess offer fully managed Magento hosting. Merchants with limited staff and technical experience can use these all-in-one hosting solutions to launch a Magento store in days.
Step 3: Install Magento
Magento 2.4 is supported only on Linux-based operating systems such as Ubuntu, Debian, or CentOS.
Install the following software solutions to set up a working environment for Magento background processes:
- Apache 2.4 (or Nginx 1.x)
- PHP 7.4
- MySQL 8.0 (or MariaDB 10.4 for Magento Commerce Cloud)
- Elasticsearch 7.9
- PHP Composer 2.x (optional)
The Redis key-value store and the RabbitMQ messaging server are recommended but are not mandatory for a Magento installation.
To install Magento 2.4 in Linux, you need to:
- Install the required PHP Modules.
- Create an Apache Virtual Host configuration file.
- Create a MySQL database and user.
- Install PHP Composer.
- Use PHP Composer to download the latest Magento 2 version.
- Set system user ownership and permissions.
- Install Magento.
The How to install Magento in Linux guide contains detailed instructions, commands, and images explaining each step.
Merchants that want to explore and test the platform on a local machine can install Magento 2 on Windows.
Step 4: Install Magento Theme
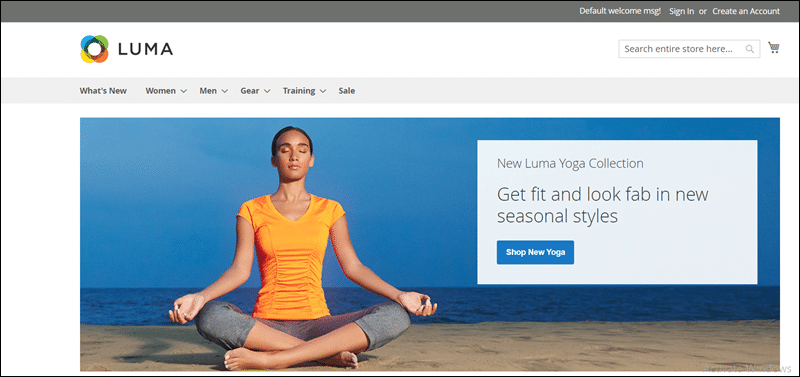
The Luma and Blank themes are available by default on Magento 2.4. Luma helps store owners get acquainted with Magento's features, while Blank serves as the starting point for theme customization.
Merchants can implement new Magento themes by:
- Building a custom theme from the ground up.
- Using PHP Composer to retrieve third-party theme packages.
- Purchasing optimized themes from the Magento Marketplace app store or platforms like ThemeForest.
Third-party themes are designed for specific use cases. Select a theme relevant to your business model and confirm that it:
- Supports advanced security features.
- Has the latest networking frameworks.
- Is fully responsive across different devices.
- Provides social media extensions and SEO tools.
- Supports cross-browser compatibility.
To install the new Magento theme:
- Use a client like FileZilla or WinSCP to establish a remote FTP connection to the Magento server.
- Upload the new theme's app and pub folders to the Magento root directory.
- Upgrade Magento using the command line interface.
- Access the Magento Admin and update the theme.
- Flush the Magento Cache.
The steps and commands are outlined in our comprehensive How to Install a New Theme in Magento tutorial.
Step 5: Customize Store Layout and Design
A unique and well-designed storefront is essential for maximizing conversion rates. You can gain a significant competitive advantage by customizing run-of-the-mill layouts and images.
To customize visual elements in Magento:
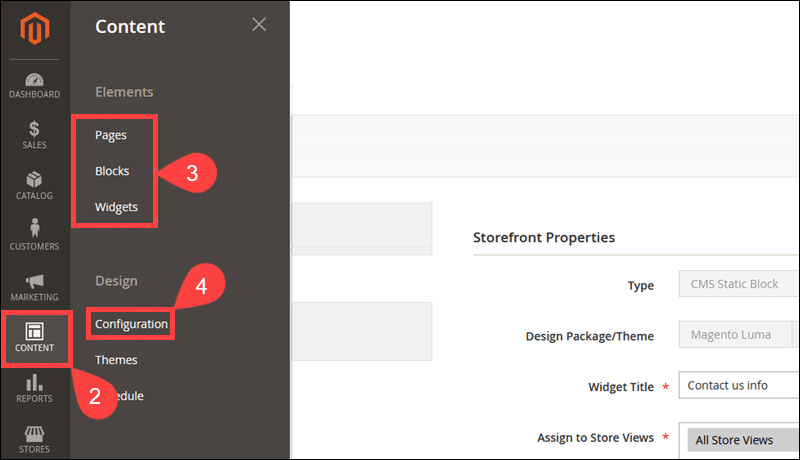
1. Access the Magento Admin.
2. Expand the Content menu.
3. Select and edit individual elements like Pages, Blocks, or Widgets in the Elements sub-menu.
4. Use the Configuration option to define global theme settings.
5. The Configuration screen enables merchants to set the default theme and customize headers, footers, product watermarks, etc.
6. Click Save Configuration.
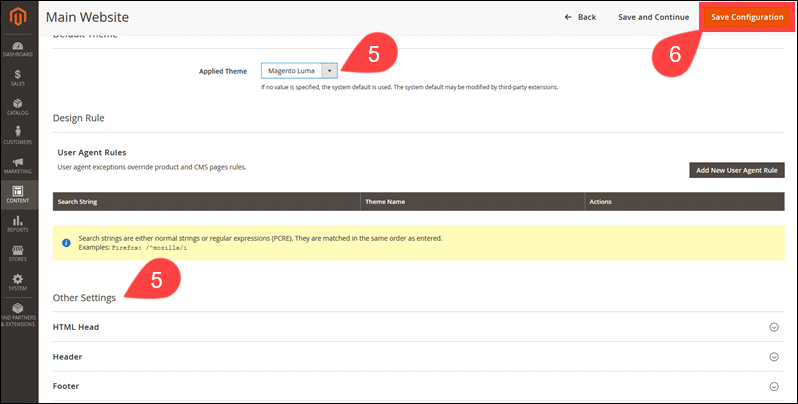
7. Flush the Magento cache to apply the changes.
Use the customization options to try out different designs and create an engaging shopping environment.
Step 6: Add and Manage Products
Magento allows merchants to import entire inventories using the CSV file format. Store owners can also and add individual products from the Magento Admin.
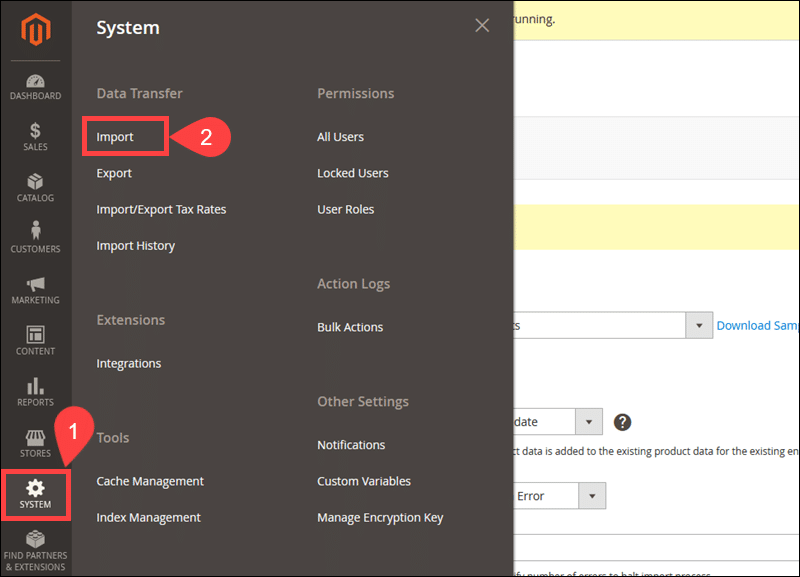
To import a CSV file containing product data:
1. Go to System.
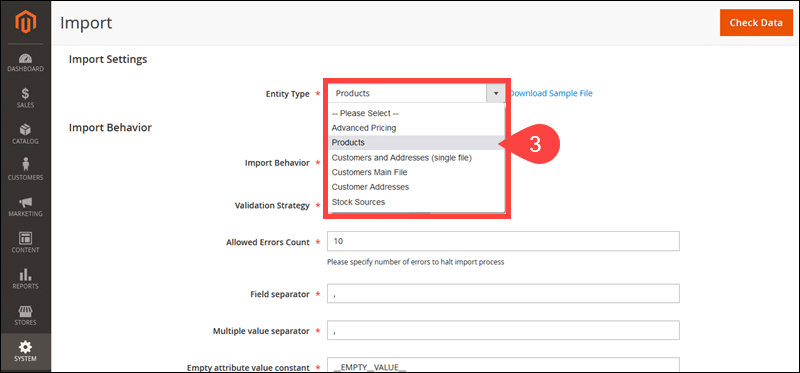
2. Select Import.
3. Expand the Entity Type dropdown menu and select Products.
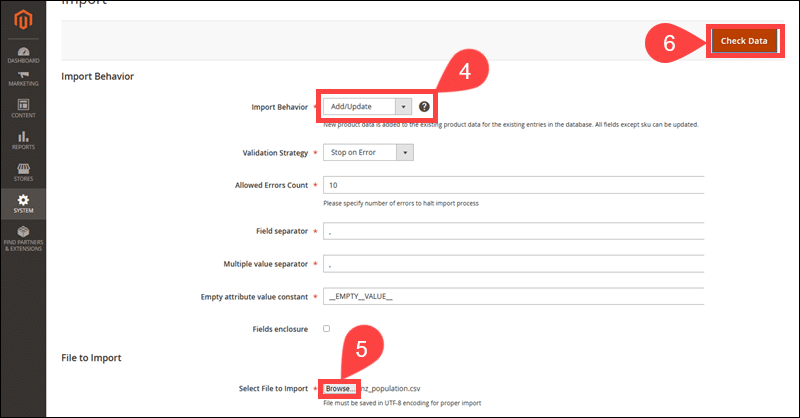
4. Set the Import Behavior field to Add/Update and configure other import parameters.
5. Go to Browse and select the product file.
6. Click Check Data to initiate the import process.
To add individual products:
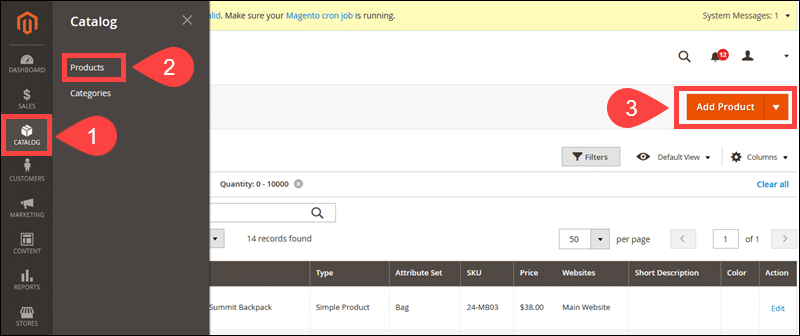
1. Go to Catalog.
2. Click Products.
3. Select the Add Product option.
4. Enter the product details on the New Product page.
5. Click Save to add the product.

Setting up automated inventory management rules for products and sources (warehouses) can reduce shipping costs and improve order fulfillment rates.
Use Magento's built-in inventory management features to update the Magento product inventory in real-time.
Step 7: Set up Payment Methods
Customers may abandon their cart if a store fails to provide trusted and convenient payment methods. Magento has several default payment solutions. However, merchants can also easily add payment methods to Magento 2 to integrate with a preferred ecommerce payment processor.
To check available payment methods in Magento:
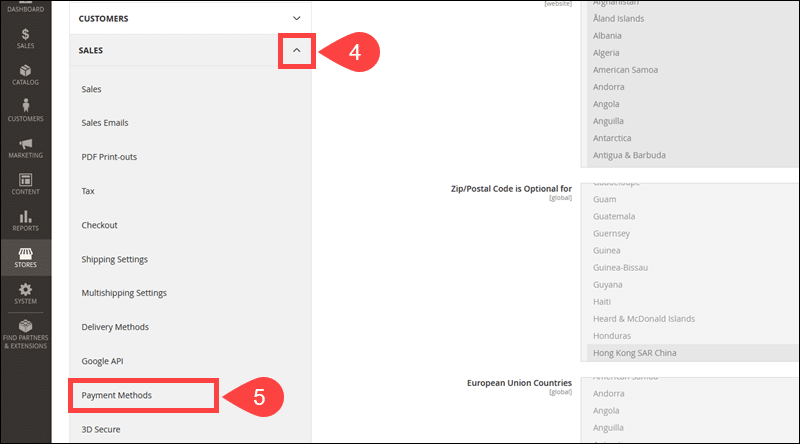
1. Access the Magento Admin.
2. Go to Stores.
3. Select Configuration.
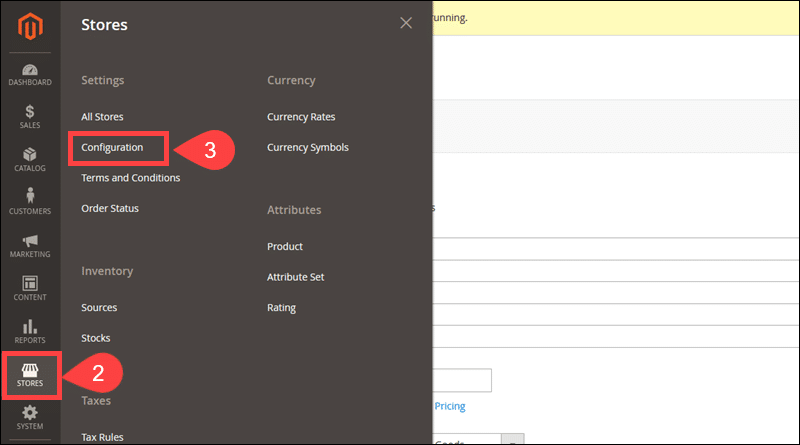
4. Expand the Sales dropdown menu.
5. Click Payment Methods.
6. Select your existing payment solution. If you do not have a payment solution, find out how to open a merchant account and what to look for when choosing a payment gateway.
CCBill provides payment processing services for a wide range of industries. Contact us today for a free consultation.
7. Use the Configure button to integrate the payment method with your Magento store.
8. Click Save Config to apply the configuration.

Implement your customers' preferred payment methods and payment solutions. Besides giving customers more options, you can avoid potential loss of income if a service is temporarily unavailable.
Step 8: Set up Shipping
Lower shipping costs and automated delivery processes can have a significant impact on profit margins. Set up shipping rules and manage delivery methods using the Magento Admin:
1. Click Stores.
2. Select Configuration.
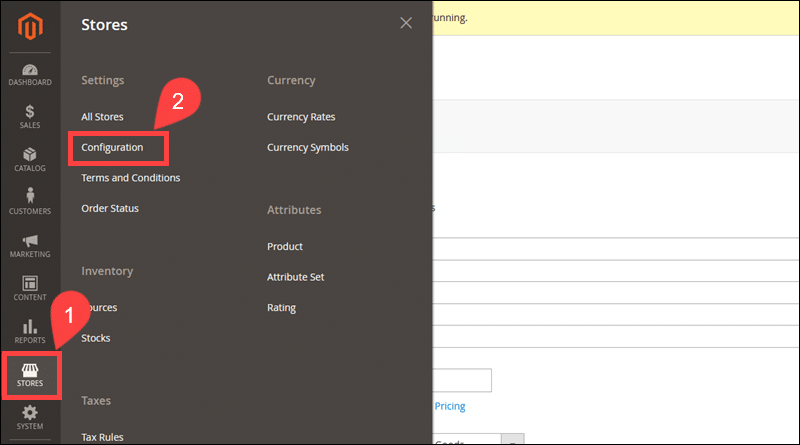
3. Expand the Sales menu.
4. Set general rules using the Shipping Settings tab.
5. Access the Delivery Methods tab to micromanage store shipping rules.

Stores that ship goods globally, sell products through various sales channels, and have multiple warehouses may need to purchase an additional inventory management extension.
Step 9: Set up Analytics
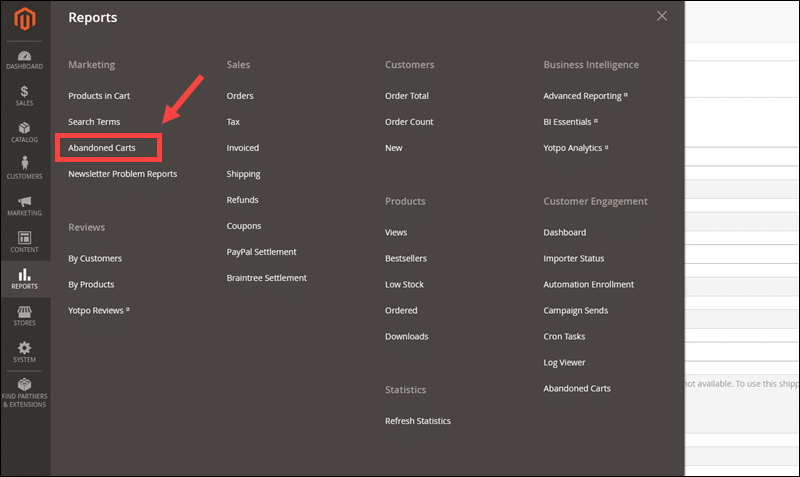
Magento databases store an exceptional amount of data about customer behavior, order fulfillment, abandoned carts, and sales. All the relevant information is accessible through the Reports menu in the Magento Admin.
To gain additional insight into customer experience, behavior, and store functionality, you can collect even more data using Google Analytics.
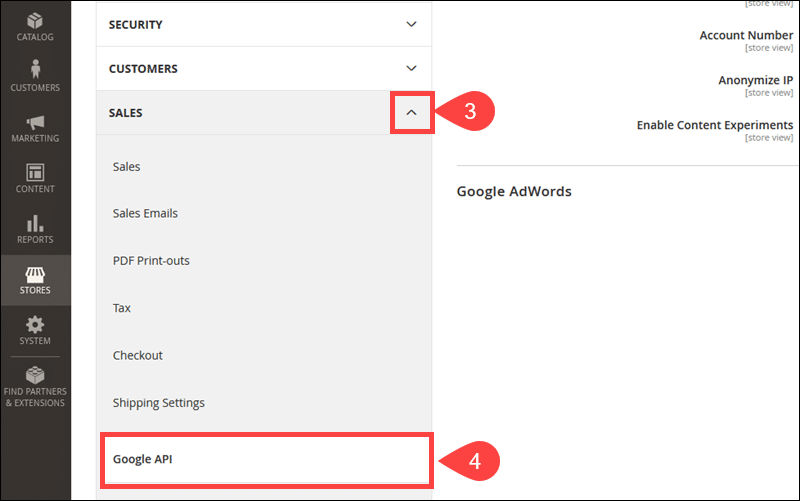
To integrate Google Analytics with Magento:
1. Go to Stores.
2. Click Configuration.

3. Open the Sales menu.
4. Select the Google API tab.
5. Enable Google Analytics.
6. Enter the GA Tracking Code in the Account Number field.
7. Click Save Config.
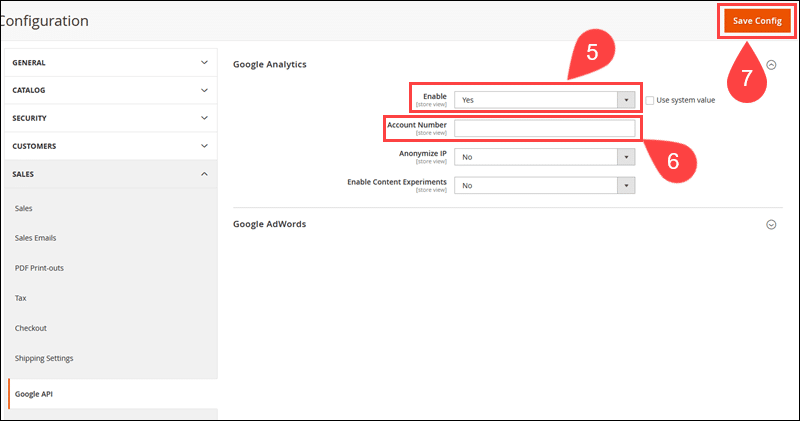
Verify that the store data is visible in the Google Analytics dashboard. It may take a few moments for the first data to appear
Additional Considerations
Magento is known for its flexibility and customization options. Install and set up the following features to ensure that your store hits the ground running.
Install an SSL Certificate
Customers do not want to leave personal or payment details on insecure websites.
SSL (Secure Socket Layer) certificates guarantee a secure transfer of data by establishing an encrypted connection between the website’s server and the user’s browser.
Install an SSL certificate in Magento to reassure customers, protect their personal information, and create a safe shopping environment.
Set up Custom Admin URL
Automated DDoS and brute-force attacks regularly target ecommerce stores. Change the default Magento Admin URL, http://yourstore.com/magento/admin, to counter malicious activity and protect your Magento store.
Learn how to change the Magento Admin URL using the Magento Admin, within the env.php file, or from the command line.
Set Up CAPTCHA on Contact Forms
Automated and malicious software that imitates human behavior (bots) is used to initiate DoS and DDoS attacks, spam, content scraping, inventory hoarding, and click fraud.
Add CAPTCHA to Magento Contact Forms to eliminate spam and block bots from using store contact forms as a gateway to compromise core services.
Set Up Transaction Failed Emails
Technical issues and human error may prevent customers from completing a transaction. Your ability to react quickly and solve problems can have a significant impact on revenue.
Magento uses automated emails to inform store admins that a transaction was unsuccessful.
Set up Payment Failed Emails in Magento to help customers complete their purchases and reinforce your brand’s reputation in the long run.
Conclusion
Ecommerce merchants make far-reaching decisions about pricing, website design, marketing, and data security every day.
Building a Magento website provides valuable insight into the many features and options this platform has to offer. Use this experience to automate store operations even further and turn shopping in your store into a fun and carefree activity.
