Introduction
The goal of every retailer is to attract and retain their target audience. Once a person is familiar with your brand and product range, making them a repeat customer is simple. Customer acquisition, on the other hand, is tricky to do online.
Ecommerce shops rely on good search engine optimization (SEO) practices to reach their target audiences: people performing search queries with transactional intent. As an ecommerce merchant, you must ensure the use of the best SEO practices.
Magento developers provide ecommerce software engineers with SEO tools, but a good Magento SEO strategy consists of more than modifications on the shop’s back-end.
This guide reveals critical ranking factors and best Magento SEO practices to help you increase your online visibility and revenue.
Note: Magento is an official CCBill shopping cart integration partner. Learn more about how ecommerce businesses benefit from our secure online payment processing services.
Magento SEO Ranking Factors in 2022
Every Google algorithm change impacts SEO ranking factors, meaning there is no fixed way to approach Magento SEO. However, the following factors are valued by Google regardless of trends and should be considered during SEO optimization.
Ranking factors are interconnected and often dependent on each other.
Relevant and Quality Content
Google evaluates the context behind search queries and connects them to information it deems valuable.
Content value is determined by its:
- Relevancy. Relevant content is up to date, follows current trends, and relates to your brand’s niche, so thorough market research is essential.
- Quality. High-quality content provides accurate and straightforward information on topics related to the brand’s niche.
Your readers also judge your content, not just Google. When they like what they read, website visitors share the content creating backlinks in the process (more on the importance of backlinks below).
Create content that is related to your business, caters to your audience’s interest, and applies the above-mentioned principles to ensure better ranking.
Keywords
Keywords are the connection between your shop and potential customers.
It is considered good practice to include keywords in the following elements:
- Website’s metadata (meta title, meta description, URL/slug, alt text, filenames, etc.)
- Product descriptions
- Headings
- Content
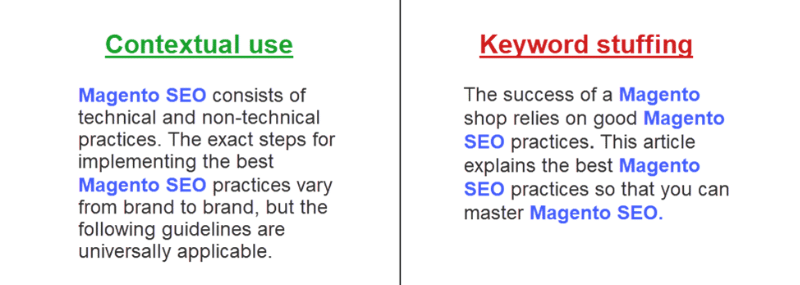
Proper use of keywords allows Google to learn about the context of your ecommerce website. However, there is a fine line between the contextual use of keywords and “keyword stuffing”.
The former term is associated with writing about a particular topic and using a keyword when it is appropriate. “Keyword stuffing” refers to the unnatural and excessive use of keywords with the aim of ranking better. The practice usually achieves the opposite effect as content packed with keywords is typically repetitive, tiring, and valueless.
Strive to include keywords contextually wherever and whenever possible.
Backlinks
Backlinks are all external links that point to your website. What gives backlinks value in terms of SEO is that people and businesses typically share content valuable to them. A website with plenty of backlinks is one that is considered to have comprehensive and factual content.
However, not all backlinks benefit webmasters.
Quality backlinks typically occur organically, when a person or business links to a piece of content to share knowledge. Opportunities for quality backlinks include:
- Social media
- Guest blogs
- Press releases
- Genuine comments
Unfavorable backlinks typically stem from spam comments on forums and social media posted by a paid person or bot. These practices are frowned upon by search engines.
Backlinks are often created by webmasters but posting quality content ensures that visitors have something to share. Avoid buying backlinks or creating them artificially because search engines could blacklist your website.
Website Speed
Website speed is the time necessary to load all elements on a page and it impacts SERP ranking in two ways:
- Directly. Google values short page load times.
- Indirectly. Buyers turn to online shopping when they want quick and efficient service. If a page takes too long to load, customers switch to another brand’s website. As a result, bounce rates increase, and dwell time is reduced, causing poor ranking.
There are two categories of factors that impact website speed:
- The website itself. Every element of a website, including the code and multimedia content, affects its loading speed.
- The server hosting the website. Website speed is also determined by the web server’s performance and the physical distance between the server data center and the website visitor.
To improve website speed, choose hosting solutions that best serve your needs. Optimize the website by minifying the code and reducing the size of multimedia files.
Responsive Web Design
Modern shoppers expect omnichannel customer experiences, making the responsive web design of your ecommerce website as relevant as ever. Google aims to meet the needs of its users, which is why the search engine began giving value to websites that are equally appealing and functional across all mediums.
Being only a search engine, Google can’t “experience” a website, but it can check KPIs, such as:
- Number of sessions and users
- Bounce rate
- Goal conversion rate
- Average time on page
- Page load time
- Average pages per session
Website KPIs can be used to identify website malfunctions and overall user experience, among other things.
Make responsive design a priority and communicate this to your design and development team. Designate quality assurance testers who will test your ecommerce shop for any anomalies prior to launch. Perform periodical testing after launch.
Website Structure
A website structure is a visual representation of all the pages on a website in hierarchical order, including all internal links. A good website structure is one that requires no more than three clicks to reach any page on the website.
The structure of a website is enhanced with the use of pillar pages. These pages provide a general overview of a topic and link to articles that cover sub-topics in-depth. Because they organize your content around topics, they help Google understand what your site is about. Pillar pages also make SEO sense because they are rich in keywords and internal links, and provide an opportunity for backlinking.
A well-designed website architecture improves UX because it allows users to navigate the website easily. This results in a positive user experience, which Google favors.
Note: Check out the best practices in design for subscription UX.
Domain Authority
Domain authority is a metric used to describe a website’s relevance to a specific topic. The metric is represented as a scale from 0 to 100, 0 being a low value and 100 being ideal.
Domain authority is built with a consistent SEO strategy that combines on- and off-page SEO practices. The algorithm that calculates domain authority takes the following factors into account.
- Number and quality of backlinks to a website.
- User-friendliness of a website.
- Number of unique sources of backlinks.
- Content quality.
- Number of bad links on a website.
- Internal link structure.
Tip: Invest company resources in web design and quality content. Check for bad links and redirect or remove them.
SSL
Security Sockets Layer (SSL) is an internet security certificate that protects sensitive information by scrambling and encrypting it. Besides keeping data secure, SSL certificates signal to Google that a website is trustworthy.
When a website is secured by an SSL certificate, the HTTP in its URL changes to HTTPS. In 2014, Google announced that websites with HTTPS in their URL would rank better than those without an SSL certificate.
Note: Follow our article to learn how to install an SSL certificate on Magento 2.
EAT Framework
EAT is an acronym that stands for expertise, authoritativeness, and trustworthiness. Google introduced the concept of EAT in the 2014 edition of their Search Quality Guidelines. EAT is not an algorithm or a ranking system, but it has had a significant impact on Google’s algorithm updates in recent years.
Google is using the EAT framework to improve existing ranking algorithms. The end goal is to determine better ways to estimate a website’s reliability and the factuality of its contents.
Successful SEO practices with EAT in mind are:
- Writing factual, easy-to-read content related to the website’s industry/niche.
- Creating content clusters that cover specific topics related to the industry/niche.
- Engaging with individuals and businesses in the same or related industry/niche to share expertise. This can take the form of:
- Guest blogging.
- Influencer marketing.
- Participation in podcasts.
- Engaging with companies and individuals on social media.
All these practices aim to convince your target audience that your brand is created by experts and can be trusted.
Clickthrough Rate
The clickthrough rate is a metric that represents the ratio of total impressions to clicks. In organic SEO, the clickthrough rate represents the chance of a user clicking on your page during a Google search.
While the metric doesn’t affect your ranking, the opposite does apply. The chances of a user clicking on a page are directly proportional to the page’s rank on a search engine result page (SERP). To an extent, a poor clickthrough rate could indicate that:
- Your page is ranking poorly.
- The preview of your content (meta titles, meta descriptions, feature snippets) isn’t convincing enough to make users visit your website.
The bits of content users see first and are most likely to click on are rich snippets, product advertisements, and metadata of the homepage and blog articles. Include metadata, implement structured data markup, and invest in quality copywriting and design to spark your audience’s interest and improve your clickthrough rate.
Magento SEO Checklist
The following checklist will help you implement the best SEO practices using Magento 2 functionality. The configurations are grouped into thematic units with brief explanations for each setting.
Note: The following instructions apply to Magento 2.4.2 and may not be of use to developers using older versions of Magento. We recommend updating Magento to the latest version.
Step 1: Set Homepage Title
To configure the title of your homepage in Magento:
- Log in to Magento’s back-end platform.
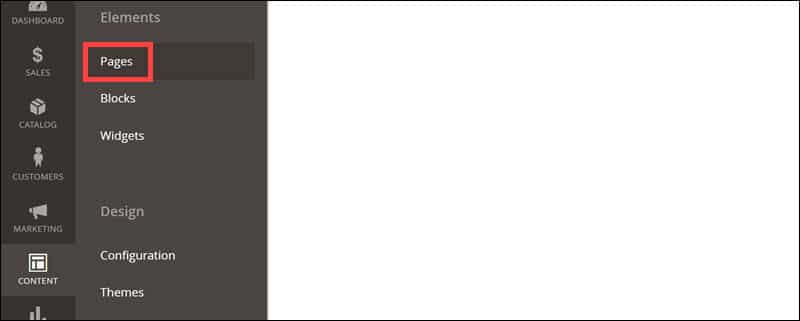
- Navigate to CONTENT > Pages.
- Locate the homepage. Click the Select button next to your Homepage and select Edit from the dropdown menu.
- Enter the desired name into the Page Title field.
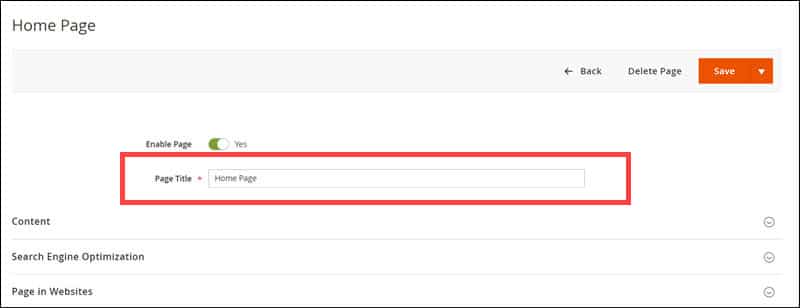
- Click the orange Save button in the upper right corner of the screen.
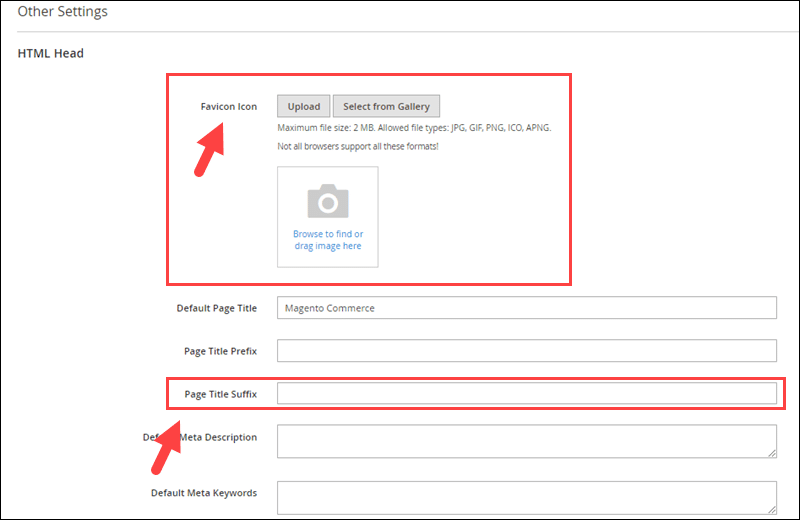
Step 2: Set Up HTML Head
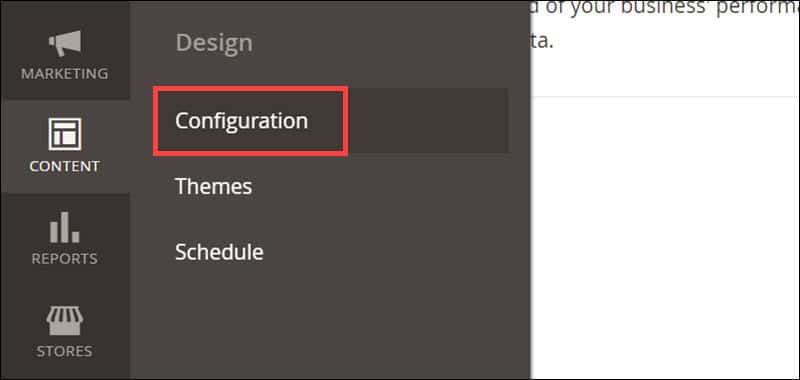
To access HTML Head settings in Magento:
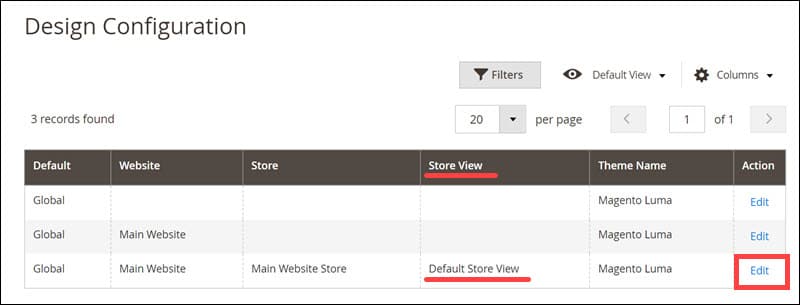
- Navigate to CONTENT > Configuration.
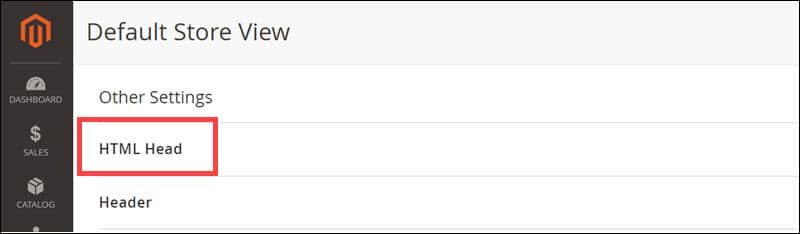
- Look for the record with the Default Store View parameter in the Store View column and click the Edit button.
- Under the Other Settings section, click the HTML Head card.
This opens a dropdown menu.
The options Default Page Title and Default Meta Description are typically not used. Search engines do not use Default Meta Keywords, so leave them blank.
The only settings that affect SEO are Page Title Prefix and Suffix. Their function is to add text before or after your title. Adding a prefix to page titles is not considered good SEO practice, so leave the field blank.
In the field next to the Page Title Suffix setting, enter a dash and the name of your shop. This means the title of every page in your shop will contain the shop’s name at the end.
Step 3: Set Up User-Friendly Navigation
Setting up user-friendly navigation in Magento takes several steps, outlined below.
1. Design a Product Category Hierarchy.
Most ecommerce shops have a minimum of 3 levels of product categories:
- Level 1 (Default Category). It’s the root category that contains all products in your shop. This category is not visible to the shopper.
- Level 2. These are the main categories in the navigational menu. The user clicks on or hovers over them to see subcategories. In the case of a clothes store, an example of level 2 categories would be For Men, For Women, and For Kids.
- Level 3. These subcategories are visible once the user clicks on or hovers over the main categories. When the user chooses to learn about products For Men, possible level 3 categories would be Tops, Bottoms, Shoes, etc.
The best product-categorizing practices vary from brand to brand. Design a structure that caters to your brand’s product range and your customers’ needs.
Once you have a plan of your syntactic structure, it is time to apply it to your Magento 2 store. If you have already created and edited product categories, skip the following section of this article.
2. Apply the Category Structure to Your Magento Store
To create an entirely new product category structure:
- Navigate to CATALOG > Categories.
- Click Add Root Category.
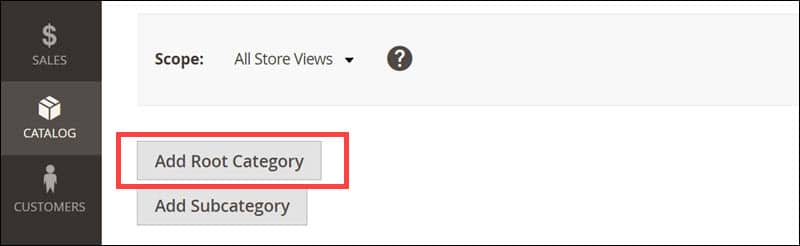
- Enter the name of your root category.
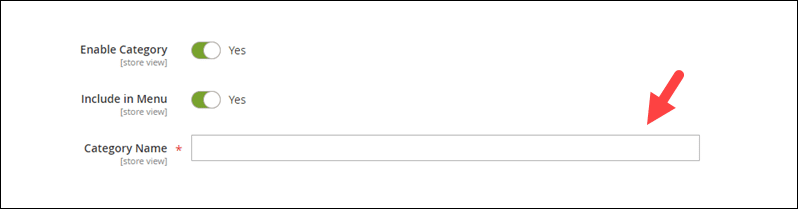
- Add products to your root category by clicking on the checkboxes next to them.
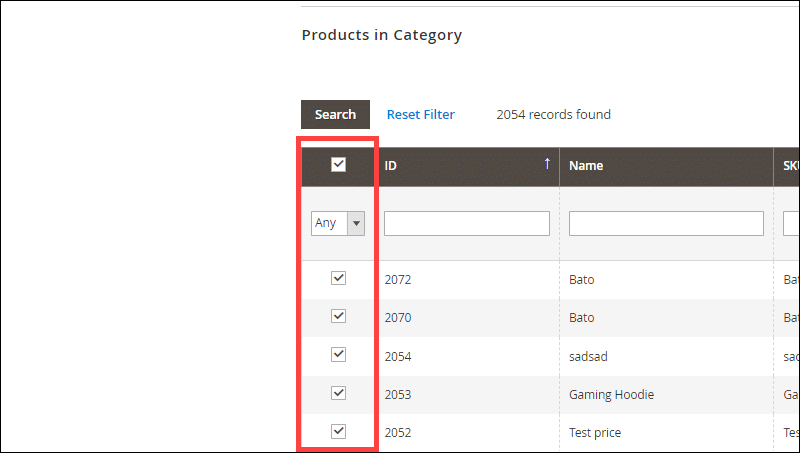
- Edit other parameters as needed and click the Save button located in the upper right corner of the page.
- Click Add Subcategory to create a new subcategory in your root directory.
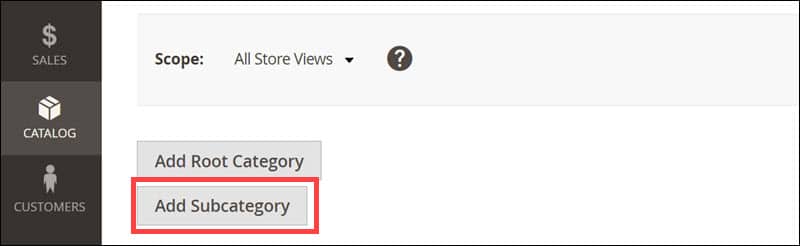
- Enter the name of your subcategory, add products to it, edit other parameters as you wish, and Save.
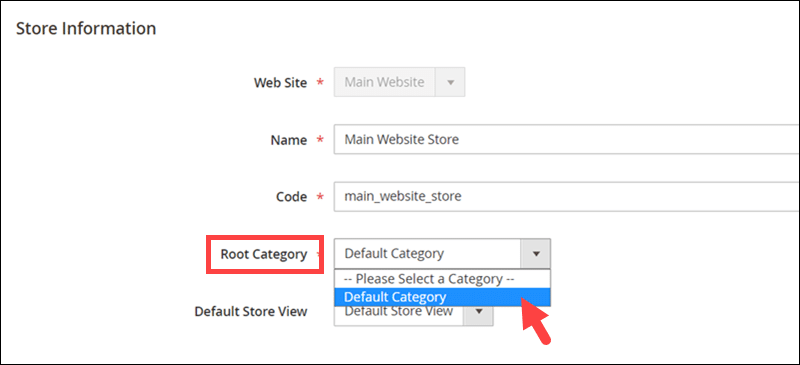
- Click Stores in the Admin panel.
- Select All Stores under the Settings section.
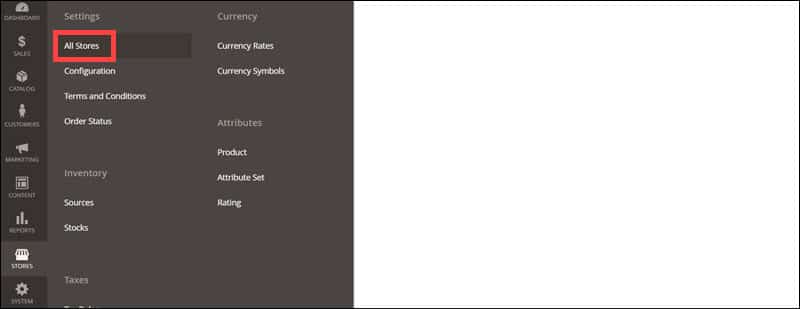
- Select your store in the Store column.
- Assign the root directory to the store by selecting it from the dropdown menu and Save.
3. Enable Breadcrumbs.
Magento enables breadcrumbs by default, but you can check by doing the following:
- Navigate to STORES > Configuration > GENERAL > Web.
- Scroll down to the Default Pages section. Next to the Show Breadcrumbs for CMS Pages option, the dropdown menu should be grayed out with Yes as its default value.
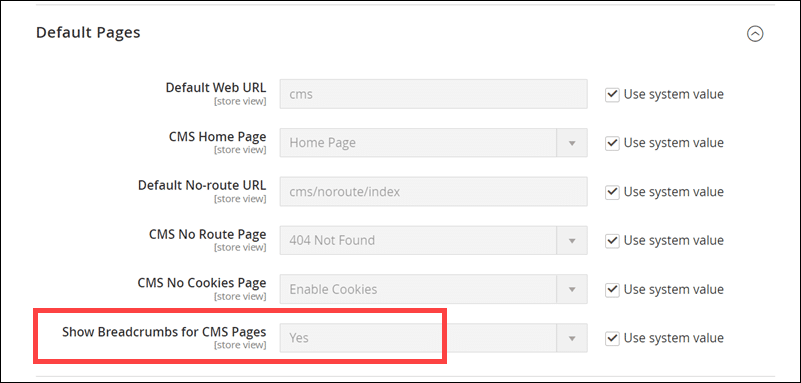
If the value is No, untick the checkbox next to Use system value, click the dropdown menu and select Yes.
Step 4: Set Up SEO-Friendly URLs
URLs are SEO-friendly when they are:
- Brief.
- Descriptive.
- Consistent.
- Lowercase.
The process of making URLs SEO-friendly consists of several steps:
1. Prevent Magento from Adding the Store Code to URLs
The default setting of the Add Store Code to URLs option is No. However, you should check to ensure that your URLs are descriptive. To do that:
- Navigate to STORES > Configuration > GENERAL > Web.
- Locate the Scope setting on the top of the page and Click Default Config.
- A dropdown menu will open. Select Default Store View.
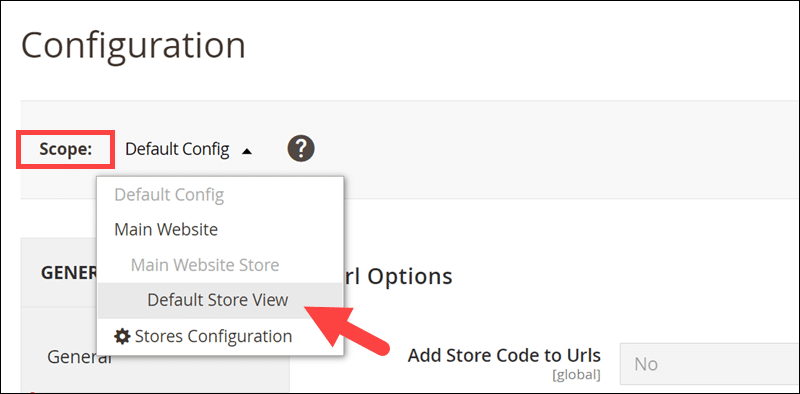
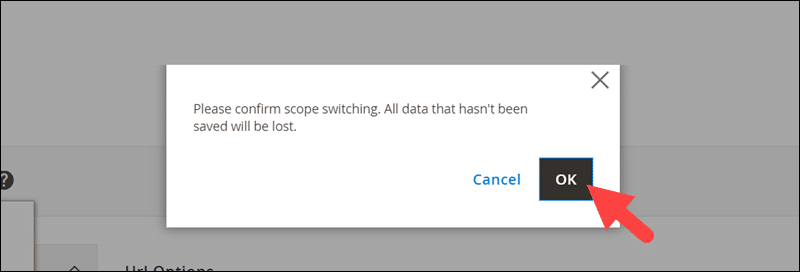
- Confirm scope switching.
- Check that the value of the Add Store Code to URLs setting is No.
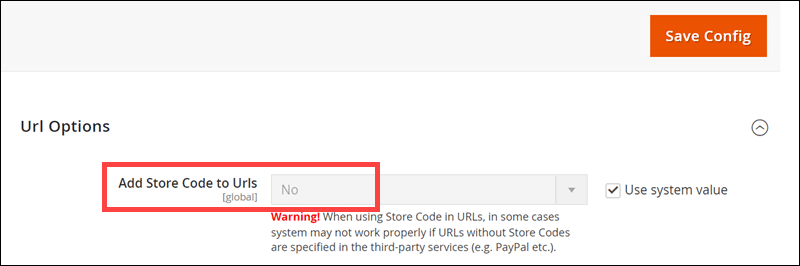
- Save Config.
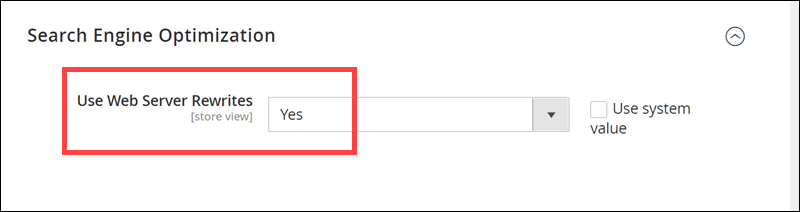
2. Enable Web Server Rewrites
Web Server Rewrites enable the use of human-readable URLs. Magento has a setting called Use Web Server Rewrites, set to Yes by default.
Check that the setting is enabled by scrolling to the Search Engine Optimization section. The Use Web Server Rewrites setting is the only one in this section.
3. Remove .HTML Extension from Product and Product Category URLs
Removing the .html extension from product URLs and Product Category URLs allows simpler migration from one ecommerce platform to another, should you need to do so in the future.
Note: This step is only applicable to new Magento shops. Removing the .html extension from URLs that belong to an active Magento store would lead to unwanted URL migration.
The process of removing the .html extension from a Magento-powered website is outlined below.
- Navigate to STORES > Configuration > CATALOG > Catalog.
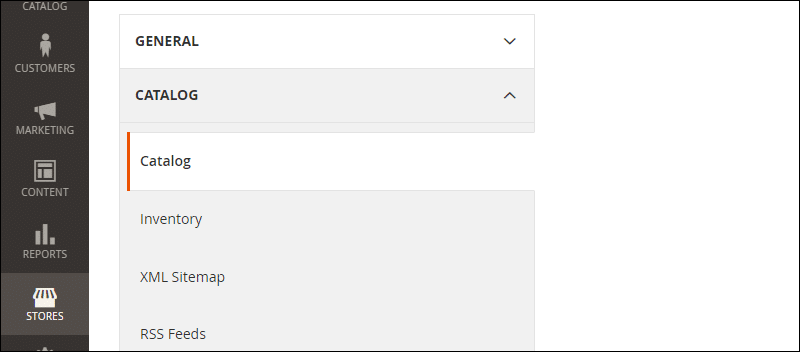
- Scroll to the Search Engine Optimization Section.
- Uncheck the checkbox next to Product URL Suffix and Category URL Suffix.
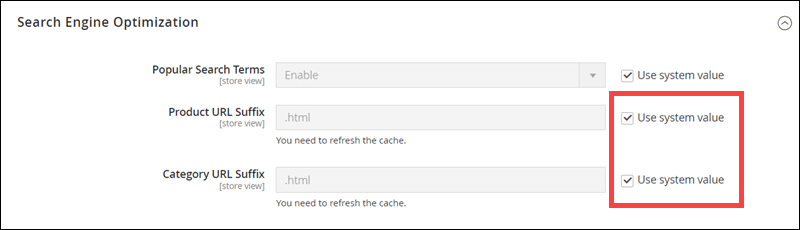
- Delete the contents of the textboxes.
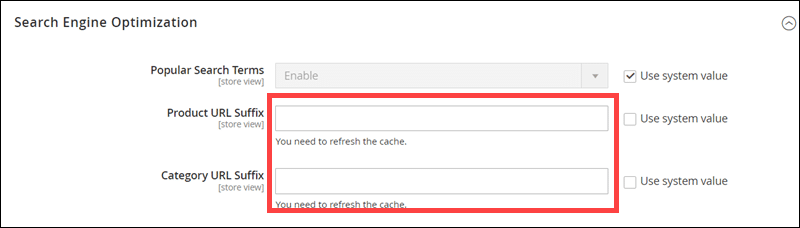
- Click the Save Config button in the upper-right corner of the page.
4. Remove Product Categories from Product URLs
The Use Categories Path for Product URLs setting allows you to remove product category keys from product URLs to shorten them.
The default value of this setting is No, meaning that product categories are not included in product URLs. The setting is located right under the Product URL Suffix and Category URL Suffix settings if you wish to check.
5. Allow Automatic Redirects for URL Key Changes
Automatic redirects save time in case of product category changes. Instead of manually creating new URLs or redirects, Magento can automatically create permanent redirects if the Create Permanent Redirect for URLs if URL Key Changed setting is enabled.
The system default value for the setting is Yes. If you wish to check, the setting is located right under the Use Categories Path for Product URLs setting.
6. Implement Canonical URLs for homepage and CMS Pages
Magento doesn’t add self-referencing canonical URLs to the homepage and CMS pages. Having no self-referencing canonical URLs leads to two things:
- Google chooses which URL it identifies as the original and only indexes that one.
- Google crawlers identify multiple URLs for the same page as duplicate content.
There are three ways to add self-referencing canonical URLs:
- By adjusting the template.
- By adding a custom XML block to pages and using it to define the self-referencing canonical URL manually.
- By using a plugin.
Whichever method you use, creating canonical URLs is halfway to making them work.
To enable canonical URLs in Magento:
- Navigate to STORES > Configuration > CATALOG > Catalog.
- Scroll down to the Search Engine Optimization section.
- Uncheck the checkboxes next to the Use Canonical Link Meta Tag For Categories and Use Canonical Link Meta Tag For Products options.

- Click their respective dropdown menus and select Yes.

- Save Config.
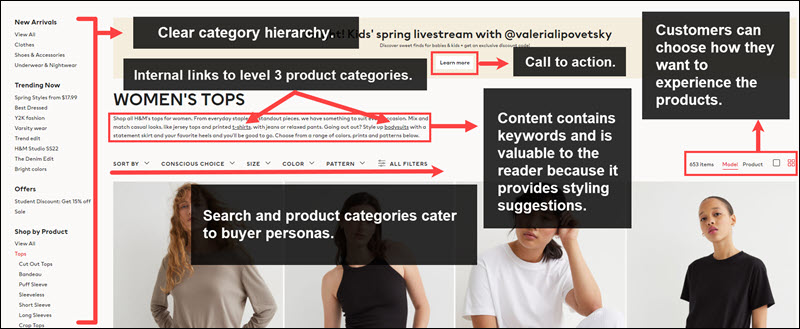
Step 5: Optimize Category Pages
Optimizing product category pages consists of performing several actions:
- Add keywords in category names.
- Design a simple navigation system (the customer must be able to easily return from a product page to the same spot on the category page).
- Include keywords in the content on category pages. Ensure the content is insightful, valuable, and resonates with your buyer persona.
- Interlink content with other category pages whenever possible.
- Include a call to action.
- Provide product filtering and view options.
- Write alt text for images and other media.
A good example of category optimization is the H&M online store.
Step 6: Optimize Product Pages
To optimize product pages, do the following:
- Upload high-quality images.
- Include keywords in title tags and product descriptions.
- Provide as much product information as possible in an easy-to-read manner.
- Include testimonials and reviews.
- Include 360° views and/or product videos if appropriate.
- Write alt text for images and other media.
Step 7: Optimize Images
Image optimization for ecommerce shops includes aesthetic and technical factors. Both impact SEO through user experience and page performance.
To optimize image esthetics:
- Invest in a professional photographer and equipment (lighting, background, camera, display props).
- Take photos against a neutral background.
- Take photos from different angles.
- Take photos of the product in use (lifestyle images).
Technical criteria depend on branding, web design, and hosting capacities, but the best optimization practices include the following steps.
- Use JPG format.
- Edit images to match real-life colors.
- Compress images for faster loading speed.
- Ensure product images comply with the shop’s design (size, aspect ratio).
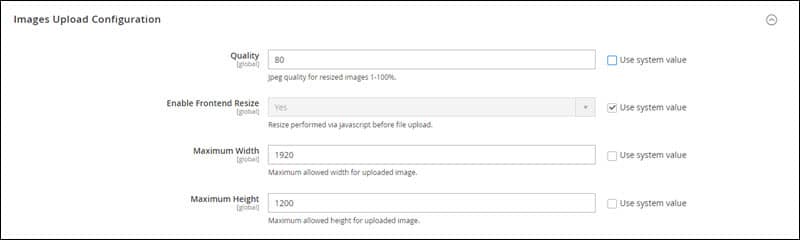
Magento 2 allows you to configure maximum width and height as well as the quality of images you will upload in the future. To do this:
- Navigate to STORES > Configuration > ADVANCED > System.
- Scroll down until you reach the Images Upload Configuration tab and click it.
- Uncheck Use system value next to the Maximum Width and Maximum Height options and enter the values you wish.
- Save config.
You can also change the image adapter used for image processing. The ImageMagick adapter produces images of superior quality than the standard adapter. Changing your image adapter is optional, but if you wish to do so:
- Select the Developer tab, which is located under the System tab.
- Click Image Processing Settings.
- Uncheck the Use system value checkbox and change the value of the setting to ImageMagick.
- Save config.

Step 8: Create/Modify Robots.txt
To configure your shop’s robots.txt file in Magento:
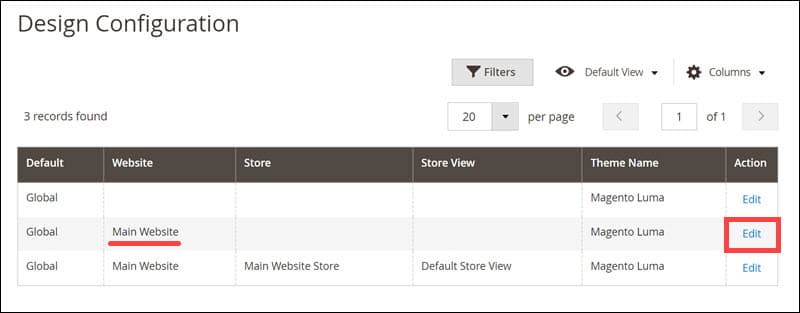
- Navigate to CONTENT > Configuration.
- Click the Edit button next to the Main Website without additional Store or Store View parameters. The Main Website Store with the Default Store View parameter does not allow the modification of the robots.txt file.
- Scroll down to the Other Settings section. Click the Search Engine Robots card. This will open a dropdown menu.
- Set Default Robots to INDEX, FOLLOW.
- Configure robots.txt by typing instructions in the field next to the Edit custom instruction of robots.txt File setting.
- Save Configuration.
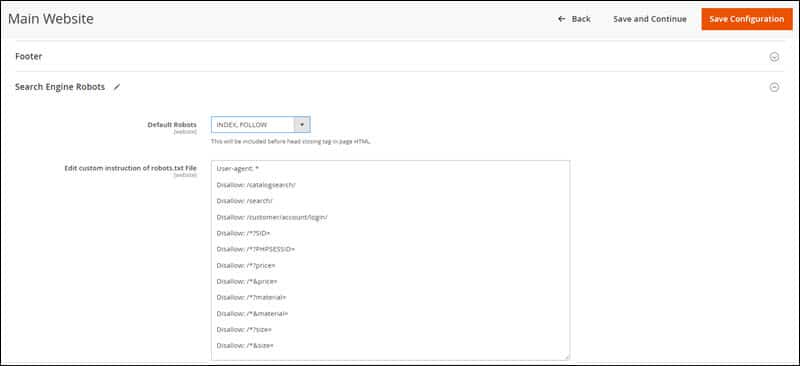
Note: If you are launching the website for the first time, double-check that the value of the Default Robots setting is INDEX, FOLLOW. If you launch a website with NOINDEX, NOFOLLOW, Google will not index your website or check for later changes.
Best robots.txt optimization practices for ecommerce shops involve disallowing the following:
- Internal search results pages.
- Login pages.
- All URLs containing session ID parameters.
- URLs with product filtering criteria (for example, size, price, material, etc.).
Here’s an example of a robots.txt file that caters to the criteria mentioned above.
User-agent: *
Disallow: /catalogsearch/
Disallow: /search/
Disallow: /customer/account/login/
Disallow: /*?SID=
Disallow: /*?PHPSESSID=
Disallow: /*?price=
Disallow: /*&price=
Disallow: /*?material=
Disallow: /*&material=
Disallow: /*?size=
Disallow: /*&size=
Step 9: Create and Optimize a Sitemap
Sitemaps tell search engines which pages on your website you deem most valuable. They also help search engines crawl through your content and determine the context of your website.
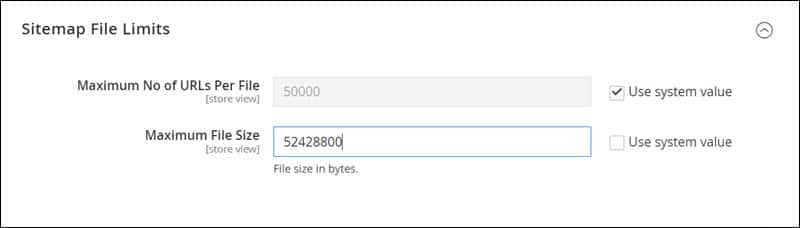
Magento comes with XML sitemap functionality. To configure your XML sitemap in Magento 2, navigate to STORES > Configuration > CATALOG > XML Sitemap.
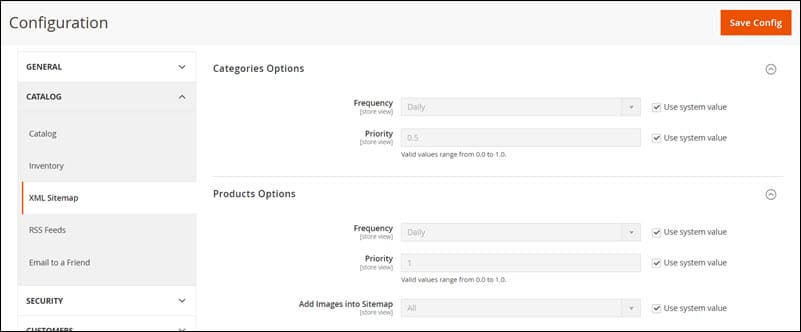
The categories and products options are configured correctly by default. The Maximum No of URLs Per File setting complies with best SEO practices, but you can raise the Maximum File Size to 52428800 (50MB).
Ensure that your sitemap regenerates automatically by following these steps:
- Scroll down to the Generation Settings section.
- Uncheck the Use system value checkbox and change the value of the setting from No to Yes.
- Specify the time and frequency of the sitemap regeneration process.
- Save Config.
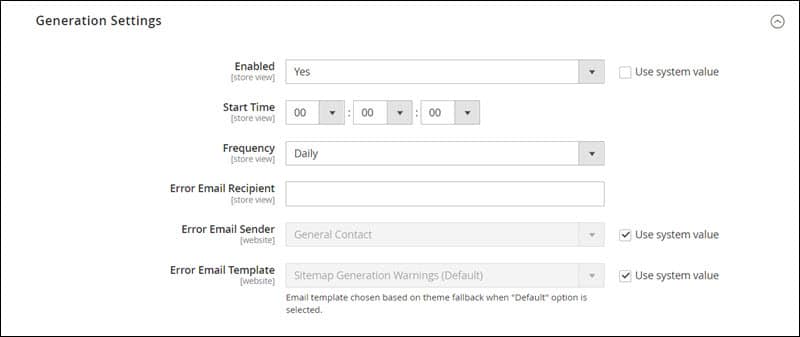
This will ensure that Google is up to date with all page changes.
After configuring sitemap settings, it is time to generate a sitemap for your store.
- Navigate to MARKETING > Site Map.
- Click the orange Add Sitemap button located in the upper right corner of the page.
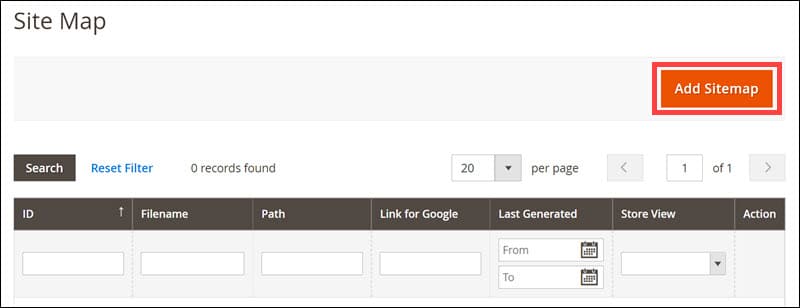
- Enter the name of your sitemap (for example, sitemap.xml) and its location (it is best to place the sitemap in the root directory of your HTML server).
- Save & Generate.
The sitemap will not work unless it is enabled. Enable Magento’s sitemap by referencing it in your robots.txt file. Edit the file and enter the following text.
Sitemap: http://www.examplewebsite.com/sitemap.xml To get the most out of the sitemap, you must also submit it to Google Search Console. The process of submitting a sitemap to GSC is described at a further point in this guide.
Step 10: Set Up Google Analytics
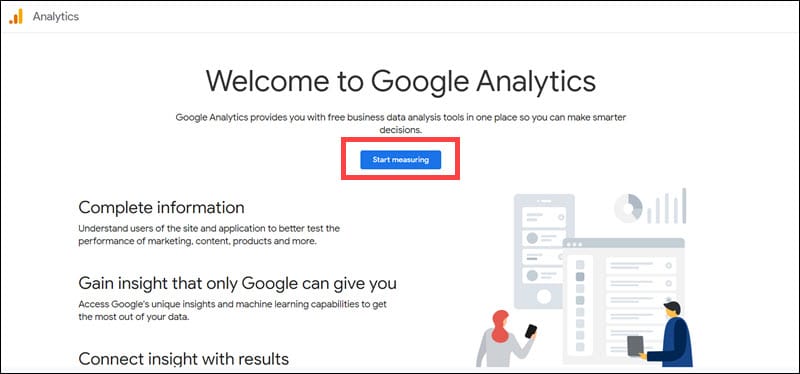
Google Analytics tracks and predicts user engagement with your website, so it is important to enable it in your Magento shop. To do so:
- Login to your Google account.
- Search for Google Analytics.
- Click the Start Measuring button.
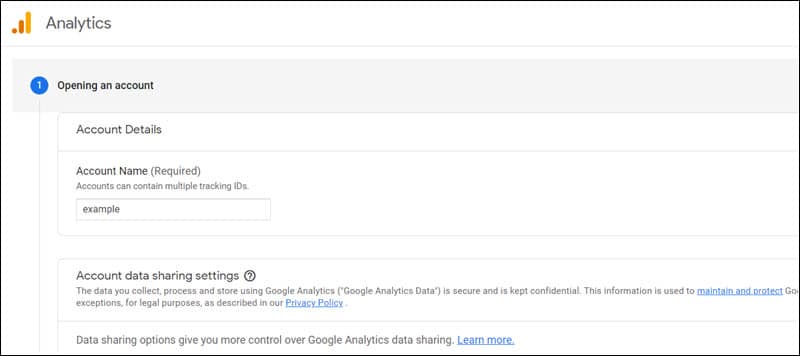
- Enter an account name and click Next.
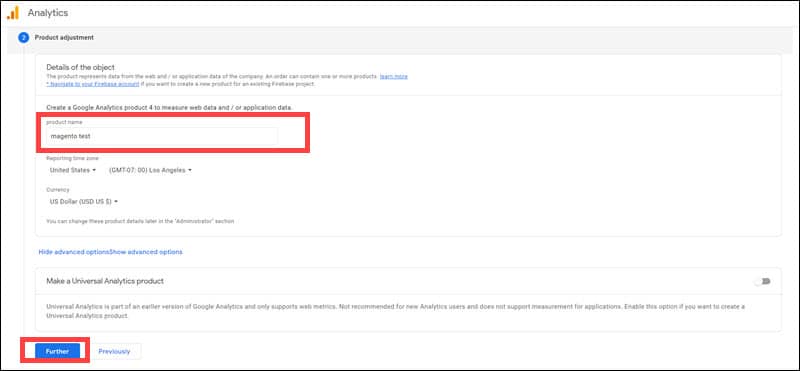
- Enter a product name, scroll down, and click the Further button.
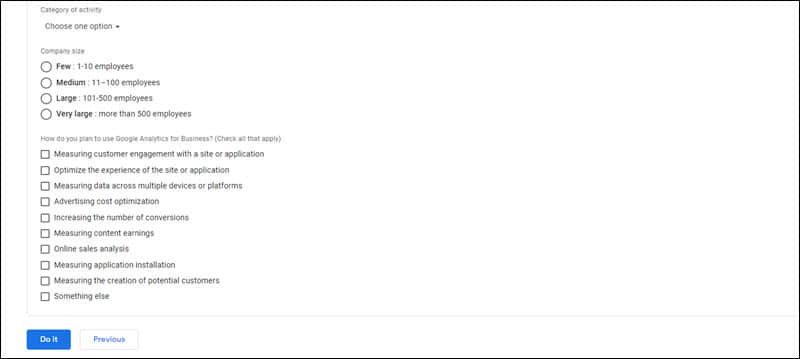
- Mark the options that describe your company and goals and click the Do it button.
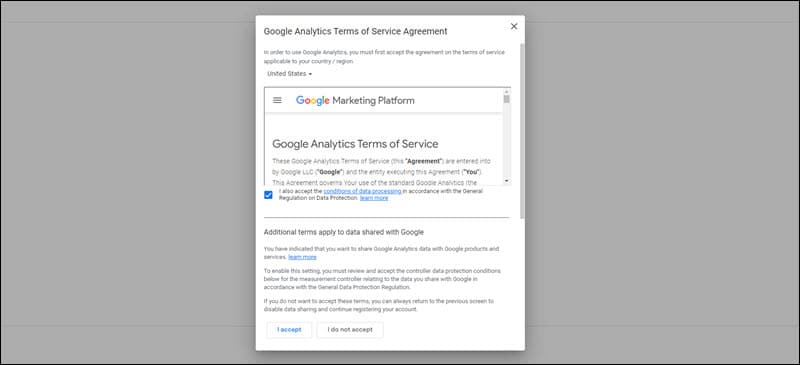
- Accept the Terms of Service.
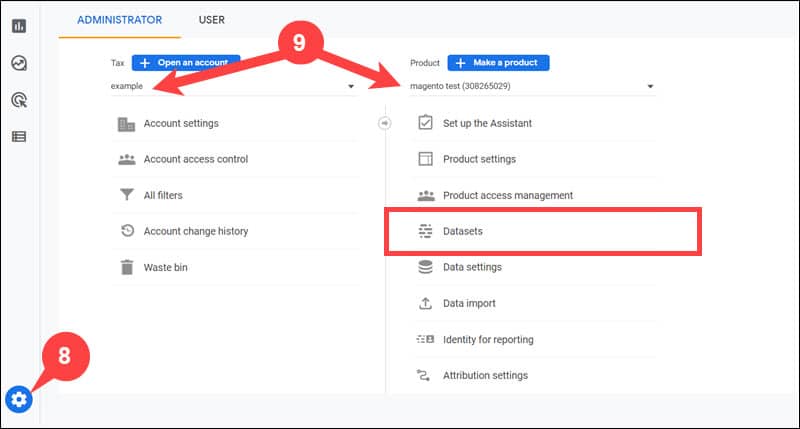
- Enter administrator settings by clicking on the gearwheel button in the bottom left corner.
- Select your account and product and click Datasets in the product menu.
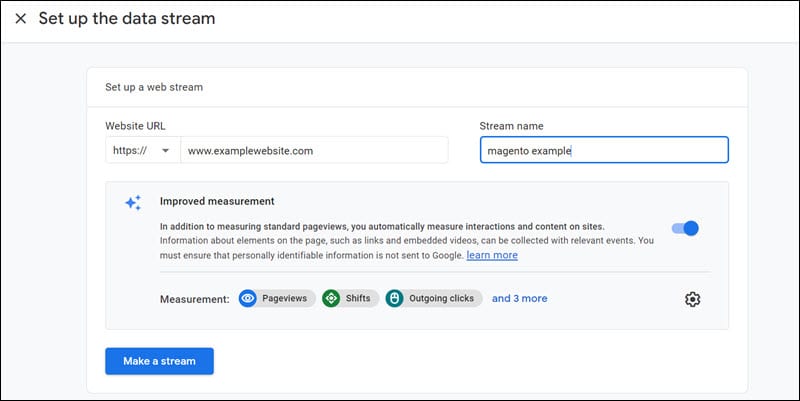
- Select the Web option. Enter your website URL and name your data stream. Click the Make a stream button.
- Copy the MEASUREMENT ID from the window that pops up.
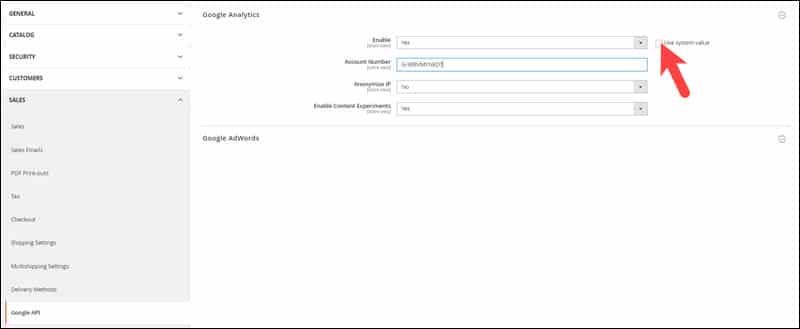
- Log in to Magento back-end and navigate to STORES > Configuration > Sales > Google API.
- Select the Google Analytics card. This will open a dropdown menu.
- Uncheck the checkbox next to the Enable setting and change the value to Yes.
- Enter your measurement ID into the Account Number field.
- Change the value of the Enable Content Experiments to Yes.
- Save Config.
- Visit the Google Analytics Dashboard. Navigate to Life cycle > Engagement > Conversions > Ecommerce > Overview.
- Select Ecommerce Settings.
- Enable Ecommerce and Save.
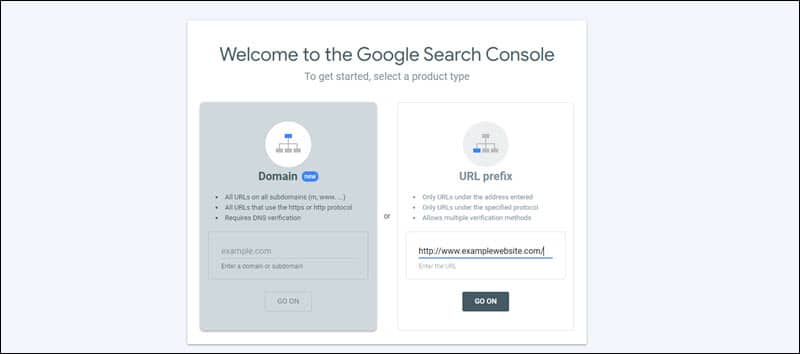
Step 11: Set Up Google Search Console
Google Search Console is a valuable tool for measuring website performance and helps further optimization. To set up Google Search Console:
- Visit the Google Search Console page and click the Get started button.
- Select the URL prefix option by entering your website’s URL into the designated field and clicking the GO ON button.
- Select the HTML tag card and copy the meta tag.
- Copy the meta tag to your website’s homepage, return to the Google Search Console window and click Verify.
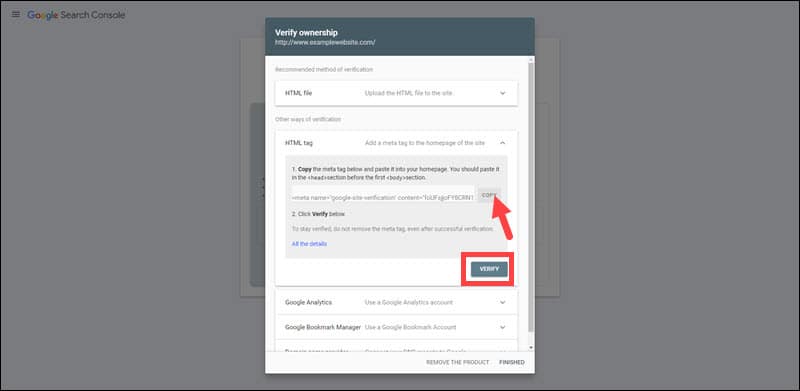
After verifying ownership, a pop-up window will notify you that the integration was successful.
Google Search Console offers webmasters the option to upload their website’s sitemap to improve indexing:
- Sign into Google Search Console.
- Select your website from the dropdown menu in the upper left corner of the page.
- Select the Index card and then Sitemaps.
- Submit your sitemap URL in the designated field and click the SUBMIT button.
Step 12: Use 301 Redirects
An important SEO-related Magento option called Auto-redirect to Base URL allows ecommerce developers to redirect users and visitors from subdomains to the store. The problem with this feature is that it uses a 302 redirect by default.
Due to their temporary nature, 302 redirects waste valuable link equity and should be replaced with a 301 redirect.
To do this:
- Navigate to STORES > Configuration > GENERAL > Web.
- Uncheck the box next to Auto-redirect to Base URL.
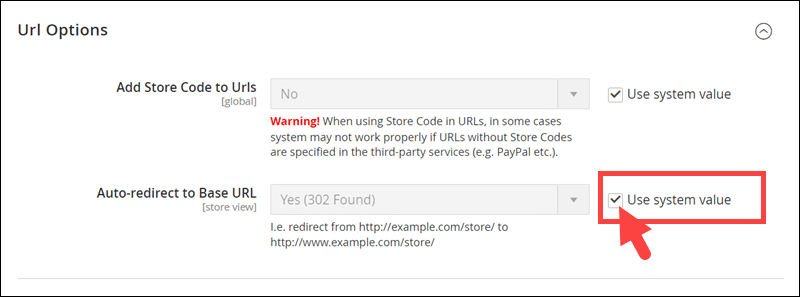
- Change Yes (302 Found) to Yes (301 Moved Permanently).
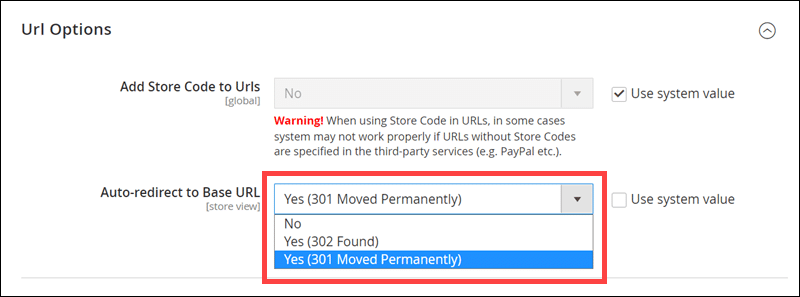
- Save Config.
Step 13: Check for 404s
The 404 code means a requested page cannot be found. While these errors do not impact the ranking of your website directly, they can do so indirectly because they negatively impact user experience.
To find 404s in your Magento store:
- Log into your Google Search Console account.
- Navigate to Diagnostics > Crawl Errors.
- Select the Not Found tab.
To fix 404s, remove the missing pages or redirect users to related pages.
Step 14: Use Structured Data Markup
Structured Data Markup helps search engines understand the content on your website and create feature snippets. These snippets can contain product reviews and prices, excerpts from your blog articles, or any other content the search engine deems valuable.
Manually implementing Structured Data Markup is a time-consuming process. Fortunately, you can automate the process with various tools such as Google’s Structured Data Tagging Assistant or third-party Magento integrations. User interfaces and options vary from tool to tool, but they work the same way.
The following steps describe how Structured Data Markup tools typically work:
- You provide the URL or HTML code of a page on your website.
- Select a category that applies to the content on the page.
- Highlight elements on your page.
- Select categories that apply to the highlighted elements and enter values if needed.
- The tool generates a downloadable HTML file.
After downloading the HTML file, upload it to implement Structured Data Markup in your content.
Step 15: Optimize Website Speed
Website speed depends on many factors. However, you can vastly improve it by tweaking Magento settings.
Change Hosting Provider
Magento needs SSL and a minimum of 2GB of RAM to function properly, but depending on the complexity of your website, obligatory requirements might exceed minimal requirements.
Choose a hosting provider that specializes in hosting Magento-powered stores and allows you to upgrade your subscription plan if needed.
Remove Unnecessary Third-Party Extensions
Extensions offer various exceptional features but add code to your website, decreasing loading speed.
Conduct periodical audits to determine whether any Magento extensions are draining your resources. If you find such extensions, optimize them if possible or consider removing them to improve website speed.
Use Lightweight Themes
Widgets and custom elements in some Magento themes can underperform when used for complex websites.
Before purchasing a Magento theme, conduct tests to determine how it impacts loading speed.
Note: If you haven’t customized Magento yet, learn how to install a new Magento theme.
Minimize the Number of Fonts in Use
A variety of fonts negatively impact user experience because they decrease website speed and make content difficult to read.
Best design and SEO practices recommend using as few fonts as possible.
If you have any unnecessary fonts on your website, remove them. The removal process does not only refer to disabling the font but also removing it from the website’s code.
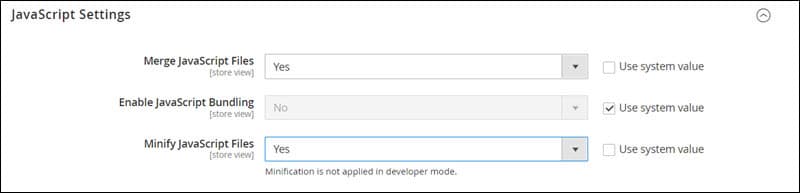
Configure JS Settings
Merging and minifying JavaScript files is considered standard code optimization practice. Optimizing JavaScript files reduces code and removes empty spaces, leading to faster website speed.
You can allow Magento to minify and merge JavaScript files.
- Navigate to STORES > Configuration > ADVANCED > Developer > JavaScript Settings.
- Uncheck the boxes next to Merge JavaScript Files and Minify JavaScript Files settings and change their respective values to Yes.
- Save Config.
Configure CSS Settings
Like with JS files, merging and minifying CSS files benefits website speed. You can allow Magento to optimize CSS files.
- Scroll down to CSS Settings.
- Uncheck the boxes next to Merge CSS Files and Minify CSS Files settings and change their respective values to Yes.
- Save Config.
File merging and code minification aren’t enough if you use external CSS styles. Styles from external files delay page loading until the files themselves finish loading. Using critical CSS allows you to prioritize or defer the loading of individual CSS files.
Magento 2 comes with Critical CSS functionality.
- Uncheck the box next to the Use CSS critical path setting and set its value to yes.
- Save Config.

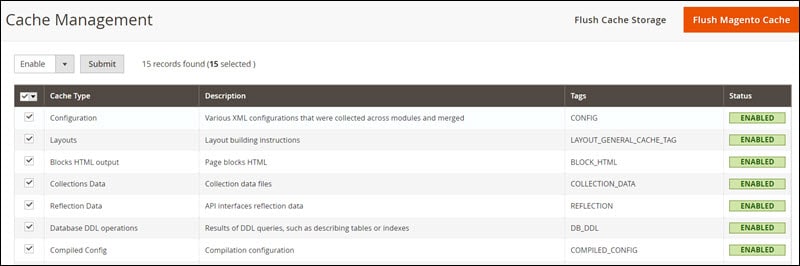
Enable Caching
Every time a visitor opens a page on your website, the server pulls data from the database and displays it. Caching is the process of creating an image of a page the first time a visitor opens it to prevent the server from pulling data and generating it from scratch. This process relieves the server and allows for faster page loading.
Enabling all caches in Magento 2 benefits website speed. The following steps outline the process.
- Navigate to SYSTEM > Cache Management.
- Select all caches by clicking on the checkbox in the grey area and selecting Select All.
- Click the Refresh button above the checkboxes and select Enable from the dropdown menu.
- Click Submit.
Advanced Developer Tips
The following practices boost Magento 2 performance but should only be handled by an experienced developer.
- Use advanced JS bundling.
- Enable deferred JS loading.
- Turn on production mode.
- Use CDN.
- Move to HTTP/2.
- Implement Varnish cache.
- Implement Redis.
- Update indexers.
- Clean database logs.
Step 16: Monitor and Enhance Magento Performance
Different websites have different optimization needs, so it is important to test and monitor the performance of your Magento store.
Test changes on a store copy with sample data to find issues before they appear in the live store. Monitor the performance of your live store to catch opportunities for improvement.
Important Additional Steps
Working on a Magento SEO strategy is an ongoing process. You have to take into account the following additional steps to ensure a successful campaign.
Start a Blog
Posting content relevant to your industry drives organic traffic and impacts ranking in numerous ways.
- Blog posts allow brands to target and rank for numerous keywords.
- Google deems websites with quality content on a particular set of topics as knowledgeable and authoritative.
- Blog content provides opportunities for quality backlinks.
- Blog posts are a way to target your buyer persona by delivering content that addresses their pain points.
Additional use cases for ecommerce blogs include:
- Promoting new products.
- Drawing attention to underselling products.
- Creating and nurturing customer relationships.
Include quality content in your marketing strategy and invest in the content marketing department as it is the most natural way to reach your target audience.
Create an Off-Page SEO Strategy
Off-page SEO is every SEO effort that does not include modifying your website. While on-page SEO efforts bear the most fruit, search engines still value off-page SEO.
Off-page SEO practices include:
- Guest posting.
- Influencer marketing.
- Social media marketing.
- Brand mentions (linked and unlinked).
Engage with your customer base and businesses in your industry using all channels at your disposal to ensure organic backlink creation and positive brand image.
Create Social Media Presence
Social media presence is a term used to describe a brand’s visibility on major social media platforms and its local and global community engagement.
A social media presence benefits SEO in numerous ways:
- Accounts rank on search engines and social media search pages.
- Content drives traffic to your website.
- Influencers act as intermediaries between a business and its target audience.
- Google favors businesses’ social media profiles that have contact information.
Create social media accounts and include up-to-date contact information. Invest in social media marketing to maximize impressions and engagement. Post business updates and engage with the community to promote a sense of loyalty.
Conclusion
Follow these guidelines and your Magento 2 store will be optimized for SERP ranking and performance.
However, these practices are of no value if your store is powered by Magento 1. To receive the latest security updates and make the most of new features, make sure you have migrated from Magento 1 to Magento 2.
