FlexForms Cascade Setup
This document explains the process of setting up FlexForms cascading payment options used with Epoch or SegPay. Merchants should also contact an Epoch or SegPay technical support representative to confirm that all the necessary changes have been made.
Test transactions DO NOT show up in the CCBill Admin Portal, and you must complete an actual transaction to verify everything is set up correctly.
How to Configure a FlexForms Cascade Setup
To streamline the configuration process, access the CCBill Admin Portal and the Epoch/SegPay admin portal simultaneously.
Configuring cascades is a four-step process:
- STEP 1: Create a FlexForms cascading payment flow.
- STEP 2: Set the necessary parameters in the URLs Library. (Each payment processor uses different parameters.)
- STEP 3: Set the parameters in the admin portal of the third-party payment processor. Work with their tech support team if necessary.
- STEP 4: Promote the cascading payment flow to live and embed the LIVE link into your website's code.
STEP 1: Create a CCBill Payment Flow
The Payment Flows feature allows merchants to configure billing cascades for different payment options. This means setting up which processor is the primary option, which is the secondary option, and so on.
For example, if a sale was denied via CCBill, you can re-route the customer and allow them to complete the transaction through Epoch or SegPay.
To create a payment flow cascade:
1. Access the Admin Portal.
2. Create a payment flow by following the instructions in the FlexForms Quick Start Guide.
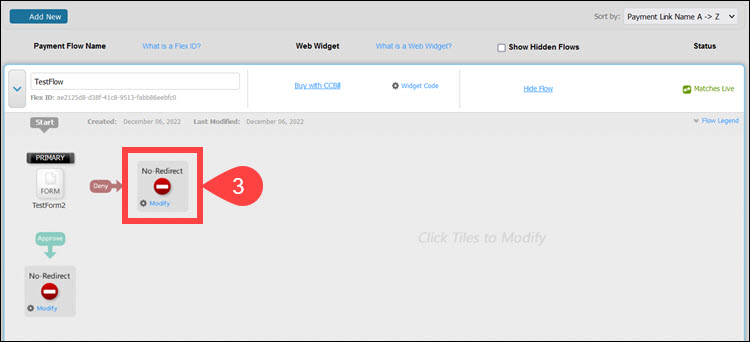
3. Click the Deny Path tile.
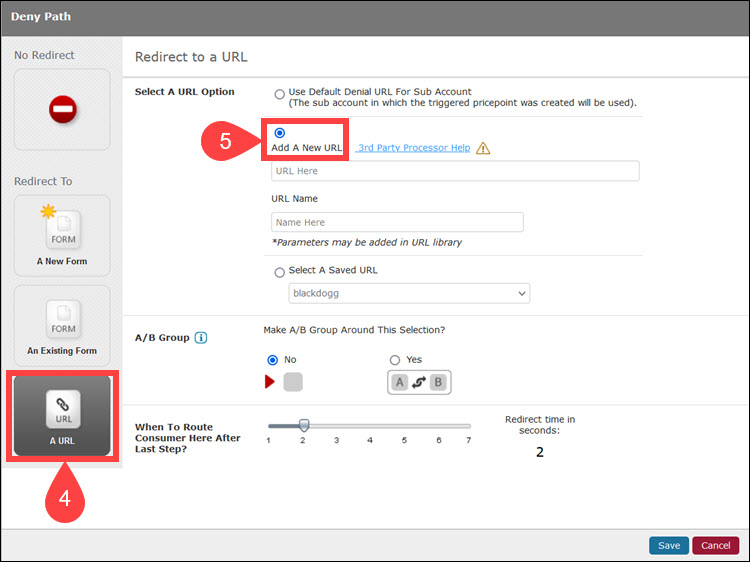
4. Select A URL as your redirect-to option.
5. Click Add a New URL.
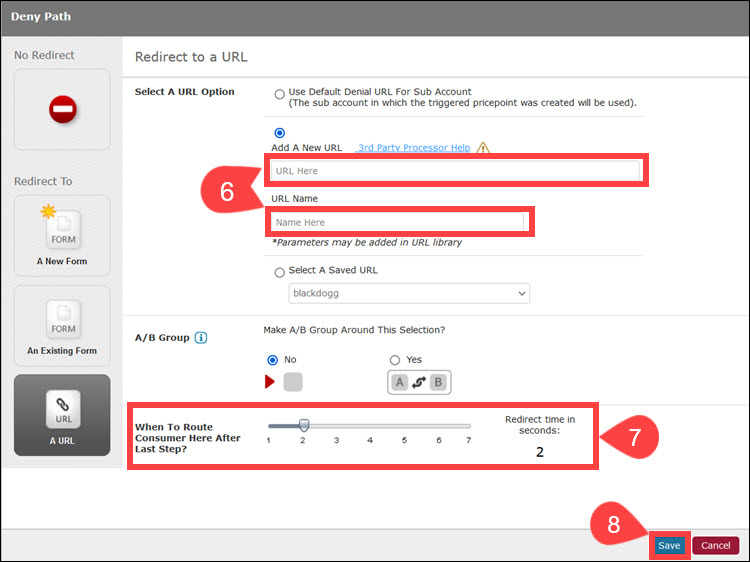
6. Enter the form URL of your secondary payment processor and URL Name in the appropriate fields.
7. Set Redirect Time (optional).
8. Click Save.
Steps 2 and 3 differ depending on your choice of third-party payment processor. Please follow the instructions outlined for the third-party payment processor of your choice.
STEP 2 (for Epoch): Epoch Parameter Setup
To set the required parameters for Epoch:
1. Access the FlexForms URLs Library in the CCBill Admin Portal.
2. Click Add link in the Name/Value Pairs column for the URL you previously added.

3. Define the Name/Value pairs.
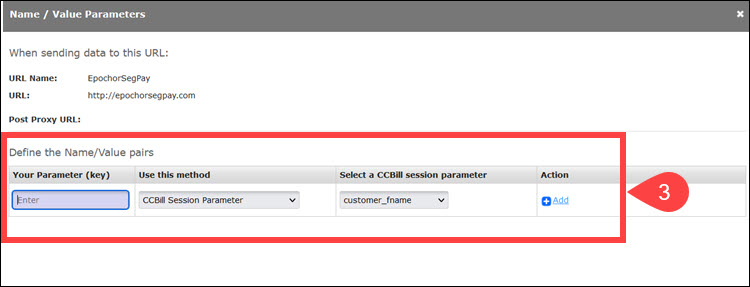
Enter the parameters as provided in the table below:
| Your Parameter (Key) | Use this method | Detail |
|---|---|---|
| co_code (Company Code) | Merchant Defined Static Parameter | See instructions below |
| pi_code (Product Code) | Merchant Defined Static Parameter | See instructions below |
| pi_returnurl | CCBill Session Parameter | returnUrl |
| response_post | Merchant Defined Static Parameter | 1 |
| x_enc | CCBill Session Parameter | encSession |
| x_reservationId | CCBill Session Parameter | reservationId |
You can obtain the required pi_code information from the Epoch admin:
- Go to the Epoch Reports > Tools > Product Code Manager.
- Click View Pricing Options beside the site which you would like to setup the CCBill configuration; the pi_codes are listed in the first column.
Enter this value in the appropriate field in the URLs Library.
STEP 2 (for SegPay): SegPay Parameter Setup
To set the required parameters for SegPay:
1. Access the FlexForms URLs Library in the CCBill Admin Portal.
2. Click Add link in the Name/Value Pairs column for the URL you previously added.
3. Define the Name/Value pairs.
Enter the parameters as provided in the table below:
| Your Parameter (Key) | Use this method | Detail |
|---|---|---|
| enc | CCBill Session Parameter | encSession |
| response_post | Merchant Defined Static Parameter | 1 |
| x-eticketid | Merchant Defined Static Parameter | See instructions below |
To acquire the eticketid value from SegPay:
1. Go to the Merchant Setup > Package area.
2. Pick the package for which you would like to set up CCBill Affiliate Cascade Billing. You are going to need the Package ID and the Bill Config ID that together make up the eticketid.
3. Once on the package screen, go to the Price Points section.
4. Scroll to the ButtonCode column. In this column, you will see the join link for that option.
5. Copy the values after the eticketid variable. This is shown in the green box below.
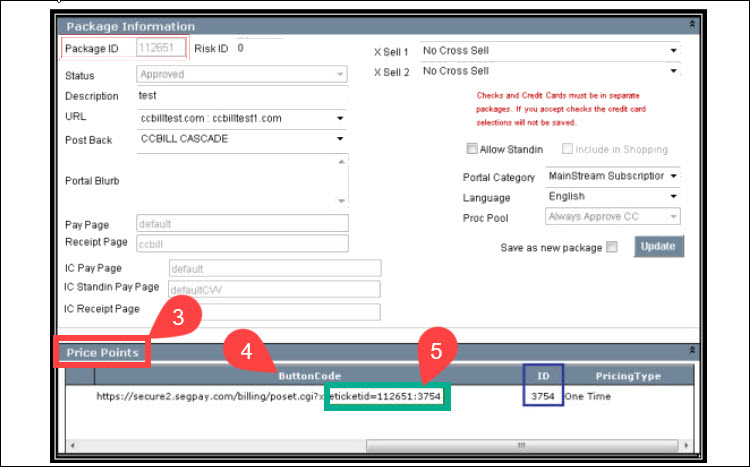
6. The Package ID is at the top of the screen.
7. The Price Point ID can be found at the bottom of the screen, under the ID column.
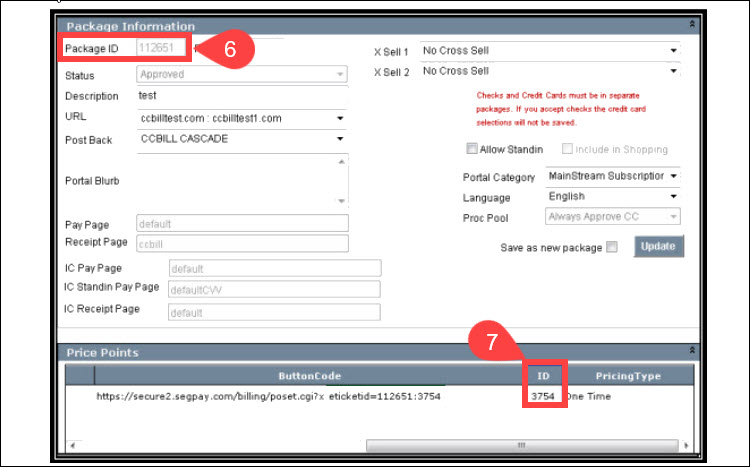
Put the Package ID together with the Price Point ID and separate them with a colon. This is the eticketid that you see in the button code link. In this example, you have the following values:
- Package ID: 112651
- ID: 2754
The eticketid value is 112651:2754. Enter this value in the eticketid field in your CCBill Admin.
STEP 3 (for Epoch): DataPlus Configuration & Receipt Page
To finalize the cascade, merchants must also update Postback configurations with Epoch. Without doing this, the transaction data is not passed into the system. Please ask Epoch Tech Support to update this for you.
Contact Epoch Support to configure your DataPlus information to the following:
- Hostname: epoch.ccbill.com
- Port: 3306
- Database: epoch
- Password: ZEnumeyAw6uT+p7f
The CCBill Postback URL is:
https://datalink.ccbill.com/postBack.cgi?The following fields are contained in the post:
- username - Customer's username
- password - Customer's password
- email - Customer's email address
- name - Customer's name
- address - Customer's street address
- city - Customer's city
- state - Customer's state
- zip - Customer's ZIP
- country - Customer's country
- order_id - Customer's Epoch assigned order ID (member ID)
- transaction_id - ID assigned per transaction
- currency - Default currency of the product
- ipaddress - Customer's IP address
- amount - Amount of the sale by default currency
- localamount - Amount of the sale by buyer's local currency
- reseller - Reseller code of the affiliate
- site - Optional reseller code that you pass to Epoch
- pi_code - Product code for the product purchased
- session_id - ID of the session recorded at the point of sale
STEP 3 (for SegPay): Postback Configurations and Receipt Page
To finalize the SegPay cascade setup, merchants must update SegPay Postback configurations to use the second trans post link for the CCBill system.
Transactional data is not passed into the system if you do not set this up. Please contact SegPay Tech Support to make the necessary changes.
STEP 4: Promote FlexForm to LIVE
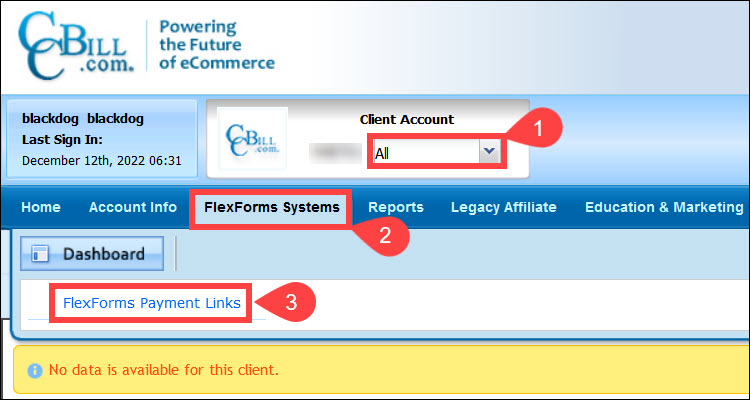
The final step involves promoting the cascading payment flow to a live environment after setting up the parameters in both admin portals. To push a Payment Flow to Live (i.e., to link a Payment Flow to your website), you need to:
1. Set the subaccount dropdown menu to All.
2. Access the FlexForms Systems menu.
3. Select FlexForms Payment Links.
4. Click Promote to Live in the row of the Payment Flow you wish to push to the Live environment.
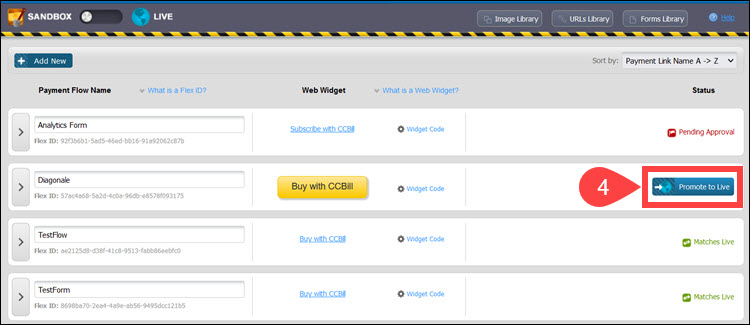
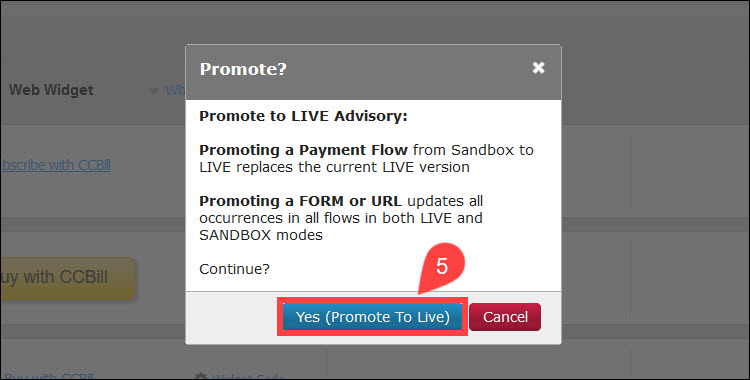
5. Select Yes (Promote to Live) to confirm your choice. Once you promote to live, a Web Widget Code is automatically generated.
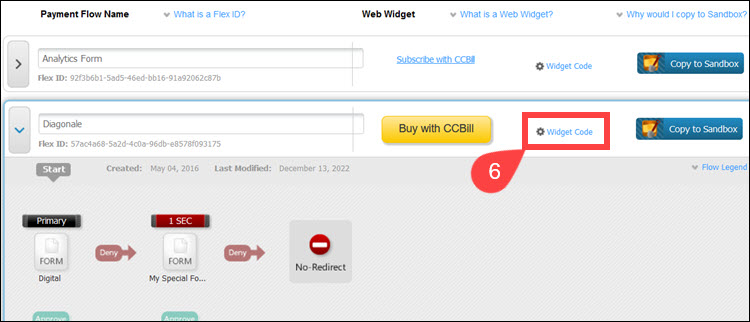
6. Click the Widget Code button in the recently promoted Payment Flow row.
7. The Links Code window will open. The right side of the Link Codes window will display the Widget Code and URL that will launch the LIVE version of the Flow.
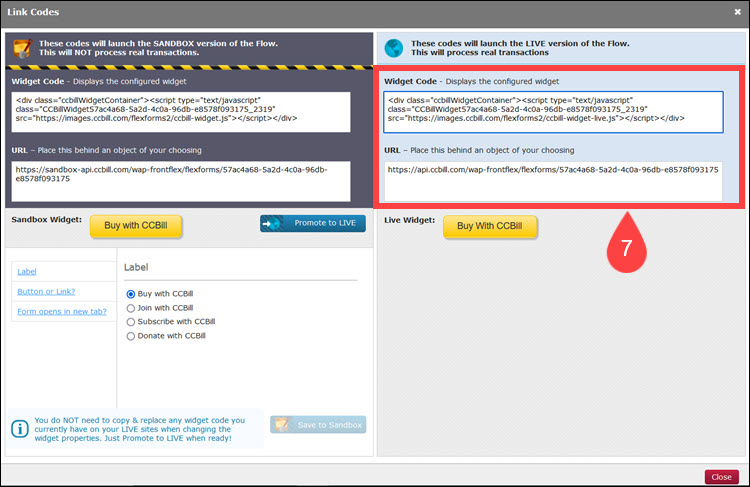
8. Copy the configured LIVE Widget Code Snippet or URL and embed it in your website's code to make use of the Web Widget functionality.
Now customers can click on the button or hyperlink to open the Payment Flow.
Support
For assistance with the cascade configuration process, contact CCBill or Epoch merchant support services.
CCBill Merchant Support
Website: https://ccbill.com/contact
Toll-Free: 800.510.2859
Phone Worldwide: International Number Listing
Email: merchantsupport@ccbill.com
Live Chat: Click Here
Epoch Merchant Support
Website: https://epoch.com/business_services#sec4
Phone Worldwide: 1 310.664.5700 (ext. 6011)
Toll-Free: 1.888.627.3888
Email: support@epoch.com
Skype: 1.800.627.3888