CCBill WooCommerce Module
The CCBill WooCommerce billing module connects your CCBill account with the WooCommerce platform for WordPress. It supports both one-time payments and subscription billing.
You can charge customers either through hosted payment forms (FlexForms) or using token-based payments via an Advanced integration.
Before installing the plugin, make sure you have the following:
- WordPress with WooCommerce installed.
- Woo Subscriptions (required for subscription products).
- An active CCBill merchant account.
Note: To sell subscriptions, you need Woo Subscriptions, a paid plugin from Automattic. While the CCBill module handles subscription billing, Woo Subscriptions lets you create and manage subscription products in your WooCommerce store.
Install CCBill WooCommerce Module
The CCBill WooCommerce module can be installed directly from the WordPress Plugin Directory or by uploading the plugin file manually.
Option 1: Install via WordPress Plugin Directory
To install the plugin from the WordPress Dashboard:
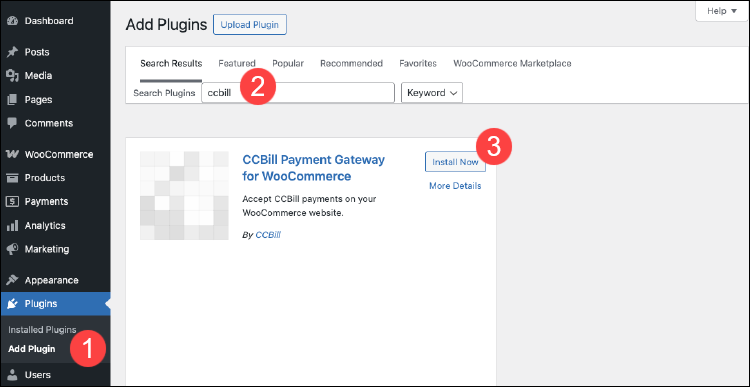
1. Navigate to Plugins and select Add Plugin.
2. Type CCBill into the search field and press Enter.
3. Locate the CCBill Payment Gateway for WooCommerce plugin and click Install Now.
Option 2: Install via File Upload
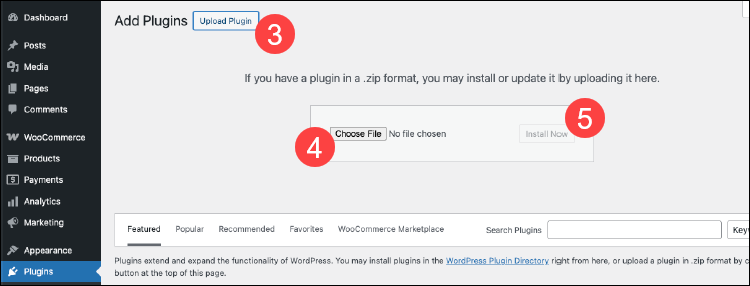
If you have already downloaded the CCBill Payment Gateway for WooCommerce plugin as a .zip file, you can upload it manually:
1. Log in to the WordPress Dashboard.
2. Select Plugins and then Add Plugin.
3. Click Upload Plugin.
4. Click Choose File and select the plugin .zip file.
5. Select Install Now.
Activate Plugin
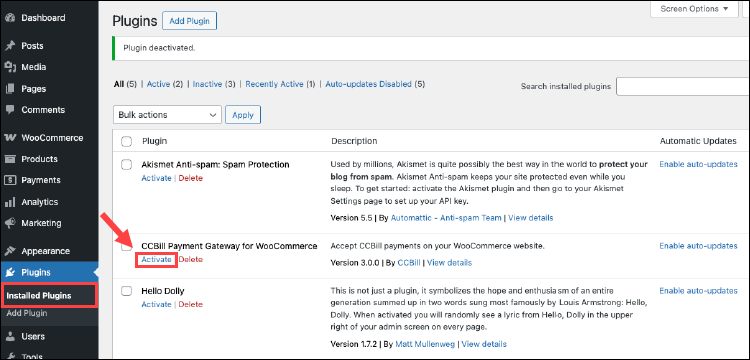
After the installation, you must activate the plugin before it can be used:
1. Navigate to Installed Plugins in the Plugins menu.
2. Locate CCBill Payment Gateway for WooCommerce.
2. Click Activate to enable the plugin.
Configure CCBill Account
Before continuing with the setup, decide which integration method you want to use with WooCommerce:
- Advanced token-based integration (recommended).
- FlexForms integration.
Advanced Integration
The Advanced integration allows customers to enter their payment details directly on your WooCommerce checkout page, without being redirected to a separate hosted payment form. Key benefits include:
- A seamless checkout experience.
- Support for multiple subscriptions in a single cart.
- Simplified subscription management with WooCommerce.
Subscription Handling
When using the Advanced integration for subscriptions:
- A payment token is created during the customer's first successful payment.
- The token is reused for all subsequent recurring charges.
- Webhooks and payment forms are not required.
Required Information
To enable Advanced integration, please work with CCBill support to ensure you have the following:
| Name | Description |
|---|---|
| Client Account Number | Your six-digit CCBill account number. |
| Client Sub-Account Number (Token Generation) | A sub-account used to generate payment tokens (not used for charging). |
| Client Sub-Account Number (Non-Recurring) | A sub-account for one-time purchases. |
| Client Sub-Account Number (Recurring) | A sub-account for subscription charges (required for subscriptions). |
| Frontend Username | Username used for token creation. |
| Frontend Password | Password used for token creation. |
| Backend Username | Backend username used for token creation. |
| Backend Password | Backend password used for token creation. |
| Dynamic Pricing | Must be enabled on your CCBill account. |
Once CCBill support has confirmed and provided the required Advanced integration details, no additional configuration is needed in your CCBill account.
If you do not plan to use CCBill's hosted payment forms, you can proceed directly to the WooCommerce Configuration section.
FlexForms Integration
The FlexForms integration provides a hosted checkout experience. During checkout, customers are redirected to a CCBill-hosted payment page where they enter their payment details. After the payment is completed, the customer is returned to your WooCommerce store.
Subscription Handling
When using the FlexForms integration for subscriptions:
- Subscriptions are created and managed by CCBill.
- CCBill initiates recurring charges (rebills).
- Subscription updates are synced back to WooCommerce using Webhooks.
- Subscription cancellations are processed through the CCBill Datalink API.
Required Information
To enable the FlexForms integration, work with CCBill support to ensure the following information is available and correctly configured.
| Name | Description |
|---|---|
| Client Account Number | Your six-digit CCBill account number. |
| Client Sub-Account Number (Non-Recurring) | A sub-account used for one-time purchases. |
| Client Sub-Account Number (Recurring) | A sub-account used for subscription charges. |
| FlexForm ID | ID of the CCBill FlexForm used to collect payment. |
| Datalink Username | CCBill DataLink username (required for subscription support). |
| Datalink Password | CCBill DataLink password (required for subscription support). |
| Salt Key | Your CCBill Salt value. |
| Dynamic Pricing | Must be enabled on your CCBill account. |
Before using the plugin with FlexForms, ensure your CCBill account settings are properly configured. Incorrect or missing settings will prevent the payment module from functioning correctly.
Note: Legacy CCBill payment forms are not supported for WooCommerce integration.
Confirm with CCBill Merchant Support that Dynamic Pricing is enabled for each sub-account used with WooCommerce.
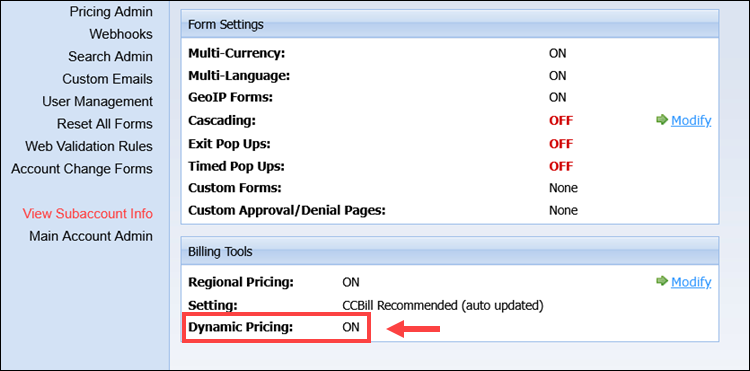
To verify that Dynamic Pricing is active:
1. Log in to the CCBill Admin Portal.
2. Click Account Info and select Feature Summary.
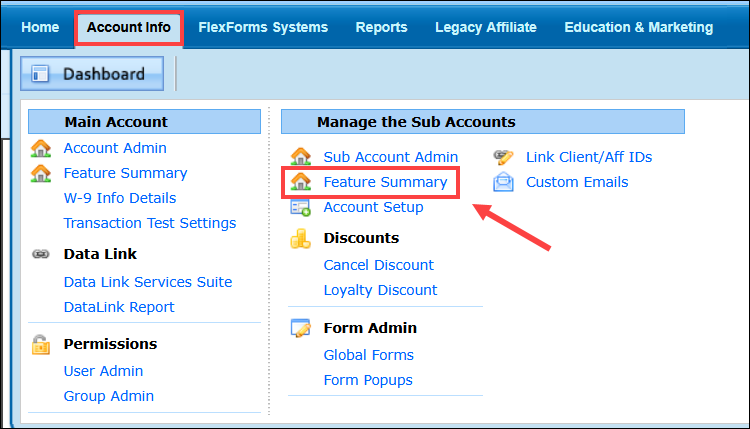
3. Select the sub-account you want to review from the list.
4. Confirm that Dynamic Pricing is marked as Enabled in the Billing Tools section.
A Salt or Encryption Key is a random string used to strengthen encryption and protect sensitive data during payment processing. To generate a Salt, contact CCBill Merchant Support and request a Salt for each sub-account used for WooCommerce processing.
Once the Salt is created, you can view it in the Admin Portal:
1. Select the sub-account you want to review from the sub-account dropdown.
2. In the left-hand menu, click Advanced.
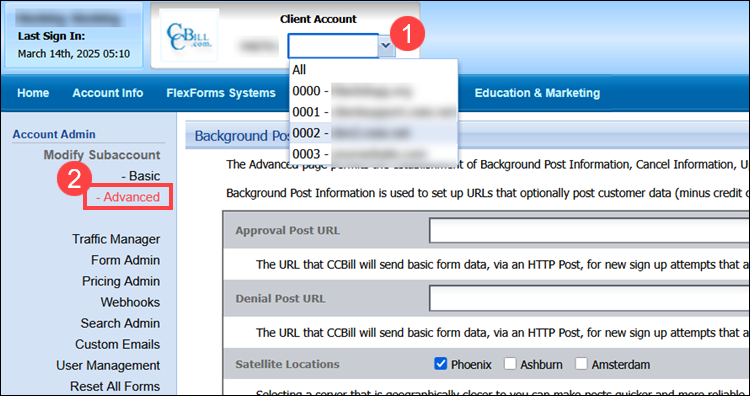
3. Locate the Encryption key field in the Upgrade Security Setup Information section.
You will need to copy this key and paste it into the WooCommerce dashboard during the WooCommerce configuration step.

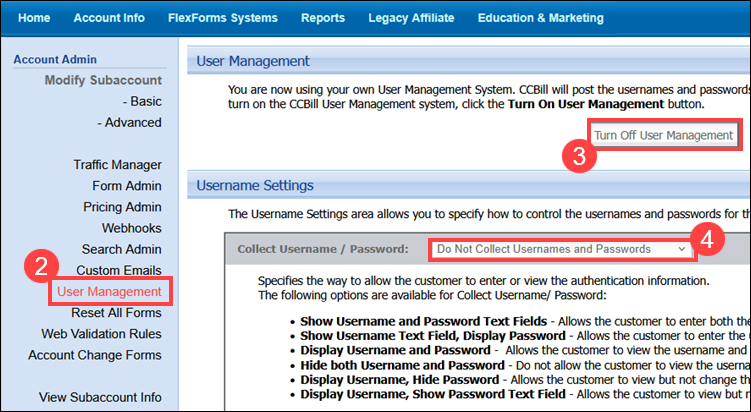
Since this account will be used for Dynamic Pricing transactions rather than managing user accounts, User Management should be disabled for each sub-account used with WooCommerce.
In the Admin Portal:
1. Select the relevant sub-account from the sub-account dropdown.
2. Select User Management from the left-hand menu.
3. Click Turn Off User Management in the top section.
4. Select Do Not Collect Usernames and Passwords in the Username Settings section.
Webhooks allow your WooCommerce store to receive notifications from CCBill when key payment and subscription events occur. These include successful payments, renewals, and cancellations.
When using FlexForms, Webhooks must be configured for each sub-account used with WooCommerce.
Note: Webhooks are not required when using the Advanced (token-based) integration.
To enable Webhooks in the CCBill Admin portal:
1. Select the appropriate sub-account from the sub-account dropdown.
2. Select Webhooks from the left-hand menu.

You can now start adding the required Webhooks: Approval, Cancellation, and Renewal.
Approval Webhook
The Approval webhook notifies WooCommerce when a payment is successfully processed. This webhook must be added to each sub-account used with WooCommerce.
1. Under Webhook URL, enter your WooCommerce store's base URL followed by:
/?wc-api=WC_Gateway_CCBill&Action=Approval_PostFor example, if your WooCommerce store is located at http://www.test.com, the Approval Webhook URL would be:
http://www.test.com/?wc-api=WC_Gateway_CCBill&Action=Approval_Post2. Set Webhook Format to URL ENCODED.
3. Select the NewSaleSuccess and NewSaleFailure event triggers.
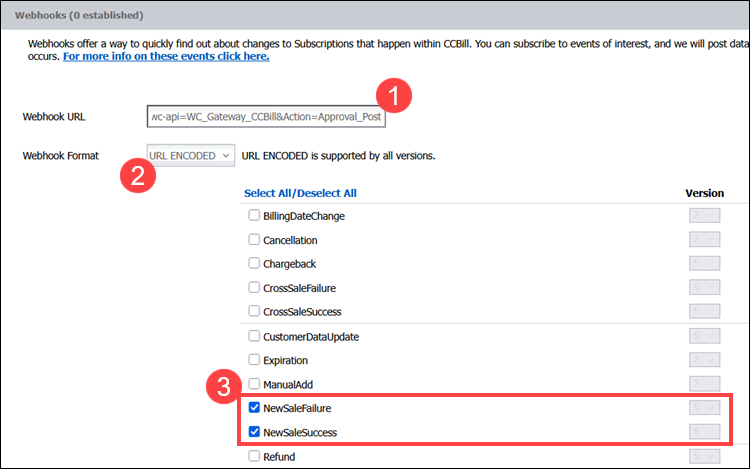
4. Click Update at the bottom of the page to save your changes.
Cancellation Webhook
The Cancellation webhook notifies WooCommerce when a subscription is cancelled. To add a Cancellation webhook:
1. Click Add in the Add Webhook field.

2. Under Webhook URL, enter your WooCommerce store's base URL followed by:
/?wc-api=WC_Gateway_CCBill&Action=Cancel_PostFor example, if your WooCommerce store is located at http://www.test.com, the Cancellation URL would be:
http://www.test.com/?wc-api=WC_Gateway_CCBill&Action=Cancel_Post3. Set Webhook Format to URL ENCODED.
4. Check the Cancellation and Expiration event triggers.
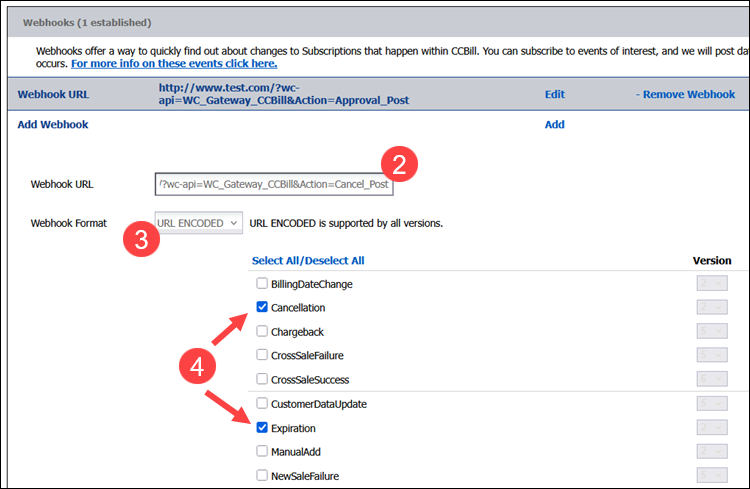
5. Click Update to save your changes.
Renewal (Rebill) Webhook
The Renewal webhook updates WooCommerce when a subscription renews successfully or fails to renew.
1. Click Add in the Add Webhook field.
2. Under Webhook URL, enter your WooCommerce store's base URL followed by:
/?wc-api=WC_Gateway_CCBill&Action=Rebill_PostFor example, if your WooCommerce store is located at http://www.test.com, the Approval URL would be:
http://www.test.com/?wc-api=WC_Gateway_CCBill&Action=Rebill_Post3. Set Webhook Format to URL ENCODED.
4. Check the RenewalSuccess and RenewalFailure event triggers.
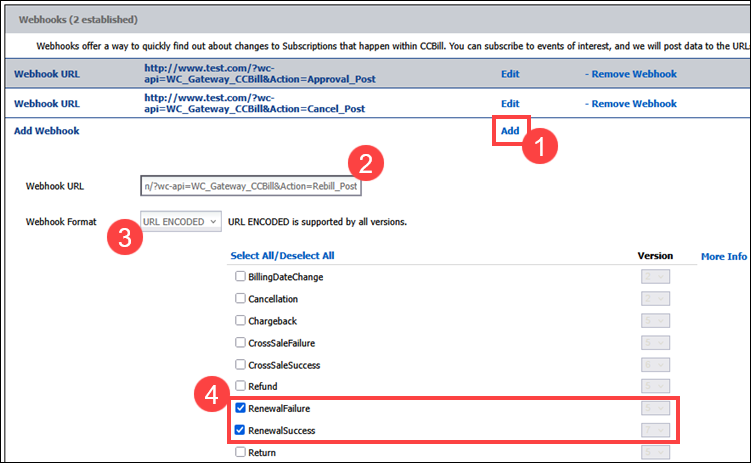
5. Click Update to commit the changes you have made.
Datalink services are required for subscription verification and cancellation when using FlexForms.
To configure Datalink access in the Admin Portal:
1. Open the Account Info menu and select Data Link Services Suite.

2. Click View Users.
3. Click the number in the Number of Users column.

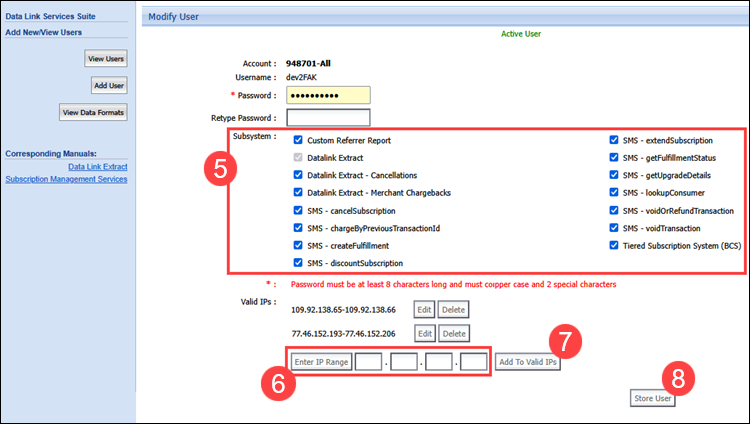
4. From the list, select the user account you plan to use with WooCommerce.
5. In the Subsystem section, select all available services.
6. Add the IP address or IP range from which Datalink requests will be sent:
- If your server runs on a single server, add its public IP address.
- If your site is load-balanced or uses multiple servers, use Enter IP Range to add the full range.
Note: Datalink requests will fail if they originate from an IP address that is not listed as valid.
7. Select Add To Valid IPs.
8. Click Store User to save your changes.
Before creating a FlexForm, you must define the URL CCBill will redirect customers to after a successful checkout.
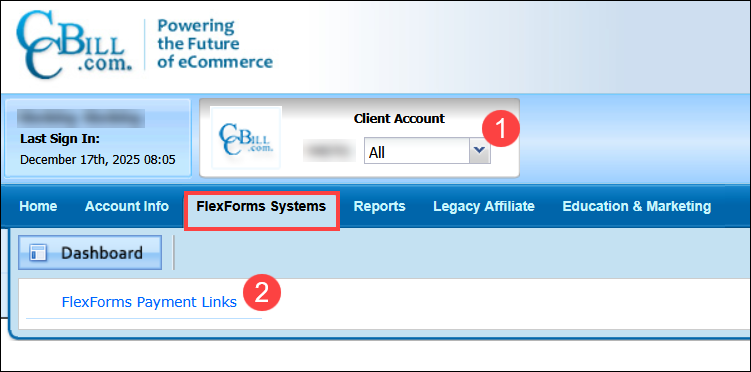
In the Admin Portal:
1. Select All in the Client Account dropdown menu.
Note: FlexForms are not specific to sub accounts, and cannot be managed when a sub account is selected.
2. Select FlexForms Systems and then FlexForms Payment Links.
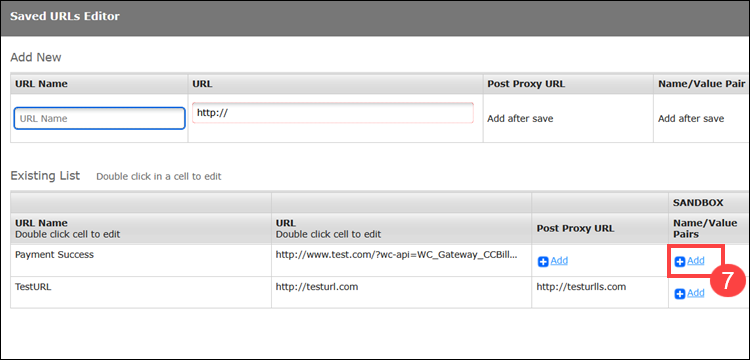
3. Click URLs Library in the upper-right corner. The Saved URLs Editor prompt opens.

4. Under URL Name, enter a meaningful name for this URL (e.g., Payment Success).
5. In the URL field, enter the base URL for your WooCommerce store, followed by:
/?wc-api=WC_Gateway_CCBill&Action=CheckoutSuccessFor example, if your WooCommerce store is located at http://www.test.com, the Approval URL would be:
http://www.test.com/?wc-api=WC_Gateway_CCBill&Action=CheckoutSuccess6. Click Save in the Actions column to commit your changes.

7. Your new URL displays in the Existing List. Click +Add under Name/Value Pairs in the SANDBOX column.
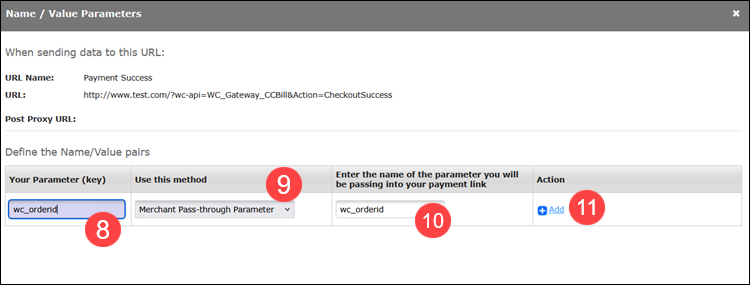
8. Under Your Parameter (key), enter wc_orderid.
9. Under Use this method, select Merchant Pass-through Parameter.
10. In the third column, enter wc_orderid.
11. Under Action, click the Add button to save this parameter.
Close the Name/Value Parameters editor to return to the Saved URLs Editor.
12. Click Promote under the Actions column. When prompted, confirm you want to set the URL to Live.
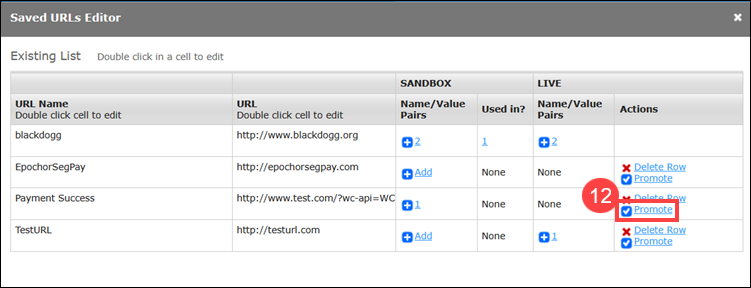
Close the Saved URLs editor to return to the main FlexForms menu.
To create a FlexForm for your WooCommerce store:
1. Click the Add New button in the main FlexForms menu.

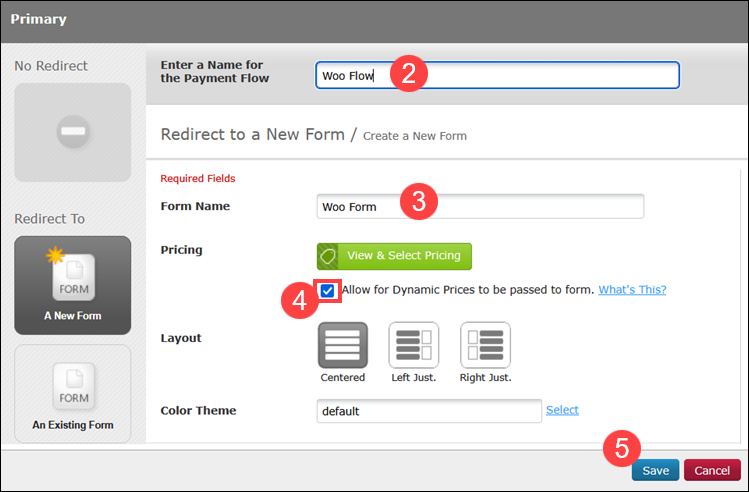
2. Enter a name for the new payment flow.
3. Under Form Name, enter a name for the form.
4. Check the box to enable Dynamic Pricing.
5. Select your desired Layout, Color Theme, and Save the form.
6. Under the green Approve arrow, click the square to modify the action.
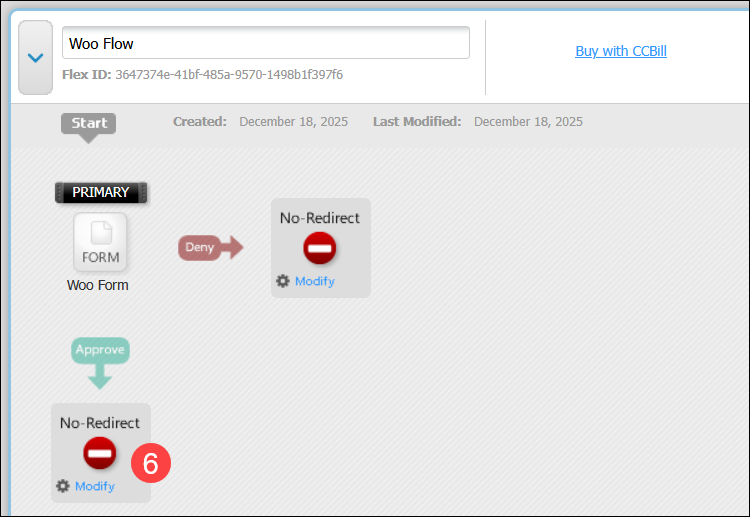
7. Select A URL in the left-hand menu.
8. Click Select a Saved URL and select the URL you created earlier from the dropdown (e.g., Payment Success).
9. Set a 1-second redirect time using the slider at the bottom, then Save the form.

10. Make note of the Flex ID; this value will be entered into the form name when configuring WooCommerce.
11. Click the Promote to Live button.
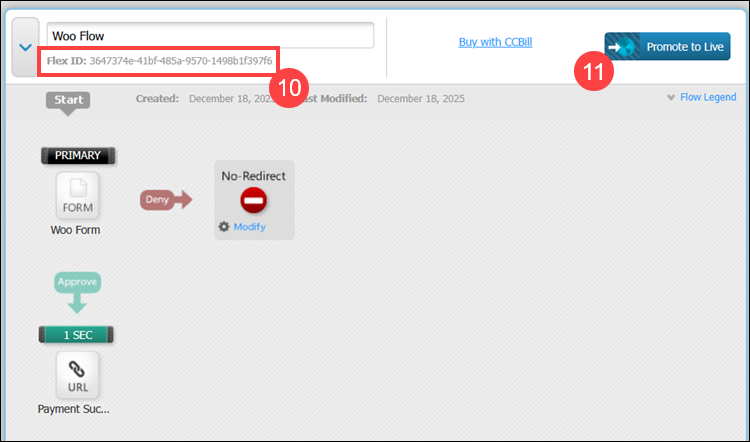
Your new form is now live and ready to accept payments. The only thing left is to configure the settings in your WooCommerce plugin to accept payments from the form.
Configure WooCommerce
In the WordPress Admin Dashboard:
1. Select WooCommerce and then Settings from the left-hand menu.
2. Open the General tab.
3. Under Currency Options, select the default currency you want to display to customers. CCBill currently supports the following currencies:
- US Dollar (USD)
- Euro (EUR)
- Australian Dollar (AUD)
- Canadian Dollar (CAD)
- Great Britain Pounds Sterling (GBP)
- Japanese Yen (JPY)
4. Open the Payments tab.
5. Locate CCBill and click Manage to open the CCBill configuration settings.
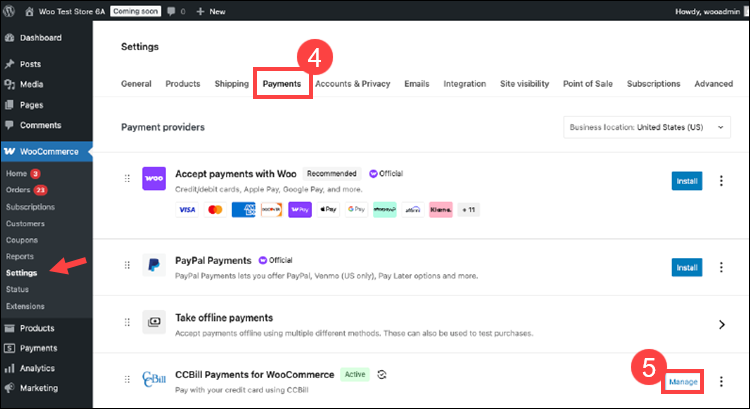
6. The next configuration steps depend on whether you are using the Advanced or FlexForms integration.
Configure the following options for the Advanced (token-based) integration:
| OPTION | DESCRIPTION |
|---|---|
| Enable CCBill | Enable the checkbox to activate CCBill payments. |
| Title | Enter CCBill. |
| Description | Enter a descriptive message for your customers, for example: Pay with your credit card via CCBill. |
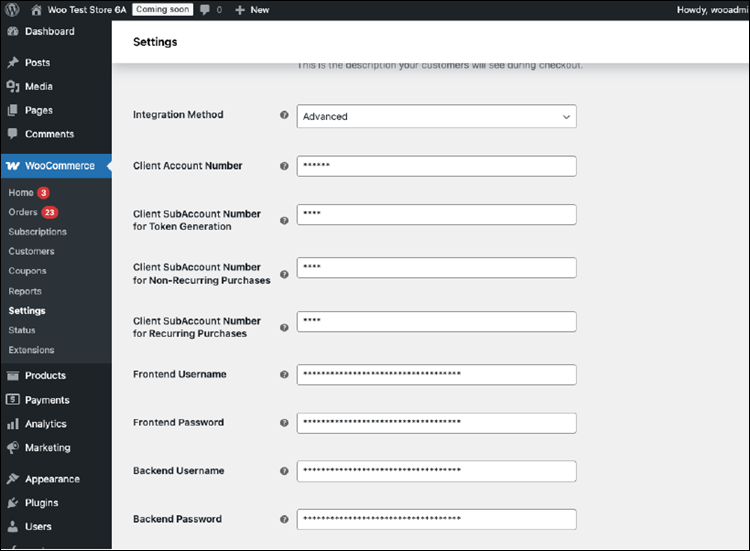
| Integration Method | Select Advanced. |
| Client Account Number | Enter your CCBill merchant account number. |
| Client SubAccount Number (Tokens) | Enter the sub-account number for creating payment tokens. |
| Client SubAccount Number (Non-Recurring) | Enter the sub-account number used for one-time payments. |
| Client SubAccount Number (Recurring) | Enter the sub-account number used for subscriptions. |
| Frontend Username | Username used for token creation. |
| Frontend Password | Password used for token creation. |
| Backend Username | Backend username used for token creation. |
| Backend Password | Backend password used for token creation. |
| Virtual Orders | A virtual order does not include a physical product. If you are selling subscriptions or downloads, enable this option to mark the order as complete after payment. Leave it unchecked if manual fulfillment is required. |
| Debug Log | Used for troubleshooting. Do not enable unless instructed to do so by CCBill support. |
Configure the following options for the FlexForms integration:
| OPTION | DESCRIPTION |
|---|---|
| Enable CCBill | Enable the checkbox to activate CCBill payments. |
| Title | Enter CCBill. |
| Description | Enter a descriptive message for your customers, for example: Pay with your credit card via CCBill. |
| Integration Method | Select Flex Forms. |
| Client Account Number | Enter your CCBill merchant account number. |
| Client SubAccount Number (Non Recurring) | Enter your CCBill sub-account number for one-time payments. |
| Client SubAccount Number (Recurring) | Enter your CCBill client sub-account number for subscriptions. |
| FlexForm ID | Enter the FlexForm ID created during CCBill account configuration. |
| Datalink Username | Datalink user username. |
| Datalink Password | Datalink user password. |
| Salt | Enter your salt/encryption key. |
| Virtual Orders | A virtual order does not include a physical product. If you are selling subscriptions or downloads, enable this option to mark the order as complete after payment. Leave it unchecked if manual fulfillment is required. |
| Debug Log | Used for troubleshooting. Do not enable unless instructed to do so by CCBill support. |

7. Click Save changes at the bottom of the CCBill settings page.
Before processing live transactions, perform a few test transactions using the test data provided by CCBill to confirm that payments, renewals, and cancellations behave as expected.
You are now ready to process payments via CCBill!