CCBill X-Cart Module
Introduction
This section provides installation and configuration instructions for the CCBill X-Cart billing module. This document assumes that the reader has a working knowledge of X-Cart and has already installed the X-Cart software.
The CCBill X-Cart billing module enables easy integration of your CCBill account within the X-Cart e-commerce platform.
The installation involves the following steps:
- Installing the CCBill payment module for X-Cart.
- Configuring your CCBill account for use with X-Cart.
- Configuring the module with your CCBill account information.
Installation
The CCBill X-Cart module is installed by uploading the files in the zip file downloaded from the CCBill website into your X-Cart installation. There are two folders that need to be copied:
- /classes/XLite/Module/CCBill/CCBill_Payment
- /skins/admin/modules/CCBill/CCBill_Payment
Before installation, if you have a previous version of the CCBill payment gateway, remove it from the X-Cart admin, then upload the new code.
Installing the Module
1. After uploading the required files, sign into your X-Cart admin.
2. On the left menu, navigate to System Settings > Cache Management.
3. Click the Re-deploy the store button.
4. Once complete, select Modules in the left menu.
5. Type CCBill in the search field and press Enter. If the files were copied correctly, the CCBill module will appear in your search results.
6. Check the power symbol to enable the module.
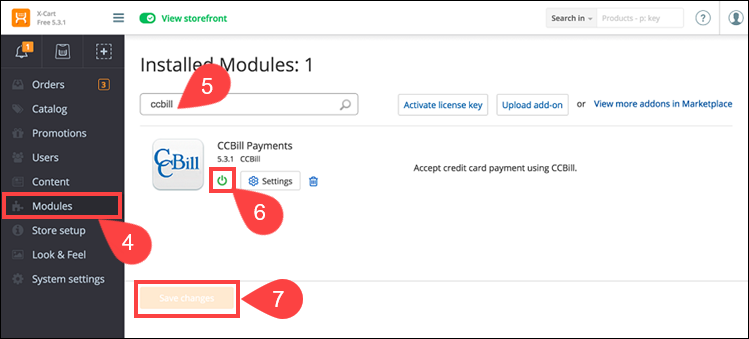
7. Click the Save Changes button at the bottom of the page. The store will automatically re-deploy.
Configuring your CCBill Account
Before using the plugin, it’s necessary to configure a few things in your CCBill account. The following CCBill settings must be correct for the payment module to work correctly.
Enable Dynamic Pricing
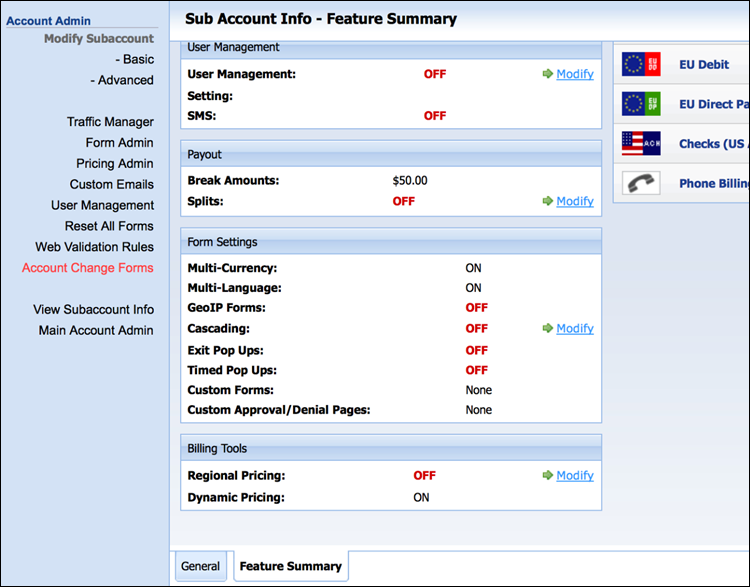
Please work with your CCBill Support representative to activate Dynamic Pricing for your account. You can verify that Dynamic Pricing is active at Account Info > Manage the Sub Accounts > Feature Summary in the Admin Portal. Your Dynamic Pricing status appears at the bottom of the Billing Tools section.
Creating a Salt/Encryption Key
A "salt" is a string of random data used to make your encryption more secure. You must contact CCBill Merchant Support to generate your Salt/Encryption key. Once set, it will be visible under the Advanced section of the Sub Account Admin menu. It will appear in the Encryption Key field of the Upgrade Security Setup Information section.

Disabling User Management
Since this account will be used for Dynamic Pricing transactions (not managing user subscriptions), User Management must be disabled.
1. Sign in to the Admin Portal.
2. On the Account Info mega menu, click Sub Account Admin.
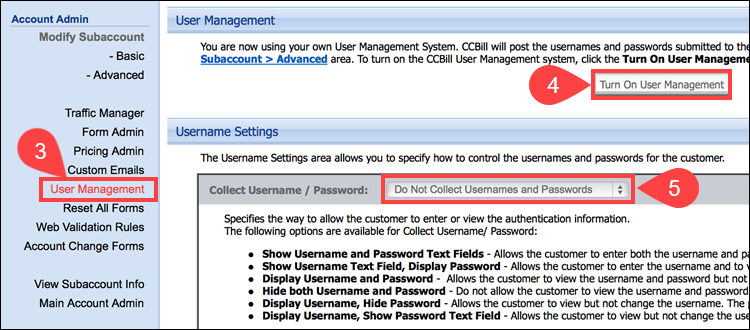
3. Open the User Management menu.
4. Click Turn off User Management in the top section.
5. Select Do Not Collect Usernames and Passwords in the Username Settings section.
Creating a New Payment Form
The payment form is the CCBill form that will be displayed to customers after they choose to check out using CCBill. The payment form accepts customer payment information, processes the payment, and returns the customer to your website where a confirmation message is displayed.
CCBill provides two types of billing forms. FlexForms is our newest (and recommended) system, but standard forms are still supported. Please choose a form type and proceed according to the section forOption 1 or Option 2, according to your selection.
Option 1: Creating a New FlexForms Payment Form
To create a FlexForm form for use with X-Cart:
1. Ensure All is selected in the top Client Account drop-down menu. FlexForms are not specific to sub accounts, and cannot be managed when a sub account is selected.
2. Navigate to the FlexForms Systems tab in the top menu bar and select FlexForms Payment Links. All existing forms will be displayed in a table.
Create an Approval URL
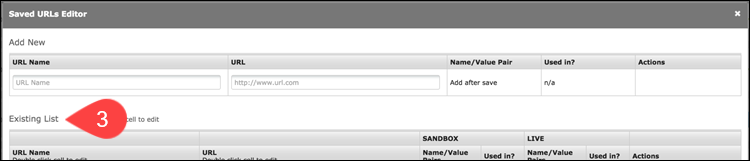
1. Click the URLs Library button in the upper-right to create a new URL. The Saved URLs Editor dialog displays.
2. Use the fields under Add New to create a new URL with the following properties.
- URL Name. Enter a meaningful name for this URL (e.g. Payment Success).
- URL. Under URL, enter the base URL for your X-Cart store, followed by:
/cart.php?target=payment_return&txn_id_name=cart_order_id&action=Approval_PostFor example, if your X-Cart store is located at http://www.test.com, the Approval URL would be:
http://www.test.com/cart.php?target=payment_return&txn_id_name=cart_order_id&action=Approval_Post3. Click Save to commit your changes. Your new URL displays under Existing List.
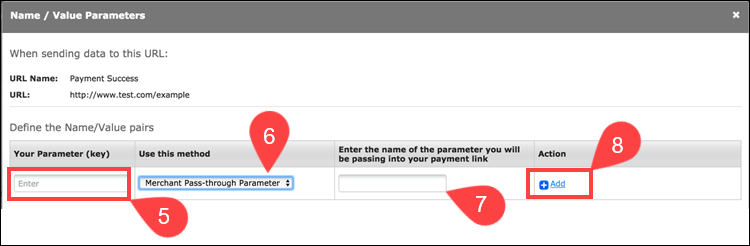
4. Click the plus (+) symbol under Name/Value Pairs in the SANDBOX column.
5. Under Your Parameter (key), enter: merchant_order_id
6. Under Use this method, select: Merchant Pass-through Parameter
7. In the third column, enter: merchant_order_id
8. Under Action, click the Add button to save this parameter. Your saved parameters display under Currently Defined Name/Value Pairs.
9. Close the Name/Value Parameters editor to return to the Saved URLs Editor. Your new URL displays in the Existing List.
10. Click Promote under the Actions column. Your URL is now live.
11. Close the Saved URLs editor to return to the main FlexForms menu.
Create a New FlexForm
1. Click the Add New button in the upper left to create a new form.
2. The New Form dialog is displayed:
- Payment Flow Name. At the top, enter a name for the new payment flow (this will be different than the form name, as a single form can be used in multiple flows).
- Form Name. Under Form Name, enter a name for the form.
- Dynamic Pricing. Under Pricing, check the box to enable dynamic pricing.
- Layout. Select your desired layout, and save the form.
- Edit the Flow. Click the arrow button to the left of your new flow to view the details. Under the green Approve arrow, click the square to modify the action.
- Approval URL. In the left menu, select A URL > Select a Saved URL and select the URL your created earlier (e.g. Payment Success).
- Redirect Time. Select a redirect time of 1 second using the slider at the bottom and save the form.
3. Promote to Live. Click the Promote to Live button to enable your new form to accept payments.
4. Note the Flex ID. Make note of the Flex ID; this value will be entered into the form name when completing the configuration in X-Cart.
Continue to the Background Post for X-Cart section of this document.
Option 2: Creating a New Standard Payment Form
To create a standard billing form for use with X-Cart:
1. Sign into the Admin Portal, and navigate to the Form Admin. All existing forms will be displayed in a table.
2. Click Create New Form in the left menu to create your new form.
3. Select the appropriate option under Billing Type. (In most cases, this will be Credit Card.)
4. Select Standard under Form Type, unless you intend to customize your form.
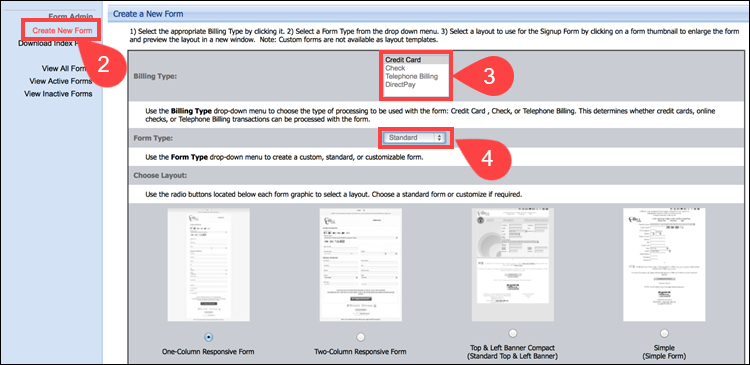
5. Choose a layout and click Submit at the bottom of the page.
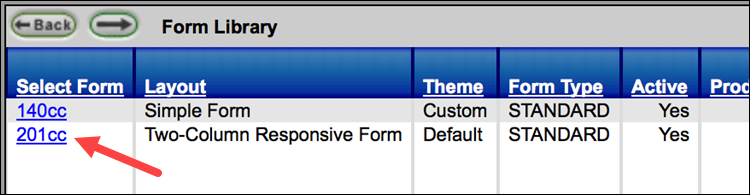
Your new form has been created and is visible in the table under View All Forms. In this example, our new form is named 201cc.
Configuring the New Standard Billing Form
1. Click the title of the newly-created form to edit it.
2. Select Basic from the left menu.
3. Set the following options:
| FIELD NAME | VALUE |
|---|---|
| Site Name | Enter the URL of your X-Cart store. |
| Approval URL | http://www.yourx-cartstore.com/cart.php?target=order&order_number=%%merchant_order_id%%&Action=CheckoutSuccess |
| Denial URL | http://www.yourx-cartstore.com/cart.php?target=order&order_number=%%merchant_order_id%%&Action=CheckoutFailure |
| Redirect Time | Select an approval redirect time of 3 seconds, and a denial redirect time of None. |
Background Post for X-Cart
In your CCBill admin interface select a sub account the purchases will be made on and navigate to Account Info -> Sub Account Admin and select Advanced from the left menu.
Notice the top section titled Background Post Information. We will be modifying the Approval Post URL and Denial Post URL fields.
| Approval Post URL | http://www.yourx-cartstore.com/cart.php?target=payment_return&txn_id_name=cart_order_id&action=Approval_Post |
| Denial Post URL | http://www.yourx-cartstore.com/cart.php?target=payment_return&txn_id_name=cart_order_id&action=Denial_Post |
Your CCBill account is now configured. In your CCBill Admin interface, navigate to Sub Account Admin and ensure the information displayed is correct.
Configuration - X-Cart
General Options
1. Select Store Setup in the left menu and select Payment Methods.
2. Click the button at the top to add a payment method.
3. Locate CCBill Payments in the list and click Add.

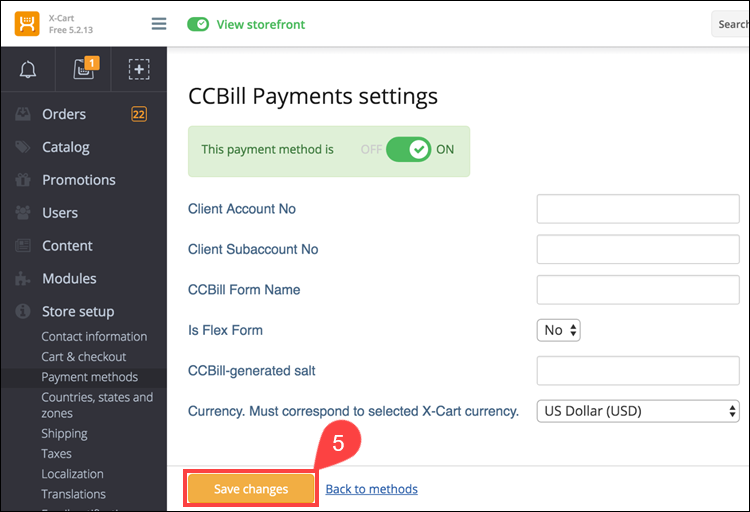
4. Enter your CCBill account information. See individual field details below.
| OPTION | DESCRIPTION |
|---|---|
| Client Account Number | Enter your CCBill client account number. |
| Client SubAccount Number | Enter your CCBill client sub-account number. |
| Form Name | Enter the name of the form created during CCBill account configuration, or FlexForm ID if using FlexForms. |
| Is Flex Form | Select Yes if using FlexForms. |
| Currency | Select the billing currency. Ensure this selection matches the selection made in the Store Setup -> Localization -> Currencies section of the X-Cart administration menu. |
| Salt | Enter your salt/encryption key obtained during CCBill configuration. |
5. Click Save changes at the bottom of the CCBill configuration section.
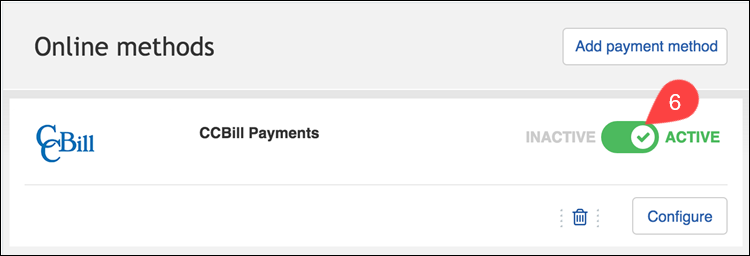
6. The system redirects you to the payment methods list, and CCBill Payments should be marked as active. If not, click the active/inactive switch to mark it as active.
You are now ready to process payments via CCBill! Please conduct a few test transactions (using test data provided by CCBill) to ensure proper operation before enabling live billing mode in your CCBill account.