Admin Portal General Help
The CCBill Admin Portal contains all of the administrative tools for both Merchants and Affiliates. This section of the wiki discusses accessing and navigating the main features of the Admin Portal.
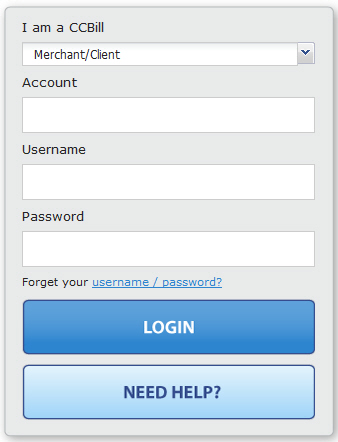
Log In to the Admin Portal
To log in to the Admin Portal:
- Browse to https://admin.ccbill.com/loginMM.cgi
- Choose Merchant or Affiliate from the drop-down menu.
- Enter your Merchant Account Number (or your Affiliate ID) in the Account field.
- Enter your Username.
- Enter your Password.
- Click Login.
Merchant Dashboard Navigation
When you have successfully logged in to the Admin Portal, you'll see this screen:
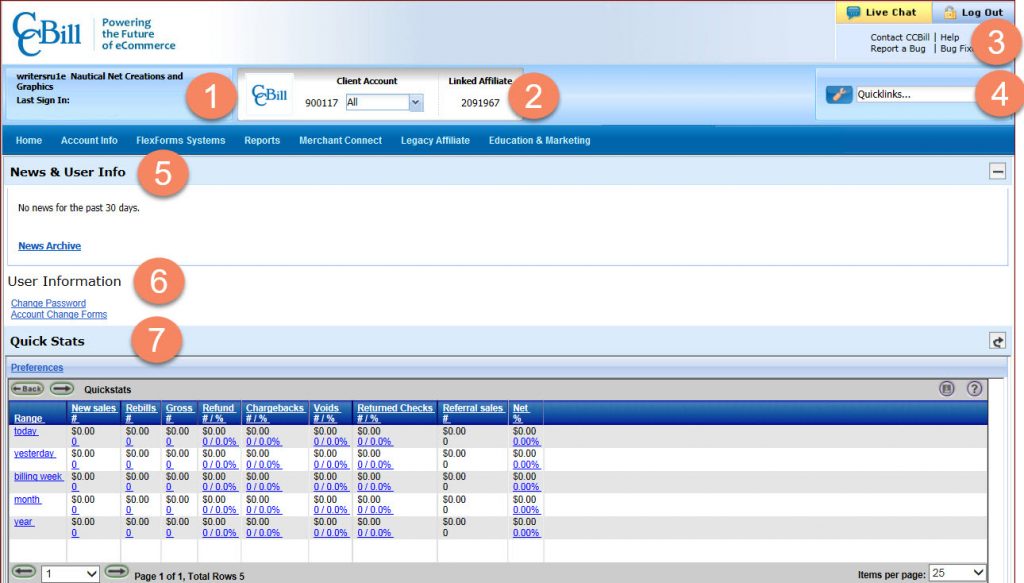
This screen is known as the Merchant Dashboard. Each area numbered in the image above has a different purpose:
- This area displays the User Name that you are logged in under, as well as the date and time of your last successful log in.
- The Search area allows you to navigate between multiple account numbers and/or subaccount numbers. Numbers that you are authorized to use should be listed in the drop-down menu, choose the one that you need to access from the menu.
- This area displays the different avenues used to contact CCBill, whether it be to submit a bug or to start a live chat with Merchant Support.
- The Quicklinks section can get you to your frequently used areas without having to browse the menus.
- The News area of the Merchant Dashboard displays any current news from CCBill. You can view older news items by clicking the News Archive link.
- You can use the User Information dashboard to change your password or to access Account Change Forms.
- The Quick Stats report gives you a quick snapshot of how your account is doing financially.
All of these items are discussed in depth in the following sections:
Contact Menu
The Contact Menu is located at the top-right of any Admin Portal screen, including the login screen.
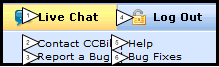
The following is a description of all Contact Menu functions:
- Live Chat. This link opens a secure connection in a new window that allows you to speak with a member of our Merchant Support team. You will be asked to enter your Name and Account Number in the pop-up window to initiate the chat.
- Contact CCBill. This opens a tool-tip with the email address and phone number for Merchant Support if you wish to contact them via one of those methods. Click the X to close the tool-tip.
- Report a Bug. If you have run into a problem in the Admin Portal or with any CCBill service or function or you have a feature you would like to request, or you can use this link to submit that information to us so that our developers can work on it for you.
- Log Out. Clicking the Log Out link will end your session and log you out of the Admin Portal. You will be returned to the Log In screen.
- Help. Clicking the Help link will take you to the Help Files for the Admin Portal. This opens in a separate window.
Note: You may be asked if you want to view only the data sent via a secure connection. This message occurs because while our Admin Portal is on a secured server (https://), our help is not (http://). Please say "No" to this message to be able to view the help content. - Bug Fixes. The Bug Fixes link allows you to view a list of bugs that you have submitted and see any notes from CCBill that may exist and/or the resolution for your reported bug.
Report a Bug
If you wish to report a bug or submit a feature request to the CCBill developers, follow these steps:
- From the Contact Menu, click Report a Bug.
- Choose the appropriate bug type from the Category drop-down menu.
- If the bug is an emergency, click the box next to Urgent.
- In the Notes field enter as much information about the bug/feature request as you can.
For example: If submitting a bug be sure to detail which screen you were on, what you clicked on just before the error occurred, what account number/subaccount number you were using, the exact text of the error message (if possible), what Internet Browser and version you were using, what operating system you use, and any other pertinent details. The more information you provide the easier it will be for our developers to reproduce the issue. - Click Submit Bug to send the bug to our development queue.
Bug Fixes
The Bug Fixes report allows you to view a list of bugs, reported by you, and view their status.
From the Contact Menu, click Bug Fixes. The report is run automatically; no date ranges or other criteria need to be entered.
The report looks like this:

- Use the arrow buttons to move backwards and forwards through the pages in the report. The report defaults to 25 items per page, though you can change that setting by choosing a different number in the Items Per Page drop-down menu at the lower-right side of your screen.
- The Date column shows the date and time that you submitted the bug.
- Note. This is the text that you entered in the bug when you submitted it.
- The Status column tells you if the bug has been reviewed, approved, rejected, completed, etc.
- The Response Date column tells you the date and time the bug was closed or completed.
Live Chat
To speak with a Merchant Support representative via instant messaging at any time, click the Merchant Chat link at the top of each page in the admin and a representative will be with you shortly.
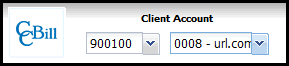
Search Menu
The Account Menu is used to choose between your account/subaccount numbers when in the Admin Portal. To change accounts, use the drop-down menus to first choose the account number (left) and the subaccount number (right). The screen will automatically refresh with the newly selected information.
Install Tools
Test Install is used to test the installation that was performed with the files downloaded from the Build Install area. The test runs some checks and determines a success or error response.
The results of the Manual Add test, showing Successful, Failed, and Codes are displayed on the right of the page.
Refer to the following for a list of the codes and their meanings:
| Code | Meaning |
|---|---|
| 000 | Generic failure accessing password media |
| 001 | Returned on add |
| 010 | Returned on remove or update |
| 011 | Unable to open, create, write directory |
| 100 | Private key incorrect |
| 101 | Catch-all error code for an abnormal problem |
| 110 | Post made from IP out of range |
| 111 | Success |
After the test is complete, you should always remove the user that was added by the test. Click the Remove Username button to manually remove the user.
Quicklinks
The Quicklinks function has been updated to make it easier to use in the Admin Portal. Additionally, there is no longer a limit on how many items you can store in your Quicklinks. The Quicklinks menu is used to add or remove pages to/from the Quicklinks menu and navigate to a page in the Admin Portal that was previously added to Quicklinks.

To add a new page to the Quicklinks menu:
- Navigate to a page in the Admin Portal that you want to add to Quicklinks.
- Click the Quicklinks button (labeled 1 above).
- Click Add page to Quicklinks.
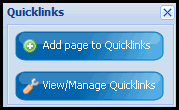
To remove a link from the Quicklinks menu:
1. Navigate to a page in the Admin Portal that you want to add to Quicklinks.
2. Click the Quicklinks button (labeled 1 above).
3. Click View/Manage Quicklinks.
4. Click to select the link you want to remove from the Quicklinks menu.
5. Click Remove.
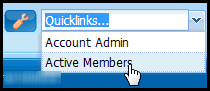
To navigate to a link in your Quicklinks menu:
- In the Quicklinks area, click the drop-down menu that says Quicklinks...
- Click to select the Admin Portal area you want to jump to.
News Archives
From the News area, click the News Archives link to view past news posts.
To List News:
- Select a date range using the Date Lookup pane.
- Select one or more Areas (such as All, Home, Reports, Tools, or Affiliates)
- Select one or more Types:
- All. Review all system news.
- Alert. Review news items that are advisory in nature.
- System. Review news items pertaining to the Admin System.
- Webmaster. Review news items written for merchants.
- Click List News to display the News report and review the selected news information.
User Information
The User Information area allows you to change your password or jump to the Account Change Forms site.
To change your password:
- Under User Information on the right side of the screen, click Change Password.
- Enter your Current Password in the first field.
- Enter the new password you wish to use in both the New Password and Re-Enter New Password fields.
- Click OK.
The Account Change Form link will take you to the Account Change Forms section of the Merchant Support site. A list of all available Account Change Forms is available on this site. If a form is listed on the site but the link does not work you will need to contact merchant support to obtain a copy of that form.
Mega Menus
A Mega Menu is a large and fully detailed menu that displays all associated sub-links without having to cascade down through categories. The menu stays active until you close it or toggle to a different menu. The switch to Mega Menus should help facilitate navigation and decrease frustration with the old-style menus.
Let's go over the components of the Mega Menu and identify the important features.
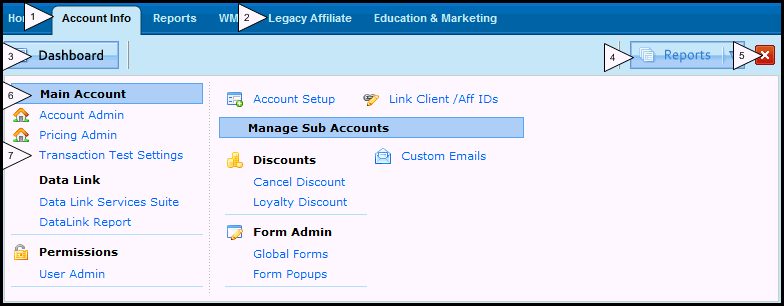
- This is an Active Tab. You'll notice that the menu title is surrounded by a lighter-blue tab similar to the tabs you see in filing cabinets. This shading helps you to identify the tab you are currently browsing. To open another tab you may either close the tab (number 5) or simply click a different Menu Title.
- This is a menu title in an inactive state, or an Inactive Tab. The shading is a darker blue color and there is no border between the inactive menu titles. All menu titles should be in this state if they are not in use. To open an Inactive Tab simply click any Menu Title.
- The Dashboard button can be pressed from ANY Active Tab. This button will take you back to the Dashboard in its neutral state with no menus active and the Quick Stats report displayed.
- The Reports drop-down is only available from some Mega Menus. The state in the image above means that there are no reports available on this tab. If reports are available, the word Reports will be black instead of blue.
- The red box with the white x in the middle is the close button. Clicking this button enables you to close the menu.
- The text indicated at number 6 is bold text with blue highlighting behind it. This indicates a Main Menu Heading. This is essentially a category within the Menu Title that helps to contain links to similar tasks, thus making them easier to locate. These are typically not links, but merely a container for similar links.
- The blue links are links to tasks contained in the Main Menu Headings. These are ultimately where you are trying to go in the Admin Portal.
Almost all of the Mega Menus are similar to what is described above, the exception being the Reports tab. Reports navigation has been enhanced in other ways and is further described in the Report Navigation topic.
Menu Behavior
- To activate a Menu, hover over the Menu Title for approximately 2 seconds.
- Stopping the hover deactivates the menu.
- Clicking the Menu Title will also activate a Menu Title (without the off-hover close ability).
- Click the red X to close the menu.
- Hovering over an object (link, icon, etc.) in a menu will display a brief description of the item at the top of the Mega Menu.
- Mega Menus are often divided into sections to group like tasks/icons together.
- Any given user may have access to all or some of the mentioned links or icons, depending upon their permissions. For example, an Affiliate may see a link to a Merchant function, but not be able to load the function because it is not available to them.
- A New or Updated icon may display next to a link as a way to indicate a newly added feature or service.
Icon Map
This is a list of some of the many icons you will see in the Admin Portal and what they indicate.
| Icon | Identification |
|---|---|
| Identifies a link that has updated or new tasks included | |
| Identifies a link that is new to that Mega Menu | |
| News, Merchant News, Affiliate News | |
| Brands and Services | |
| Data Link | |
| Support, Help | |
| Main Account, Subaccount | |
| Permissions | |
| A Queue or List | |
| Search, Look Up, Find | |
| Tools | |
| Dashboard | |
| Admin | |
| Admin Utilities | |
| Create a New Subaccount | |
| Form Admin | |
| View Affiliate Details | |
| Affiliate Account Profile | |
| Traffic Director | |
| Programs | |
| Invitation Queue | |
| Marketing Materials | |
| Create a Test Sign Up | |
| Activity | |
| Related Reports | |
| Manage SAKS | |
| Link Merchant and Affiliate IDs | |
| Regional Pricing | |
| Event Notification System | |
| Virtual Terminal, Discounts | |
| Link Code Wizard | |
| Up Sales | |
| Cross Sales |
Report Navigation
For your convenience, Mega Menus moves ALL reports onto one tab. Report links exist as well under other Mega Menus, but those are there for convenience. The Reports Mega Menu gives you access to every available report based on your permissions.
Access to every available report is based on your permissions. Reports are now navigable by Topic, Alphabetically, and as Favorites.
Clicking on the Reports menu title will give you a Mega Menu that looks similar to this:
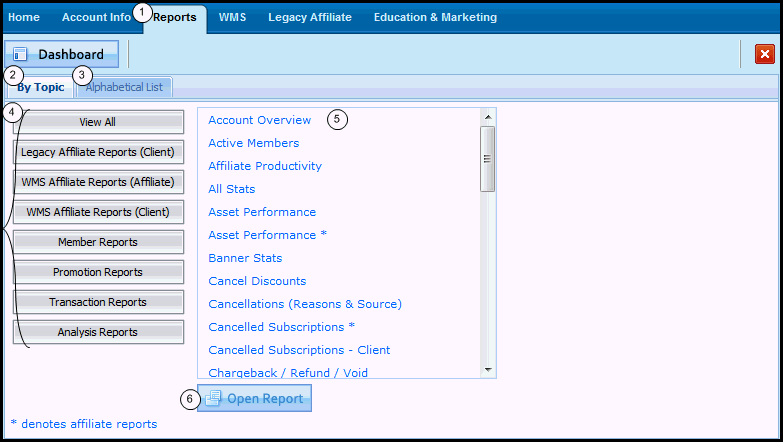
- The Reports Menu Title.
- The By Topic tab displays the Topic Grouping (4), allowing you to choose a topic and view all available reports in that group.
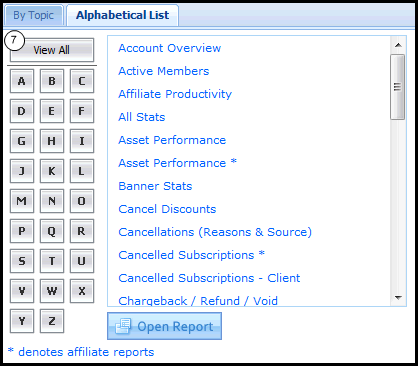
- The Alphabetical List tab displays a mock-keyboard (7, below) that allows you to select a letter and view all reports with a name that begins with that letter.
- The Topic Group contains topic buttons. Selecting one of these buttons will display all associated and available reports for that topic group.
- The Results Pane displays the results of your applied alphabetical or topic filters.
- The Open Report button opens the report selected in the Results Pane.
- The Keyboard displays when the Alphabetical List (3) is active. Selecting a letter on the keyboard will display all reports with a name that begins with that letter.
Browse Reports by Topic
To locate a report by topic:
- Click to select the Reports Menu Title.
- On the Mega Menu click to select the By Topic tab.
- Click the Topic Name that you wish to filter by in the Topic Group list.
- Click to select the report you want to view from the Results Pane.
- Click Open Report.
Browse Reports Alphabetically
To locate a report alphabetically:
- Click to select the Reports Menu Title.
- On the Mega Menu click to select the Alphabetical List tab.
- Click the letter that you wish to filter by in the keyboard list.
- Click to select the report you want to view from the Results Pane.
- Click Open Report.