Configuring CCBill for Ubersmith
The goal of this document is to provide configuration instructions on how to setup CCBill payment processing for use with Ubersmith. This document assumes that the reader has a working knowledge of Ubersmith and has admin access to the CCBill Admin and Ubersmith portal.
Requirements
Please note that you will need the following to set up CCBill for Ubersmith:
- A CCBill Data Link (API) User
- Your Ubersmith's IP range/address
- A CCBill subaccount for use with Ubersmith
- Your Webhook URL which you will find in the Payment Processing section of the Ubersmith portal
If you lack any of these, this document will instruct you on how to proceed.
First, log in to both your CCBill Admin and Ubersmith portal accounts. You will need information from both portals, so just stay login during the configuration process.
Configuring your CCBill Account
Before billing clients with CCBill, it’s necessary to configure a few things in your CCBill account. Please ensure that CCBill settings are correct or the payment gateway will NOT work.
Create a Subaccount for Billing Ubersmith Clients
In order to set up CCBill you need to:
- Log in to the CCBill Admin Portal.
- Click Account Info > Account Setup.
- Follow the on-screen instructions to set up the website. (Find detailed instructions here.)
- Each page of the wizard permits the establishment of specific options when creating a new subaccount. Click Next to proceed to the next step and choose a new subaccount number.
- The New Subaccount #field displays the next available subaccount number. Several successive pages of the #Create Subaccount wizard will follow.
- Click Prev to return to the previous wizard page.
- You don't need to download the index page.
Once you have created a subaccount, you can proceed with the configuration.
Disable User Management
Since this account will be used for Dynamic Pricing transactions (not managing user subscriptions), User Management must be disabled.
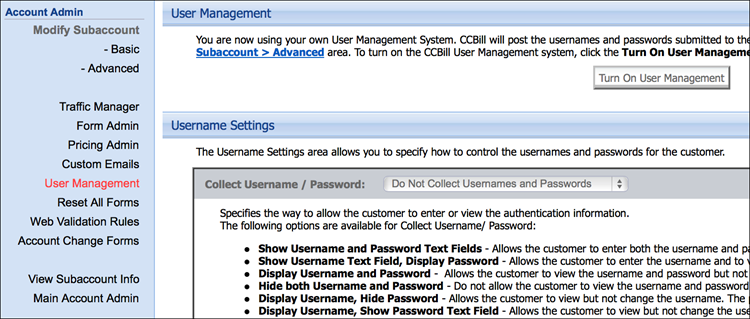
- On the Account Info mega menu, click Sub Account Admin > User Management.
- Select Turn off User Management in the top section.
- Select Do Not Collect Usernames and Passwords in the Username Settings section.
Set Up Webhooks
To set up webhooks, please navigate to your Ubersmith portal account.
- Click Setings.
- Then select the Payment Processing Options link in the Billing & Payment section.
- Select CCBill from the Credit Card Gateway drop-down. This will display all information and options associated to setting up CCBill as your payment gateway.
- The second line in the CCBill options section will read your organization's Webhook URL. Copy the Webhook URL. For further details, see image below.
Disclaimer: The image below is an example. Your Webhook URL will be different.

After you have copied your Webhook URL, navigate back to the CCBill Admin.
- Click Account Info > Sub Account Admin.
- Select the subaccount intended for use with Ubersmith.
- Click Webhooks from the left navigation pane.
- Paste the URL from Ubersmith in the Webhooks URL field.
Set Up Data Link
For this integration to work, you will need to set up a Data Link user. Clients who do not have access to Data Link need to contact CCBill Merchant Support and file a request. Before you start setting up a Data Link user, you also need your Ubersmith server's IP address.
In order to set up Data Link:
- Hover over Account Info.
- Click Datalink Services Suite.
- Select Add User from the navigation pane on the left.
- Account. Make sure you select the Ubersmith subaccount.
- Enter a Username and Password. (Password must be 6 to 8 alphanumeric characters, with at least one number and one letter.) Make sure to note these, as you will need to enter it in Ubersmith.
- Subsystem. You will need to activate the Data Link Extract and SMS chargeByPreviousTransactionId subsystems.
- Valid IPs. Enter your Ubersmith's IP range or a fixed IP address.
- Click Store User.
To learn more about Datalink, follow these links:
If you need help in setting up Datalink, please contact Merchant Support.
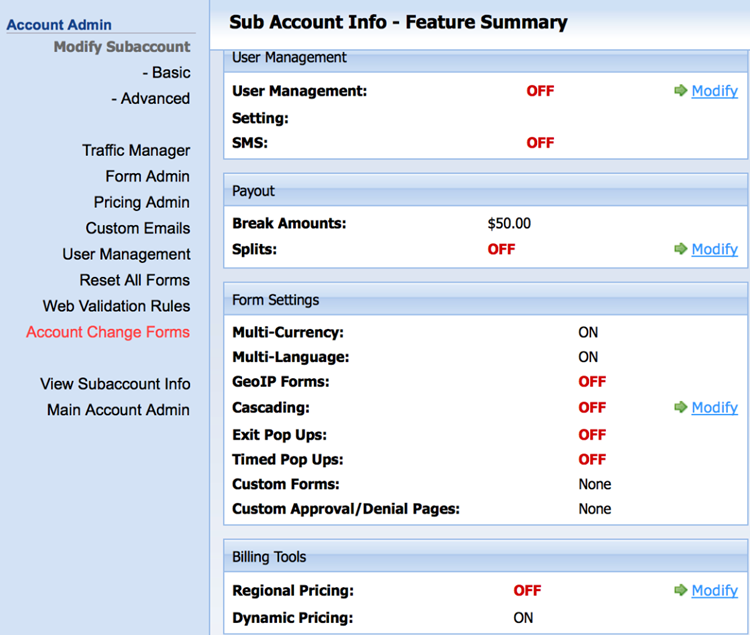
Enable Dynamic Pricing
Please work with your CCBill Support representative to activate Dynamic Pricing for your account. You can verify that Dynamic Pricing is active at Account Info > Manage the Sub Accounts > Feature Summary in the Admin Portal.
Your Dynamic Pricing status appears at the bottom of the Billing Tools section.
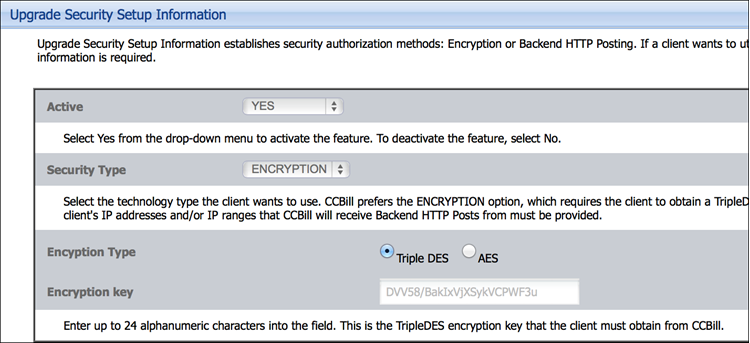
Create a Salt / Encryption Key
A "salt" is a string of random data used to make your encryption more secure. You must contact CCBill Merchant Support to generate your Salt/Encryption key. Once set, it will be visible under the Advanced section of the Sub Account Admin menu. It will appear in the Encryption Key field of the Upgrade Security Setup Information section.
Creating a New Payment Form
The payment form is the CCBill form that will be displayed to your clients if they opt to pay with a credit card. The payment form accepts customer payment information, processes the payment, and sends the client to a designated URL after the payment has been processed.
Below you will find additional instructions on how to create a FlexForm. If you need a more in-depth user guide, please refer to our FlexForms User Guide.
Creating a Payment Flow and FlexForm
To create a FlexForm for use with Ubersmith:
1. Ensure All is selected in the top Client Account drop-down menu. FlexForms are not specific to sub-accounts, and cannot be managed when a sub-account is selected.
2. Navigate to the FlexForms Systems tab in the top menu bar and select FlexForms Payment Links.
3. Click the Add New button in the upper-left to create a new payment flow. You are now essentially editing the first tile of the Payment Flow. In this case, you will be creating a FlexForm payment form for your Ubersmith clients.
4. Enter a Name for your Payment Flow in the top field.
5. There are three (3) Redirect To options:
- New Form. Create a new FlexForm. If you do not have a payment form, choose this option.
- Existing Form. Use a previously made Form.
- URL
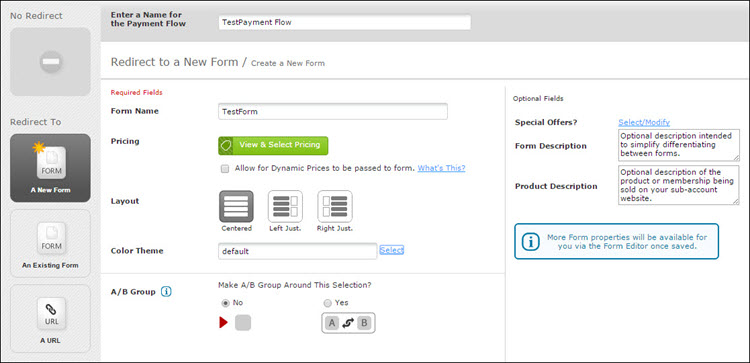
Creating a FlexForm
1. Select New Form, as we will assume that you have not set up a FlexForm yet.
2. Set basic Form settings:
| Setting | Description |
|---|---|
| Enter a Form Name | This will be the name of your Form. |
| Pricing | You needn't assign any Price Points to this form. Prices will be dynamically inserted. |
| Check the Dynamic Prices checkbox | Prices MUST be dynamically inserted for this integration to work. |
| Select a Layout | Centered, Right Justified, or Left Justified. |
| Select a Color Theme | Select a predetermined Color Theme. |
All of these settings and many other can be modified in the FlexForms Editor at every moment. Pop up the Editor by clicking the Forms Library button in the upper-right corner of the screen.
There you can create new forms as well, by clicking the Create New Form button.
Payment Flow Map
After you have created your Primary Tile FlexForm, you will see a graphic representation of the Flow.
Edit your Primary Tile by clicking on it. Beside your Primary Tile are Redirect Tiles, which are automatically made, and their default state is No Redirect. So, if a customer is declined or approved when making a transaction, they will see the default approval or decline message.
Click on a Redirect Tile if you want to modify it.
Approval and Deny Path
The Approval path is the route customers take when their transaction is approved. The Approval Tile is always below the Primary and Deny Tile.
The Deny Path is the route customers take when they are declined on a transaction. They will be redirected to the deny path to try again. The Deny Tile is always to the right of the Primary Tile.
Promote a FlexForm to Live
Promoting a FlexForm to Live will enable your form and payment flow for Live transactions. When making changes to a Live FlexForm, you needn't update the code on your website when you're done. To promote a FlexForm to Live:
1. Open the Forms Library.
2. Select a FlexForm from the scrollable area on the left.
3. Click Promote to Live?
4. Click Yes (Promote to Live) to confirm your choice.
Collect your FlexForm URL and Widget Code
Once you have created your FlexForm and promoted it to the Live environment, you can collect the URL and widget code. To do so, select the Widget Code link in the payment flow of your newly created FlexForm. This will display the necessary information.
Make sure to copy the URL and Widget Code for Live payment processing. See image below for additional information.
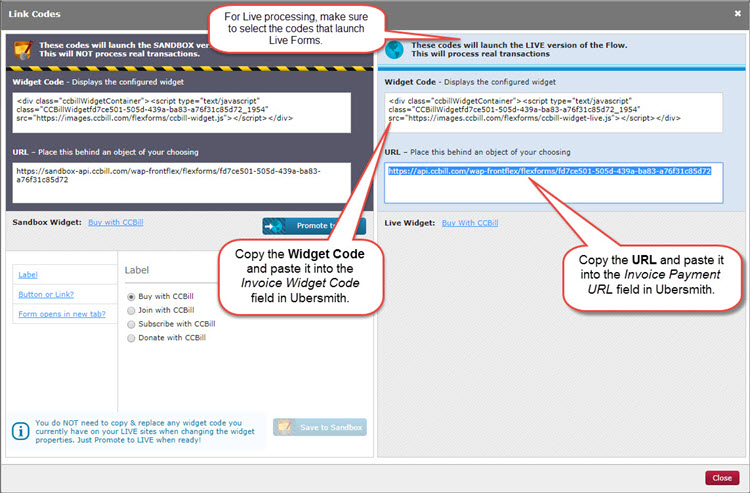
You will need to paste these into corresponding fields in Ubersmith.
Setting Up CCBill as a Payment Gateway for Ubersmith
Your merchant account is a critical aspect of your Ubersmith setup. Without a merchant account configured, you cannot accept credit card payments directly, and you cannot easily set up recurring billing for your clients with CCBill.
To setup Ubersmith to communicate with CCBill payment processing servers:
1. Log in to your Ubersmith portal.
2. Find and select the Settings link. (Setup & Admin in older versions of Ubersmith.)
3. Navigate to the Payment Processing Options link under the Billing & Payment section. (Client Manager in older versions of UBS.)
4. Open the Credit Card Gateway drop-down menu and select CCBill.
5. This will prompt open the fields you need to fill in to be able to process payments with CCBill.
CCBill Options
| Option | Description |
|---|---|
| Client Account Number | Enter your CCBill client account number. |
| Client Subaccount Number | Enter your CCBill client sub-account number. |
| API Username | Enter your CCBill Data Link username. |
| API Password | Enter your CCBill Data Link password. |
| CCBill Salt Key | Enter your salt / encryption key obtained during CCBill configuration. |
| Currency | Select billing currency. CCBill currently supports the following currencies: US Dollar, Euro, Australian Dollar, Canadian Dollar, Great Britain Pounds Sterling and Japanese Yen. |
| Mode | This option allows you to place your communications with CCBill in Sandbox or Live mode. Before you go live with your Ubersmith setup, it's a good idea to try a few transactions in Sandbox mode. When you are satisfied with the results, you can change this option to Live. |
| Payment System | Select whether your clients will initiate the payment form through an URL or Widget. |
| Invoice Payment URL | FlexForms URL that opens the payment form. |
| Invoice Widget Code | FlexForms widget code that opens the payment form. When setting up the Invoice Widget Code, it is required to put in '##parameters##' within the code. (See example below.) |
Please see example below:
<div class="ccbillWidgetContainer"><script type="text/javascript" class="CCBillWidget36efa1df-TEST-cffe6cfc4fe1_4640" src="https://images.ccbill.com/flexforms/ccbill-widget-live.js">##parameters##</script></div>Some users do not store and accept CVV2 data due to PCI and MasterCard or Visa regulations. If that is true for your use case, then select No.CVV2
Some users do not store and accept CVV2 data due to PCI and MasterCard or Visa regulations. If that is true for your use case, then select No.
When you are finished, click Update at the bottom of the page to save your CCBill configuration.
Confirmation
You are now ready to process payments via CCBill!
Please conduct a few test transactions using the Sandbox mode to ensure proper operation before enabling live billing mode.
Support Options and Additional Resources
Ubersmith
- Information Link: https://www.ubersmith.com/
- Ubersmith Documentation: https://docs.ubersmith.com/
- General Inquires: https://www.ubersmith.com/#Contact
CCBill Payment Processing
- Call Support: 800.510.2859
- Hours: 24/7
- email: merchantsupport@ccbill.com
- Live Chat: Click Here!